Claris Connect Uses
This blog post is part of a series on Claris Connect. Prior posts have covered setting up Flows using existing triggers and actions. Explore our insights on the Claris workflow automation software that simplifies integrating your business applications.
Table of Contents: Claris Connect Series
- Claris Connect and Amazon Web Services (AWS) – Getting Started
- Using Claris Connect with AWS Simple Notification Service (SNS)
- How to Implement Custom Responses in a Claris Connect Flow
- Claris Connect and AWS S3
- Trapping and Handling Errors in Claris Connect Flows
- How to Integrate Claris Connect with Amazon SES
- How to Create Custom Connectors in Claris Connect
Introducing Custom Connectors
Claris Connect debuted in 2020 as a cloud services integration tool. In September 2023, Claris made another bold step forward in Connect by introducing custom connectors. The ability for FileMaker developers to create your own connector is an important (although still limited) addition to this product.
How to Build a Claris Connect Custom Connector
To create a custom connector, you will need a Claris Connect account, either free or paid. You’ll also need access to the app to which you’re connecting, and this app must use a REST API. At this point, OAuth is not supported, so the API will need basic authentication using a username/password combo or a bearer token (or, similarly, app IDs and auth tokens).
Custom connectors are built using a JSON schema. Claris provides useful instructions for building your connector in the Knowledge Base and help pages.
The help page shows three JSON schemas: Open AI, Google Maps, and Shopify. In addition, several FileMaker developers have built other connectors, documented their process, and exposed the connectors in articles, videos, and on the FileMaker marketplace. Therefore, others clearly can create connectors, although not all APIs are available due to restrictions on authentication methods.
To build a Custom Connector, one could start with existing samples and replace certain information specific to the API for which your connector applies. Or, one could look at the schema and the examples in the Claris help page and start here.
The custom connector we built, Smarty Streets, is an address verification API. Smarty Street supports various API endpoints, but as a starter Connector, only one such endpoint or action is supported in this example.
Starting the Custom Build Process
We planned to build the JSON schema from scratch. We reviewed each object within the schema to determine what was required and how each object applied to the connector. Sure, we could have taken one of the example schemas, dropped this into a “custom” connector in Claris Connect, and called it a day. However, we wouldn’t have learned anything from this process.
Along the way, we encountered some issues and specific requirements. Creating custom connectors is a relatively new feature in Claris Connect, and some unanswered questions remain. This post walks through the process of creating a connector and explores each of the objects in the JSON schema in detail.
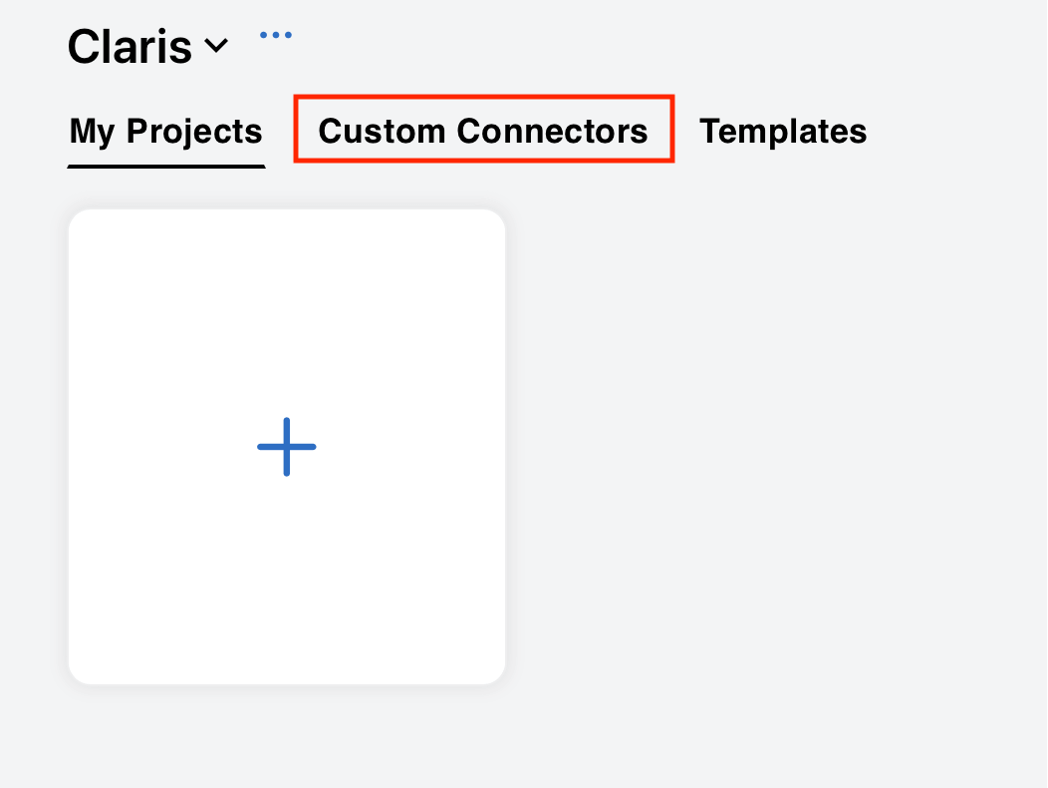
To begin, in Claris Connect, click the Custom Connectors tab.

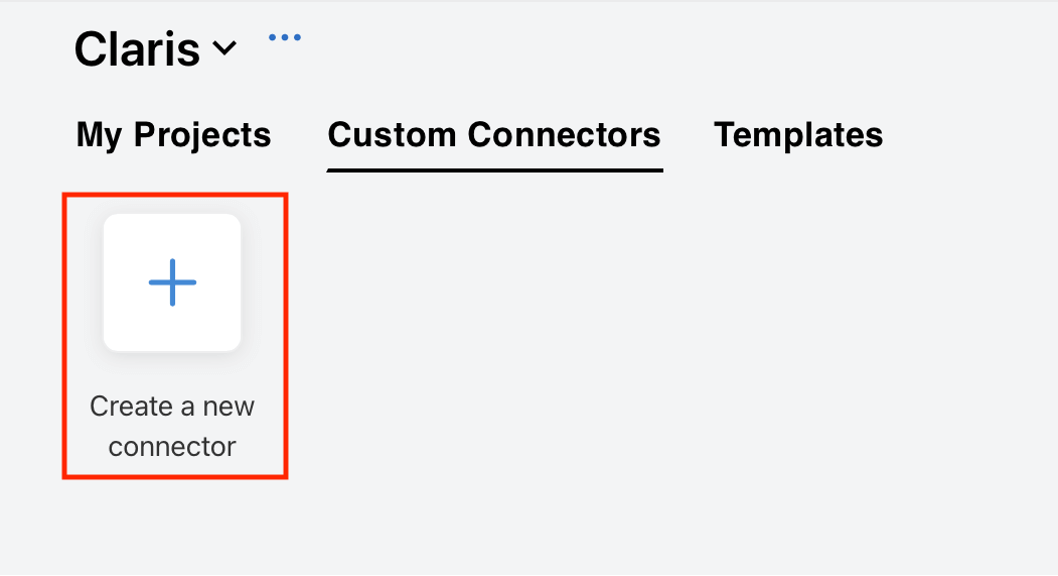
From here, click Create a new connector.

Working with Sample Schema
The new connector comes with a sample schema, plus options to select from one of up to 12 different sample schema in the drop-down (three of which appear in the documentation examples on the help page). Some other intriguing options from this list include WordPress, Mailgun, Clearbit, and Google Translate.
Building Schema from Scratch
To build a schema from scratch, you can write the JSON in an external editor or the Custom Connector editor. We started with the single curly brackets denoting the opening and closing indicators for a JSON object and then added specific objects within these curly brackets.
{
}
JSON specification states that comments should not be used only include data structures like arrays and objects. Next, we added the initial objects for the schema: version, name, and description. The name will be used when saving your Connector. Both the schema and name elements are required. The description element is optional. The name and description appear in the card when you click the icon for the connector in the tab, so having some sort of description for your custom connector is recommended. The schema element specifies the version of your connector.
"schema": "1.0",
 "name": "SmartyStreets",
 "description": "USPS and International Address Validation."
The Building Blocks for Your Custom Connector
All data objects and arrays that follow those three objects become the crucial building blocks of the Connector. Smarty Streets uses an auth-id and auth token, generated when you create your account. The auth-id and token are sent as part of the URL. These values are not pasted into the JSON schema but instead are entered as part of testing your schema and when setting up the Flow.
There are six additional data objects in the schema:
- requiredSettings
- auth_components
- auth_request
- endpoints
- actions
- testConnection
Authentication Components
While the documentation writes that “auth_components” is the “property necessary for authenticating to third-party APIs,” none of the examples elaborate on this, instead showing the type simply as “none.” Perhaps this is a placeholder for other types of authentication that Claris will add in the future.
  "auth_components": {
    "type": "none"
  }
Required Settings
The “requiredSettings” object contains an “authFields” array, an array of fields required for authentication. The user enters these values when connecting to the API, such as an API key, auth-id and auth-token, or domain and access token. Per the documentation, the “authFields” array is required. In the case of Smarty Streets, there were two required fields: auth-id and auth-token. (The errorText element isn’t required. We hardcoded this per one of the examples in the Claris documentation. However, you might be able to return API-specific errors using JSON in the response like “errors[0].message” here instead.
  "requiredSettings": {
    "authFields": [
      {
        "label": "Authentication ID",
        "description": "Please enter your auth id",
        "key": "auth-id",
        "masked": true,
        "errorText": "Missing parameter. Try reconnecting"
      },
      {
        "label": "Authentication Token",
        "description": "Please enter your auth token",
        "key": "auth-token",
        "masked": true,
        "errorText": "Missing parameter. Try reconnecting"
      }
    ]
  }
Authentication Request
Authentication is handled in the “auth_request” object. Since Smarty Streets embeds the authentication as part of the URL, we needed to use “custom_query” as the type. The other options are basic_auth (username and password), bearer (bearer token), custom, custom_header, custom_body (as part of the body), and none.
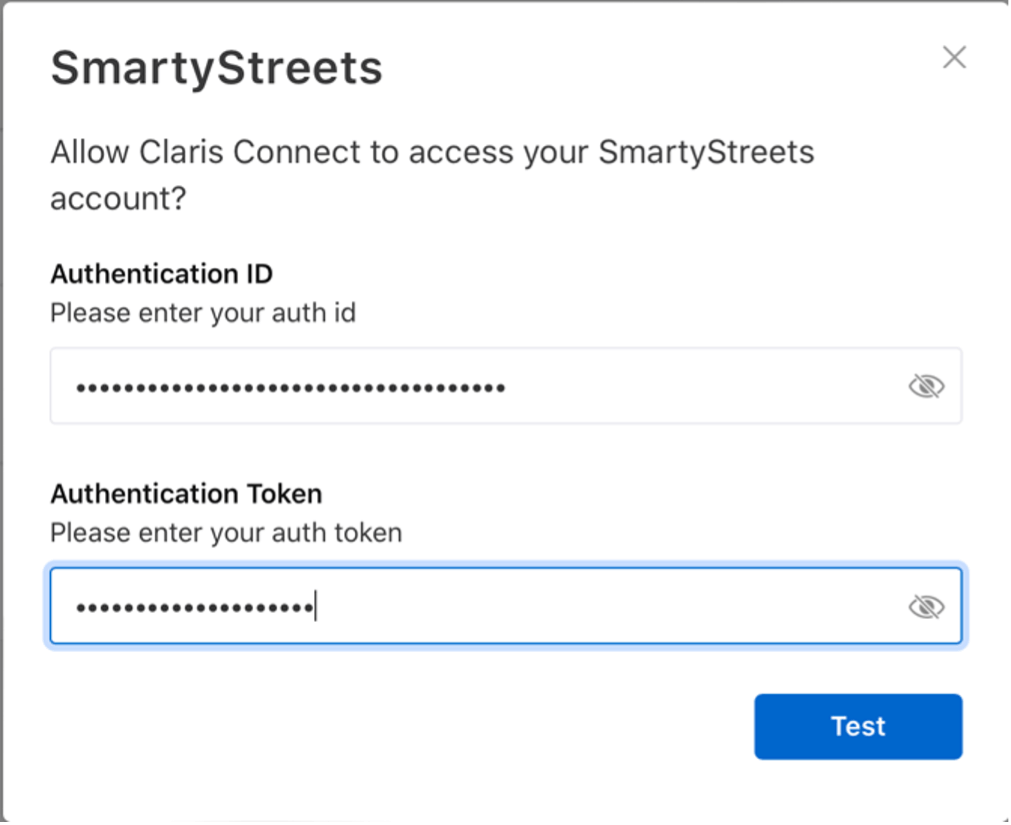
As a side note, we did test authentication using “none” as an option since the auth-id and auth-token are included in the URL. However, this didn’t behave as expected; instead, it prompted us to enter the values in the form (see screenshot with the login prompt below).
When building your custom connector, pay close attention to the type of authentication required. This determines the additional objects; in this case, the query_parameters.) In the query parameters, you can point back to the authFields using handlebar syntax — the double curly brackets.
"auth_request": {
 "type": "custom_query",
 "query_parameters": {
      "auth-id": "{{authFields.auth-id}}",
      "auth-token": "{{authFields.auth-token}}"
   }
}
Connect will prompt you to log in when testing the connector using the two parameters you defined. The label, description, and other options are defined in the requiredSettings data object.

Endpoints
An API endpoint is a digital location where an API receives requests about a specific resource. This is a URI with the API’s domain and specific resource query – such as “street-address” – to request information about a street address. Each API will have certain endpoints that are exposed via URIs. These endpoints receive specific requests and return specific information.
Within each method in the data object in your custom connector (GET, POST, etc.), you can stack multiple data objects with the endpoint and URI. For each separate method, you need a separate method object. In our initial connector, we only tested one GET endpoint. With GET, all aspects of the request are contained in the URI, which is built from the components in your actions (see below). Think of this as the URL that goes into the FileMaker script step “Insert from URL” where the street, city, and state are appended as parameters (and, in the case of Smart Streets, if you used Insert from URL instead of a connector, the auth-id and auth-token as well).
Although not covered in this example Connector, to validate multiple addresses in a single request to Smarty Streets, you would change the method to POST. The address data then would be encoded as a JSON array (See Smarty Streets’ documentation.) A POST request allows for more data, while a GET request embeds the request in the URI. This JSON array would instead be sent in the body of the cURL request.
"endpoints": {
  "GET": {
    "/street-address": {
      "url": "https://us-street.api.smartystreets.com/"
    }
  }
}
Troubleshooting Errors
Important: The help page shows an endpoint of “https://api.platform.claris.com,” so initially, we added the Smarty Streets endpoint of https://us-street.api.smartystreets.com. However, when we tested our connection, it returned an error:
We reviewed each data object in the schema, trying to identify what caused this error. We’d like to thank Bryan Wats, who responded to our query in the Claris Community forum regarding an authentication question around the auth-request type. He provided a working schema that showed that a trailing slash is required in the endpoint.
Looking at the examples in the documentation from Claris, we saw that all the example custom connectors show the trailing slash, while the help page leaves it out. The placement of the trailing slash requirement is strange, given that within the method data object, the specific endpoints (i.e./street-address) are prefixed with a slash. Here is where the custom connector error messages could use some improvement, or at least there should be consistency between the documentation and examples.
Actions
This data object is an array that specifies the actions and any associated properties that need to be included in the connector. Of the nine properties within this data object, the majority — six — are required, making this one of the most important and detailed components of any custom connector. The required properties are:
- modelId
- actionId
- method
- endpoint
- helpText
- actionFields
We’re not quite sure of the purpose of the model ID or action ID of the action. There didn’t seem to be a specific requirement as to how we named these two properties. The helpText property contains the text displayed under the Action tab in the connector; there’s also a label property, which is not required, that appears in the same section.
Endpoint and Method Properties
More important are the endpoint and method properties. Each action will have one method and one endpoint. For our action to validate an address, we used the GET method and the “/street-address” endpoint, as defined by the Smarty Streets API.
The queryParameters contain the parameters that go into the URL, such as street, city, and state. Each uses the double curly brackets pointing to the urlFields property within this data element. The urlFields are the form fields where the street, city, and state (in this connector) are filled out and sent to the endpoint to validate the address. Each object within the urlFields array contains properties for key, label, description, type, and where required or optional. Although actionFields is required in Connect schema, for our Smarty Streets connector we relied instead on urlFields and set actionFields to an empty array. Are the two objects interchangeable? That’s not clear from the schema definition, as both urlFields and action fields are described as “An object that specifies the fields to be included in the action.”
Assembling the Pieces
With all these pieces in place, below is the complete array that we built for the Smarty Streets connector.
"actions": [
    {
      "modelId": "address",
      "actionId": "lookup_street",
      "method": "GET",
      "endpoint": "/street-address",
      "label": "Validate an address",
      "helpText": "Validates an address from input with city,state,zip",
      "queryParameters": "street={{urlFields.street}}&city={{urlFields.city}}&state={{urlFields.state}}",
      "actionFields": [],
      "urlFields": [
        {
          "key": "street",
          "label": "Street",
          "description": "Enter the street value of the location",
          "required": true,
          "type": "string"
        },
          {
          "key": "city",
          "label": "City",
          "description": "Enter the city value of the location",
          "required": true,
          "type": "string"
        },
          {
          "key": "state",
          "label": "State",
          "description": "Enter the state value of the location",
          "required": true,
          "type": "string"
        }
      ]
    }
  ]
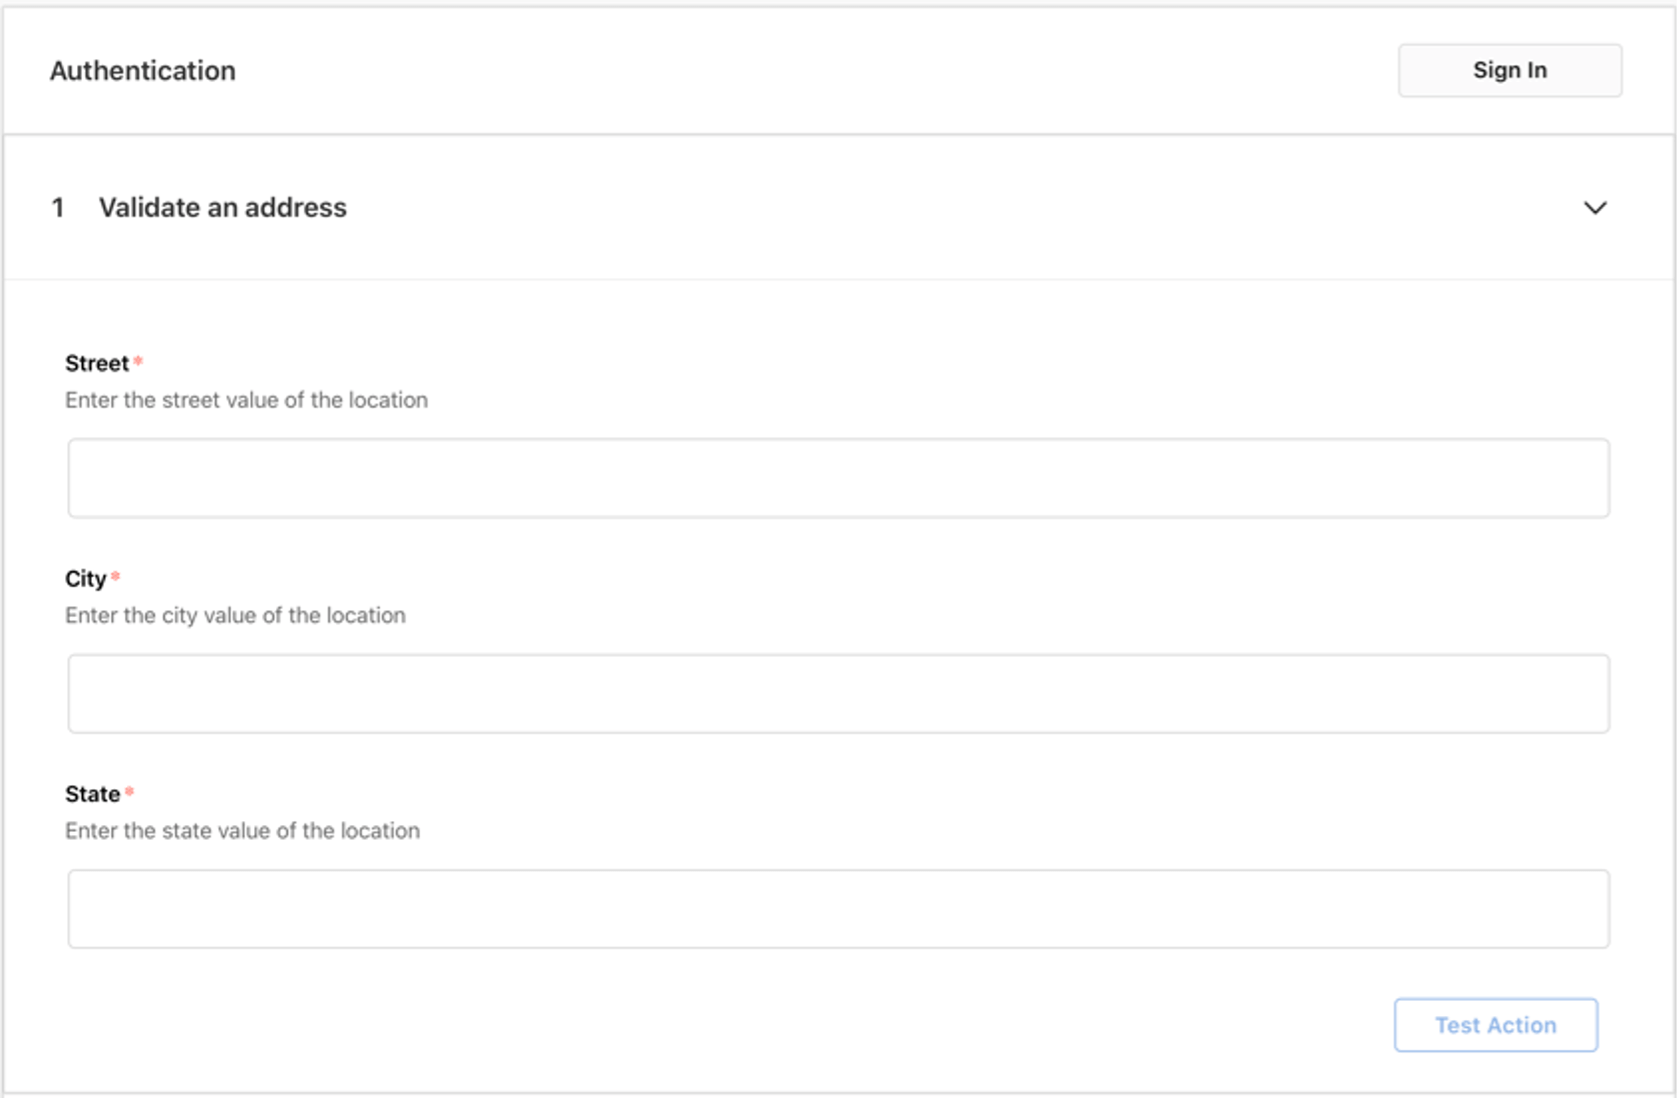
The dialog in Connect then looks like this prior to publishing the connector. You can use these fields to test or add information in the test connection (see below) data object. When the connector is published, these fields will become available for step data so you can tie them to another action with live data from your application. In our case we made all fields required.

Test Connection
The test connection covers the properties used to verify the connection between Claris Connect and the API and ensure the authentication is valid. Only the “endpoint” is required, although there are three other properties—queryParameters, method, and body.
For our test connection endpoint, we used “/street-address.” We also sent a queryParameters value of a known street address. We knew the connector was ready when we tested the connection, and it returned a JSON object with the address information.
"testConnection": {
    "endpoint": "/street-address",
    "queryParameters": "street=1234%Fake%20Ave&city=MyCity&state=wi"
}
Per the documentation, “[t]he call specified in testConnection inherits auth_request settings and is made when authenticating to the API.” It’s also important to note that you cannot publish your connector unless you get a successful HTTP response.
When testing the connection, it appears the GET method is implied. If you add a method of POST, for example, in the SmartyStreets action to get the address, this returns an error. A successful test should return an array with address verification data like this (we have masked some of the data):
[
  {
    "input_index": 0,
    "candidate_index": 0,
    "delivery_line_1": "STREET MASKED IN EXAMPLE",
    "last_line": "CITY STATE 53704-5719",
    "delivery_point_barcode": "537045719180",
    "components": {
      "primary_number": "NUMBER",
      "street_name": "STREET",
      "street_suffix": "Ave",
      "city_name": "CITY",
      "default_city_name": "CITY",
      "state_abbreviation": "WI",
      "zipcode": "53704",
      "plus4_code": "5719",
      "delivery_point": "18",
      "delivery_point_check_digit": "0"
    },
    "metadata": {
      "record_type": "S",
      "zip_type": "Standard",
      "county_fips": "55025",
      "county_name": "Dane",
      "carrier_route": "C008",
      "congressional_district": "02",
      "rdi": "Residential",
      "elot_sequence": "0101",
      "elot_sort": "D",
      "latitude": 43.09316,
      "longitude": -89.34282,
      "precision": "Zip9",
      "time_zone": "Central",
      "utc_offset": -6,
      "dst": true
    },
    "analysis": {
      "dpv_match_code": "Y",
      "dpv_footnotes": "AABB",
      "dpv_cmra": "N",
      "dpv_vacant": "N",
      "dpv_no_stat": "N",
      "active": "Y"
    }
  }
]
Creating the Connector
Once the test has passed, click on the Create Connector button. Your new connector then shows up in the Custom Connectors tab. To add it to a flow, you’d use it like any built-in connector as part of an action.
Limitations
At this point, OAuth is not supported, limiting some of the APIs you can connect to. Only actions are supported, not triggers. You’ll start your Flow by selecting from one of the existing standard triggers and then add actions from your custom connector.
Additionally, you can’t create a custom icon, and you can’t update a connector. Once created, you need to delete it and create a new one with any changes. This makes it difficult to version control existing Flows that use the specified custom connector within Claris Connect. When creating JSON schema files for Claris Connect, it might be useful to set up version control using Git instead.
Moving Forward with Custom Connectors in Claris Connect
As stated, our goal was to build a custom connector from as close to scratch as possible, relying mainly on the schema definition provided by Claris. Even though we carefully followed the schema in the documentation, we encountered an issue when testing the connection. At first, we thought the error was related to the authentication method, only to later learn about the trailing slash in the endpoint.
Although frustrating, the time spent going over each of the data objects, in the end, made us understand these better as we learned about required vs. optional properties, checked the order of the data properties in the schema, and ran through various tests.
The world of custom connectors is exciting, albeit young, with few limitations. As Claris builds out this capability, we expect to see more opportunities for existing and new connectors. If you need help launching this functionality for your FileMaker application, our team can help. Contact us to talk with a consultant today.