Table of Contents: Claris Connect Series
- Claris Connect and Amazon Web Services (AWS) – Getting Started
- Using Claris Connect with AWS Simple Notification Service (SNS)
- How to Implement Custom Responses in a Claris Connect Flow
- Claris Connect and AWS S3
- Trapping and Handling Errors in Claris Connect Flows
- How to Integrate Claris Connect with Amazon SES
- How to Create Custom Connectors in Claris Connect
What is Amazon SES?
Within Amazon Web Services’ (AWS) diverse cloud services, AWS Simple Email Service (SES) provides inexpensive and scalable email communication for your email addresses and domains. You can use it as a basic email service for or as the backbone of your application’s user communication tools.
How does AWS SES Compare with Other AWS Services?
In contrast with AWS Simple Notification Service (SNS), SES only focuses on email communication. SNS can deliver notification communications through multiple communication channels (email, text messaging, mobile notifications, to name a few).
SES can also be utilized for application communication for sending and receiving email messages. Some common use cases for SES include end-user reporting sent via email, mass email mailing list communication, and triggering email notifications when unexpected errors occur in each application. SES also provides built-in email administrative tools such as spam and virus protection, a reputation dashboard, and integrated sending statistics. As more email service providers move away from SMTP, SES can provide a low-cost alternative for legacy applications that lack support for OAuth and other modern authentication services. All of this, paired with a robust API, makes SES can be an inexpensive and indispensable resource for email communication in your applications.
AWS SES Pricing
Pricing for SES is mostly free to start. New customers can send emails for free through SES’s flexible free tier. This enables new senders to try the SES features you need. With SES, you can receive up to 3,000 message charges for free for the first 12 months. The free tier can be used to try the following emailing services: Outbound emails, Inbound emails, and Virtual Deliverability Manager for outbound email processing.
Claris Connect Amazon SES Connector: A Guide
To add to the list of other supported AWS Claris Connect connectors, the “AWS SES” connector provides exclusive access to the “Send Email” action. Messages can be formatted as HTML and can include attachments. This is a major use case for SES integration with Claris Connect. However, the SES API is vast and could be extended with a custom connector. With features such as RAW MIME formatted email messages and advanced security, a custom connector can take your Claris Connect SES integration further.
Setting Up Claris Connect with AWS Access
If you have not yet set up your Claris Connect or AWS access, see our previous blog post, “Claris Connect and Amazon Web Services (AWS) – Getting Started.”
Verifying Your Domain
Before you can send emails using SES, you need to verify either a domain or a single email address. Verifying an email is easy. AWS will send an email to the address. If you click the link in the email, then you can start sending emails.
The main downsides with verifying an email are you need to receive an email for any address you want to send, and you cannot set up DKIM for individual emails. Because of the lack of DKIM support, it’s better to verify a domain.
The process to verify a domain is simple: once you add the domain, you will be directed to create three CNAME records that both verify control of the domain and set up DKIM.
Once the domain is verified, the next task would be updating your spf record. spf is a simple txt DNS record that lists what hosts are allowed to send emails for your domain. spf has a handy feature that lets you add records from another domain. To add SES to your spf record, you just need to add include:amazonses.com.
For example, if your spf record looks like “v=spf1 include:spf.protection.outlook.com -all” you would change it to “v=spf1 include:spf.protection.outlook.com include:amazonses.com -all”.
Setting Up Feedback Notifications
The next step is to set up feedback notifications so you will know when there are issues with the email you send. First, create a SNS topic. To start, you might want to have this send an email to someone who will handle bounces and spam complaints. The ideal situation, however, has it going to a system that automatically processes the bounces. (This is outside the scope of this blog post.)
For now, create a standard (not FIFO) queue and give it a name like “bounced emails.” With the topic created, you can now create a subscription and select email as the protocol, enter an email address, and click create a subscription. This will send an email to verify acceptance of the subscription. Now that you have the topic and a subscription, go back to SES → verified domains → select the domain → click notifications → and click edit. Set all three feedback types to notify the topic you just created.
Sending Emails to Unverified Addresses
At this point, you can send emails to verified identities from a verified identity. To send emails to addresses you have not verified, you will need to request production access. Requesting production access will increase your sending rate and daily sending quota and allow you to send emails to addresses you have not verified.
On the SES account dashboard, click on the request production access banner. There, you can create a ticket providing information about how you plan on sending an email. Fill out the form completely. You should get a response within 24 hours, either switching you to production or asking for more information.
How to Set Up IAM Security Access with Access Key ID and Secret Key for SES
Once you have verified our domain or email address, you will set up API access to SES so a service like Claris Connect can authenticate and perform actions. Log into the AWS console and search for IAM or “Identity Access Management.” IAM provides a centralized location for authentication and authorization within your AWS environment.
Creating a User
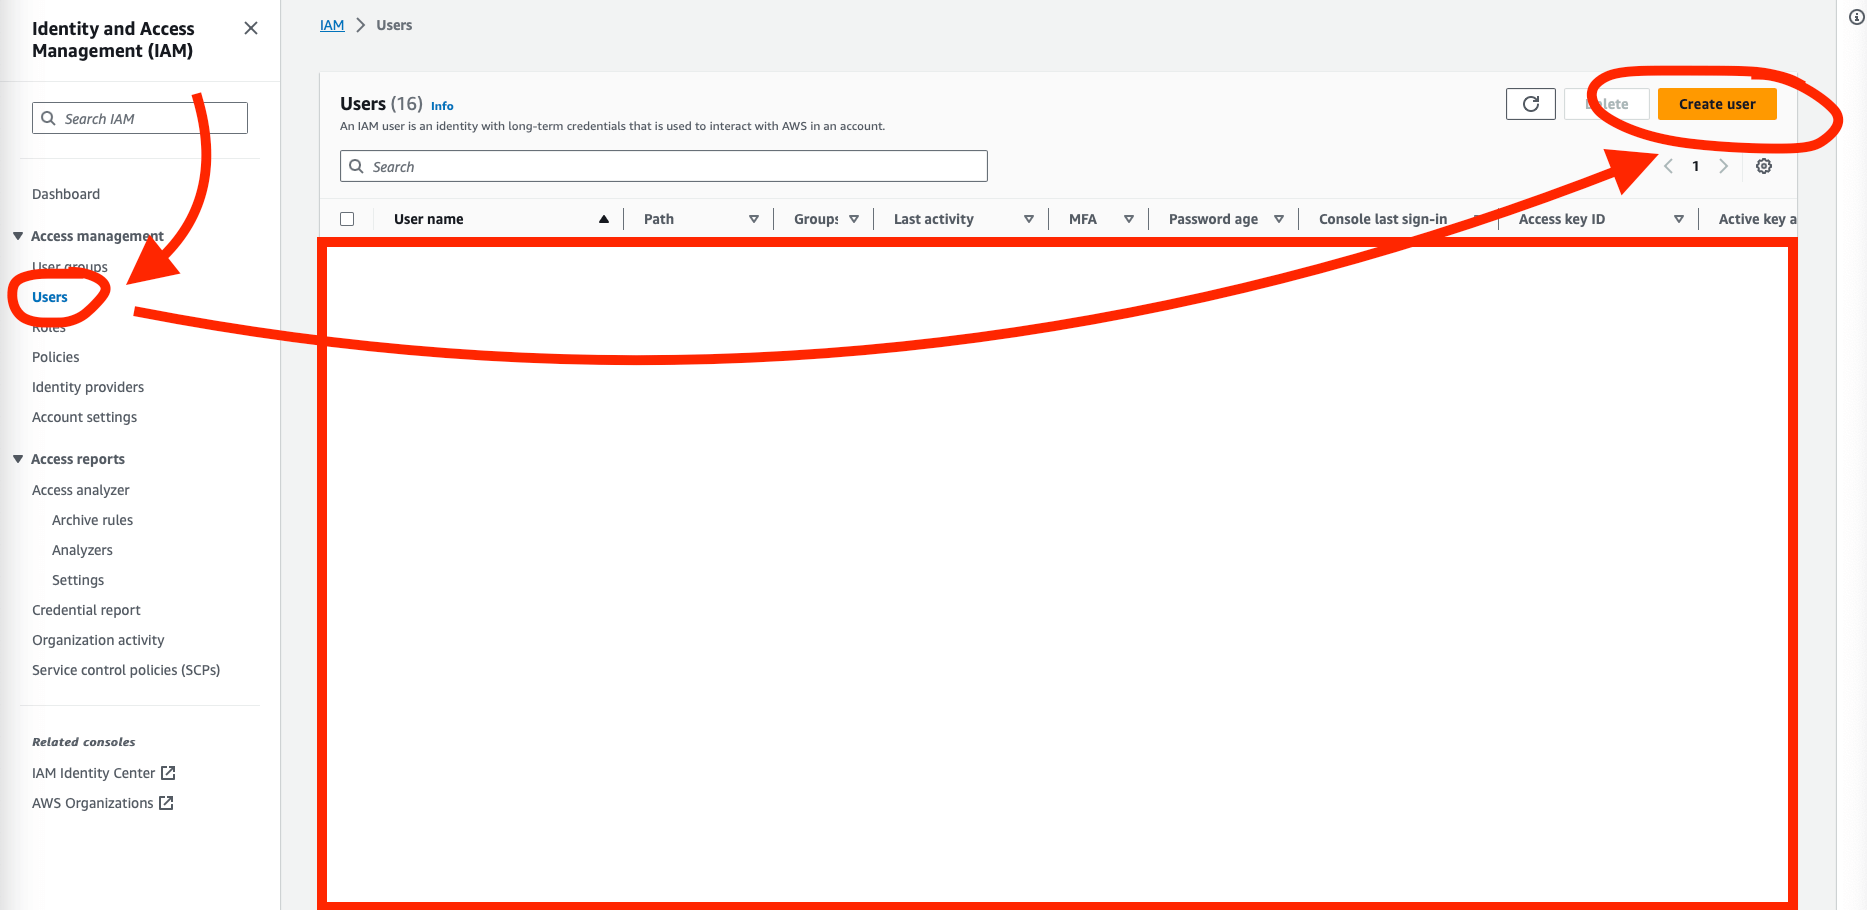
In the AWS admin console, search for “IAM” and click the first result. From here, click on “Users” and click the orange “Create User” button in the upper right:
Setting User Permissions
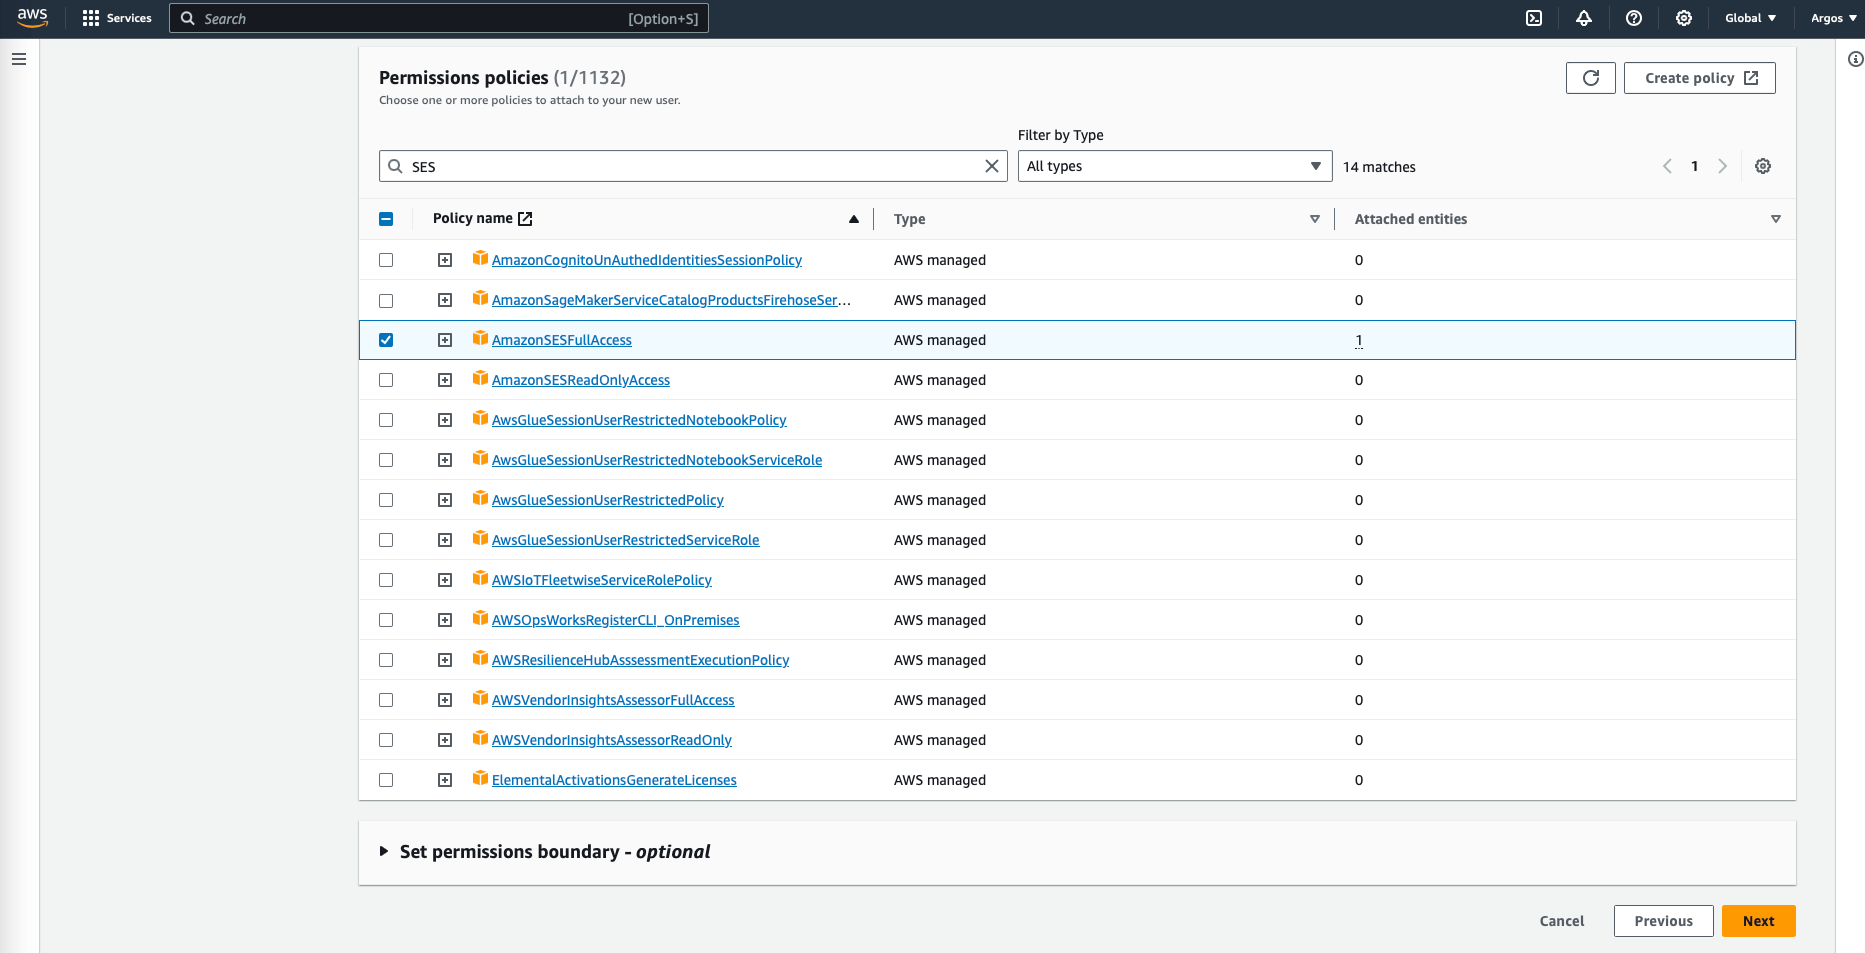
In our example, we will create a user called “app-access-SES,” but you can use more specific usernames for your access, environment, and application. When setting permissions for the new user, click “Attach policies directly,” search for “AmazonSESFullAccess,” and select this policy. Claris Connect requires Full Access to SES to configure and send data through the SES API.
Creating User Groups
Another approach to assigning permissions is to create a group that has the specified policy assigned to it and add the users to that group. This allows you to easily add and remove access to the API service without completely deleting a user account. This will work well if you have multiple application environments on various development platforms that all want to use the SES API.
Creating an Access Key for Users
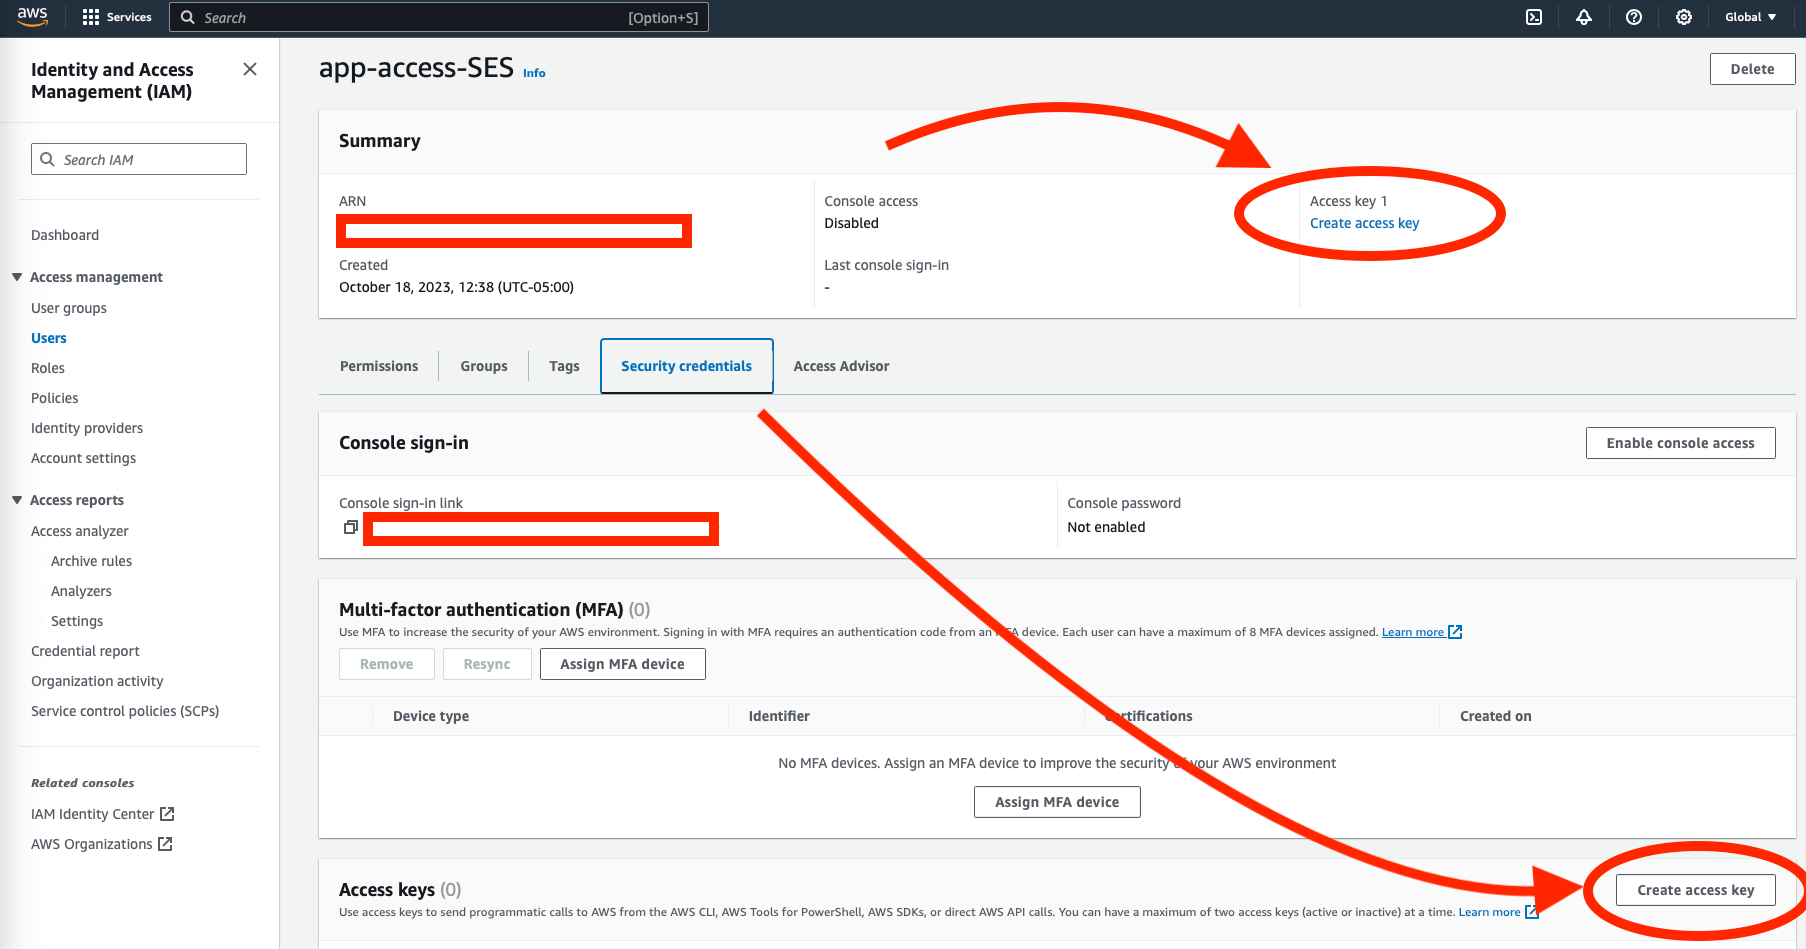
Finally, click “Create user”. After creating the user, click on the user in the IAM user list to view the details for that new user. Click on the security credentials tab and click “create access key.” This process will create an access key and shared secret ID. You will use these values when configuring your access to SES in Claris Connect. You must keep a record of these values as you cannot retrieve them after setting up the access key. Soliant recommends following AWS best practices when it comes to access keys.
Using SES Connector in a Claris Connect Flow
Once we have Claris Connect and AWS configured, we can proceed with creating a new flow in Claris Connect. In this example, we will be sending an email via SES through FileMaker.
As with most AWS connectors in Claris Connect, the available actions are limited. In this case, we have one action: “Send Email.” The “Send Email” action helps fulfill the most common use case for SES, easily sending email at scale.
In FileMaker, we see the following common use cases:
- Sending email notifications to specific users when a customer order is paid in full
- Updating all customers weekly on the status of their order(s)
- Or, notifying a developer of an unexpected error in user testing
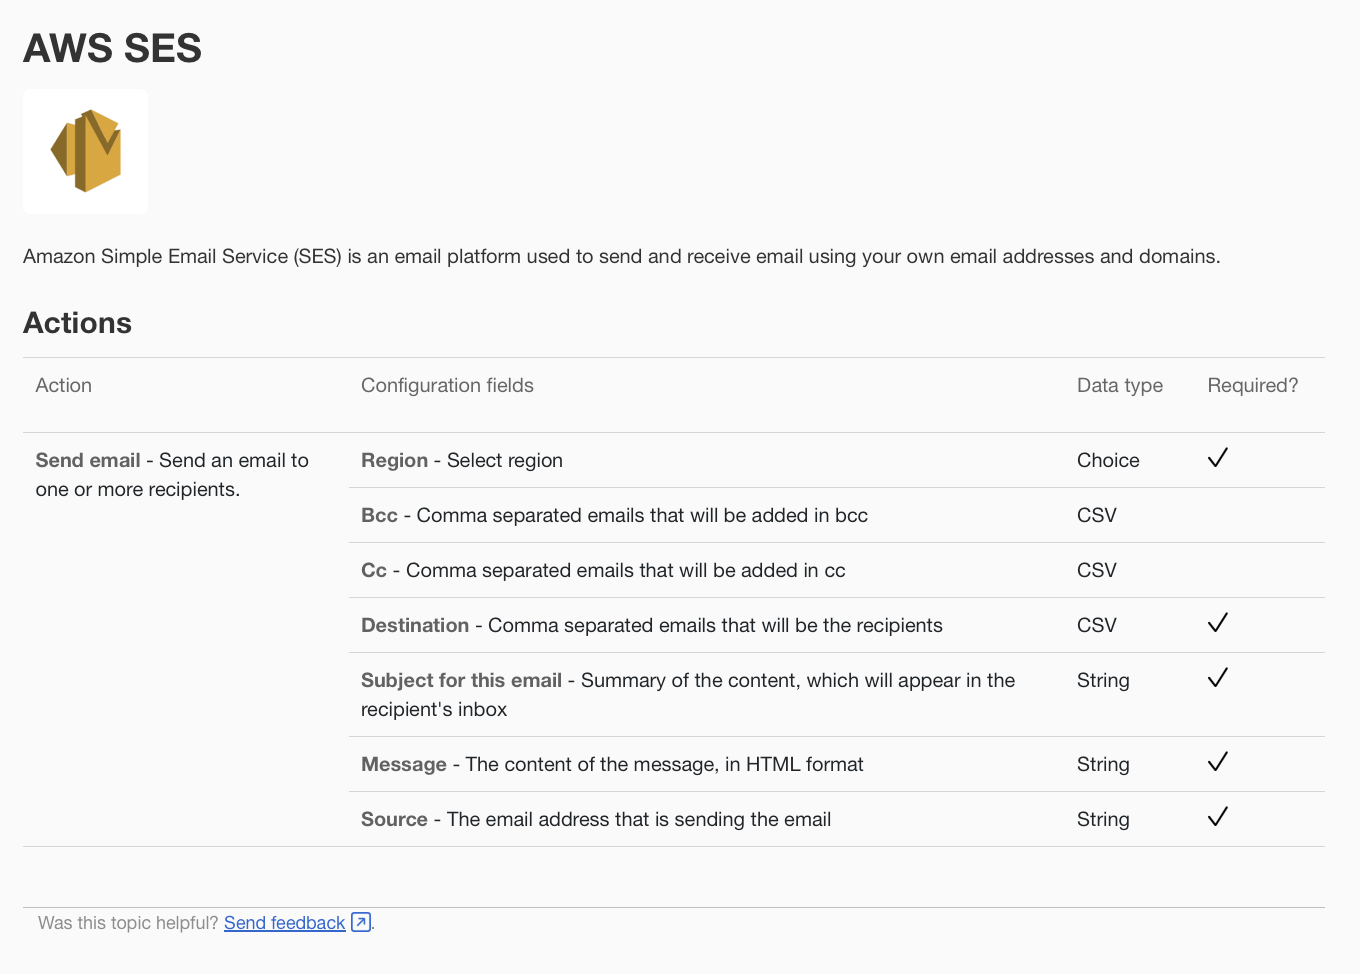
As we can see above, there are five required fields for calling the “Send Email” action. Some are self-explanatory, like message, subject, and destination. The Region configuration field is set based on which region you chose to set up SES in your AWS environment. We will discuss how to properly set this value for any AWS region that supports SES.
Create New Flow
First, create a new flow. We will call our flow “Send Email Via SES” and click “Claris FileMaker Server” or “FileMaker Server Cloud,” depending on your configuration.
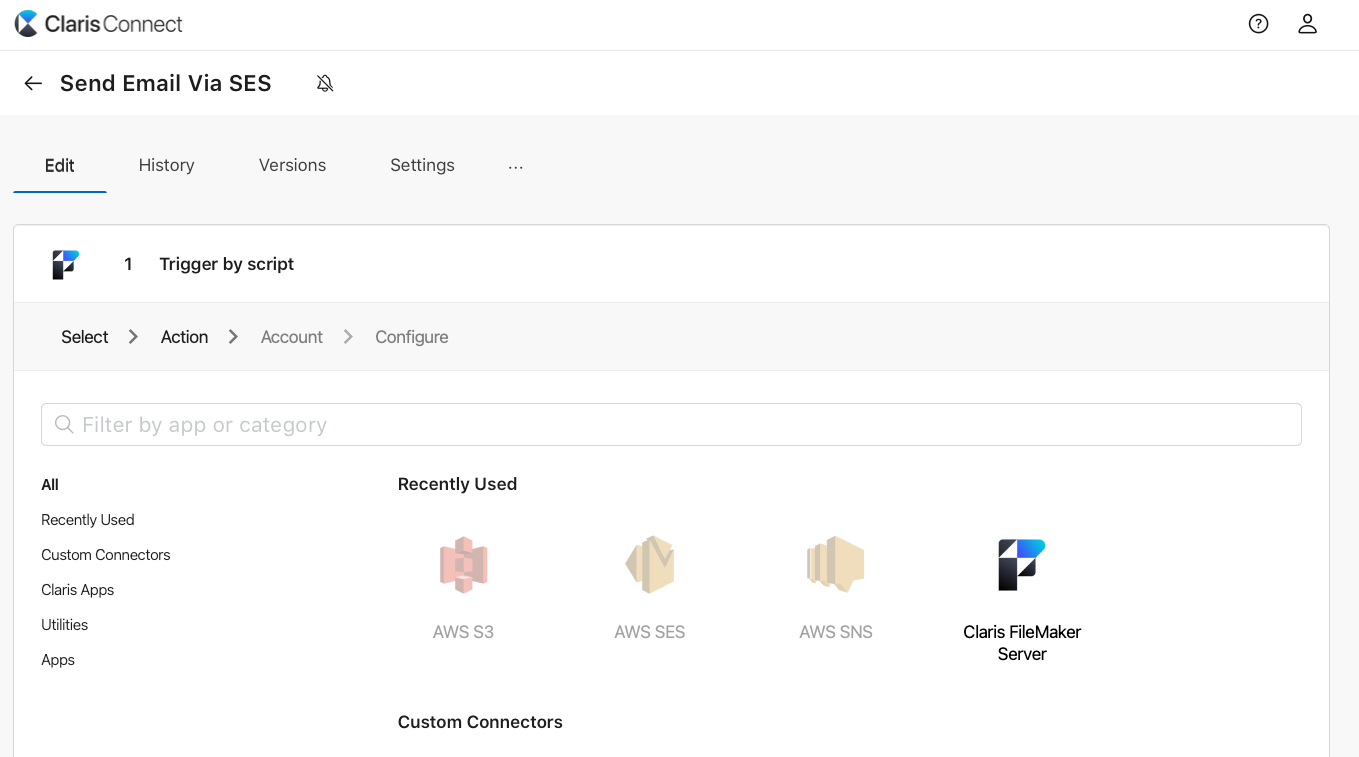
Specify Your Connected File
Click continue after selecting “Trigger by script.” If you have previously authenticated your Claris FileMaker Server, it should appear as a verified option. Otherwise, enter the credentials used for logging into the specified FileMaker database file and specify the file you will be connecting to on the specified FileMaker Server.
Note that you will want to ensure you have enabled the “Access via FileMaker Data API (fmrest)” extended access privilege on the specified file. Once you have verified your account, you will be on the configure screen. Here, follow the instructions for creating a script inside your specified FileMaker file.
Inserting Data Into Your Send Email Action
In our script, we included a JSON object called $json_data that included four values from FileMaker: action, message, subject, and destination. We can use these passed parameters within our Claris Connect Flow to insert data into our Send email action. Note: I am only including a single recipient in the “destination” value, but you can use a comma to separate multiple recipients in this single value.

Add Action for AWS SES “Send Email”
Click the “+” button to the right of your Trigger by script action and add a new action. Search for “SES” to find the AWS SES connector, seen below.
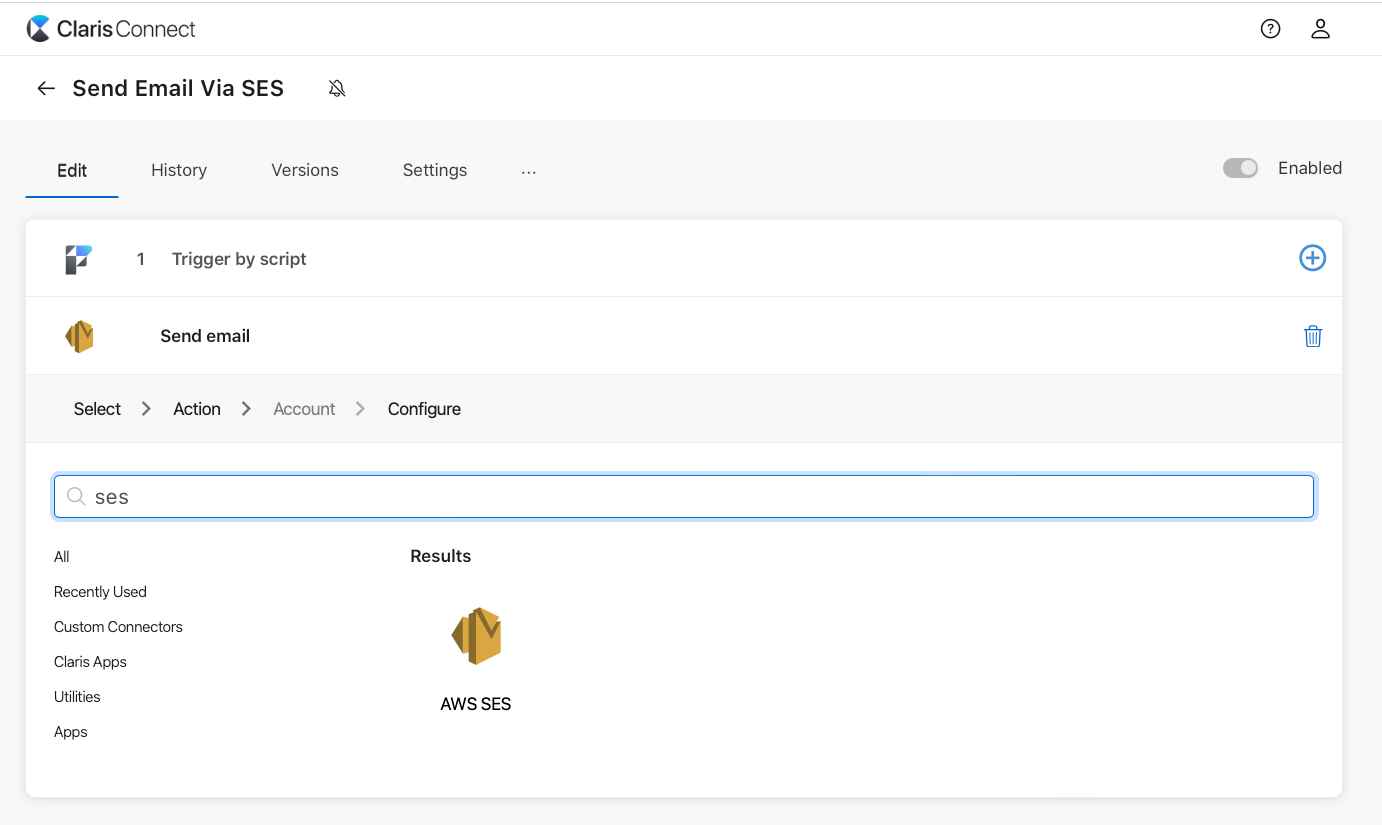
Entering Your Access Key
Click “Continue” after selecting the one available action of “Send email.” Next, you will need to enter your Access Key ID and Shared Secret Key that you set up in IAM in the AWS console.
Setting Your Region
Next, you will see the configuration fields available for this action. In our example, we used the us-east-1 region (Virginia) as our SES region. Setting this value can be tricky if you are not using one of the listed regions in the drop-down. To type the specific region, we will need to use the region code. For example, if I wanted to use SES in the US-Ohio region, I would enter us-east-2 in the region field, as seen below:

Since we included parameters in our previous flow action, we can insert these values into the available configuration fields. For example, clicking the “+” button to the right of a given configuration field allows you to reference passed parameters in previous flow action steps. See below:
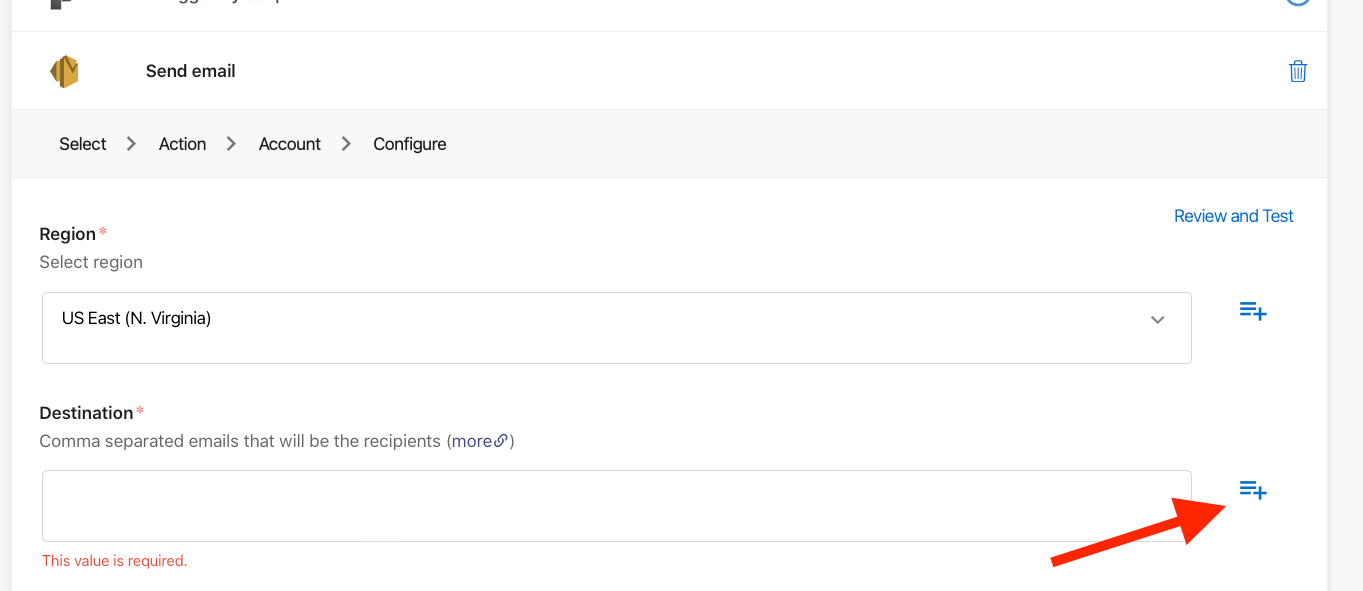
From the ensuing card window, you can search for the parameter you want, or you can select it from the drop-down.
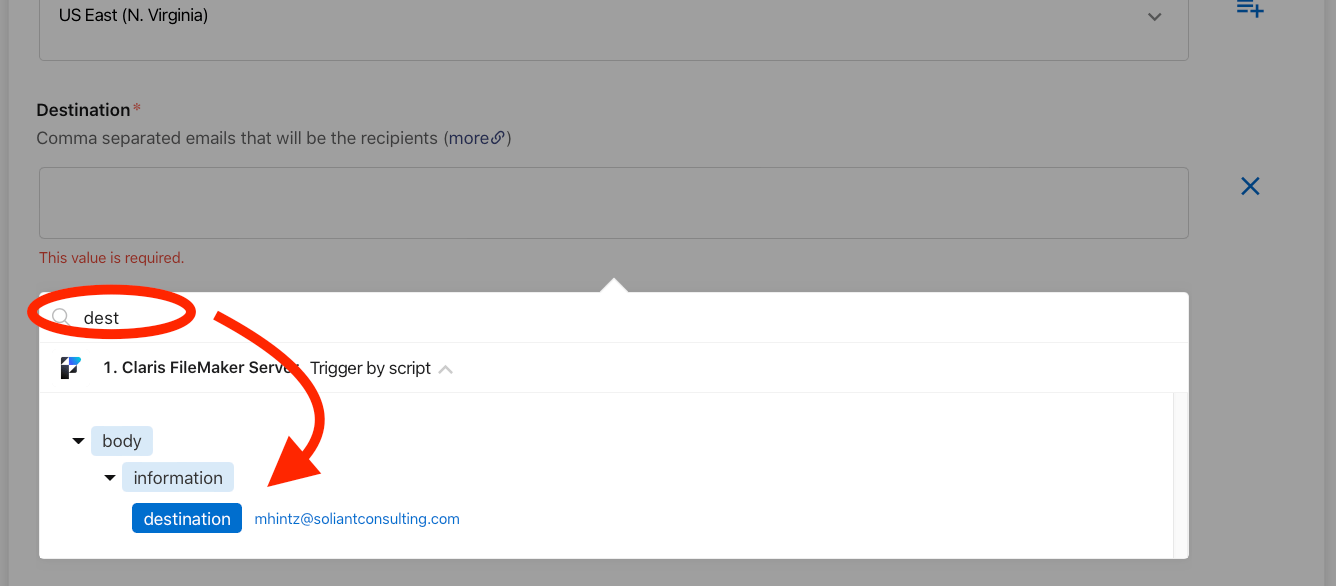
Repeat this process for all required fields in the configuration step and use passed parameters included in your previous connect flow step.
Testing Your Claris Connect Amazon SES Flow
Finally, test the entire flow by calling the script you configured in the first step of the flow. After that, verify the results in the History tab on your flow. Now, you can call this Connect flow from any FileMaker script in your file with one line of code and customize the message, subject, and recipients. This provides a powerful and easy-to-maintain API integration between FileMaker, Claris Connect, and Amazon SES.
Moving Forward with Claris Connect & Amazon SES
We covered a lot in this blog post. Any application integration is no small undertaking, but hopefully, this guide provides a template to help you use these services quickly and easily. Integrating Amazon Web Services Simple Email Service (SES), FileMaker, and Claris Connect provides an easy-to-use and cost-effective solution for sending email at scale.
Our FileMaker consulting team helps businesses leverage Claris Connect integrations to strengthen their FileMaker applications. Contact us to talk to a consultant about customizing your solution with certified experts.