Soliant Applications
Health Questionnaire
Screen students quickly and efficiently.
Introduction
Soliant Health Questionnaire provides a fast and systematic way to screen students and faculty on iPad for health-related issues before they enter a school building or attend a school-related camp. This screening, paired with temperature readings, helps streamline the return to in-person learning for schools and districts.
Soliant Health Questionnaire was developed with the generous contributions of Glenbrook High School District 225, Glenview, Illinois.
How it Works
Using Soliant Health Questionnaire, a faculty member greets the student by scanning their ID on iPad, then taps to quickly record the student’s answers to a series of health-related questions — questions that you can customize. Based on the student’s responses and the school’s health policies, the app displays a large, clear message — green for permitted and red for denied — to indicate if the student may be permitted into the building. Plus, use this app to check in faculty and staff as well.
Overview
Soliant Health Questionnaire contains two interfaces: The administration interface and the event admittance mobile interface.
Setup Support & Consulting Services
To streamline your setup and application deployment, our FileMaker consulting team at Soliant Consulting is offering two additional paid packages:
Standard Setup
Our standard setup package is $8,000 and includes the following:
- Application deployment
- Basic security and accounts setup using FM internal accounts
- Active Directory and Open Directory setup
- Mobile device connection and set up
- Server set up, configuration, and best practices
- Basic backup and disaster recovery plan
- Optional cloud hosting set up on Soliant.cloud with a waived setup fee
- One day of application training
- One day of application usage security review
- Business needs and workflow analysis comprising of 8 hours of consulting
A la Carte Setup Options
The following services are available a la carte for an additional charge after standard setup:
- Server hardening
- Integrating with current identity providers
- i.e., Ping Octa, Azure AD, and more
- Template customized for your school district
- Claris Connect set up
- Claris Connect training
- Mentoring for in-house developers
- Proof Of Concept for SIS integration
- Data migration (services may vary based on data needs)
- Enhanced vaccination tracking functionality
Please contact Soliant Consulting at info@soliantconsulting.com to learn more about our Standard Setup package and a la carte offering pricing.
Premium Setup
For an additional $8,000, we provide services beyond our standard setup package. These can include integrations with other core systems and applications, custom application development, workflow management, or additional training. Please contact our team to learn more.
All packages must be paid in full in advance. Please contact our team at info@soliantconsulting.com to learn more.
Administration Interface
The administration interface was designed for FileMaker Pro running on a Macintosh or Windows PC. Here administrators can manage the list of Organizations, Students, and Events in the app.
Main Menu
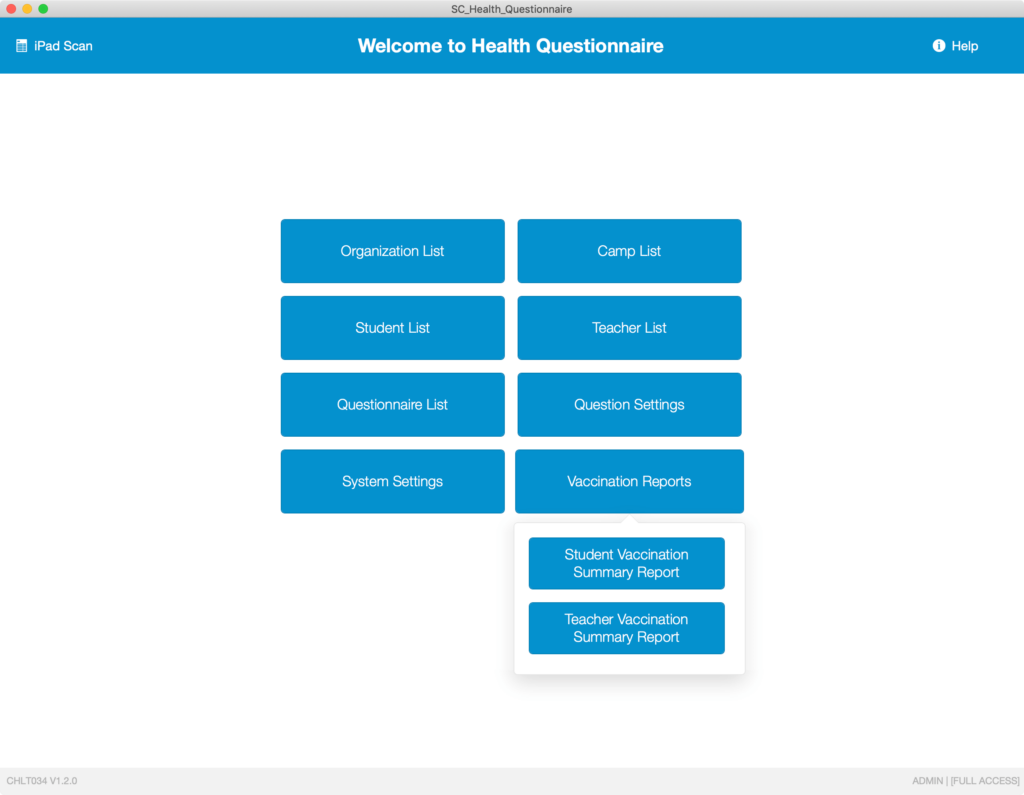
When you open Soliant Health Questionnaire using FileMaker Pro, the app will present the Main Menu. It contains large buttons for navigating to the main entities of the app:
- Organization List
- Student List
- Teacher List
- Camp List
- Questionnaire List
- Question Settings
- System Settings
- Vaccination Reports
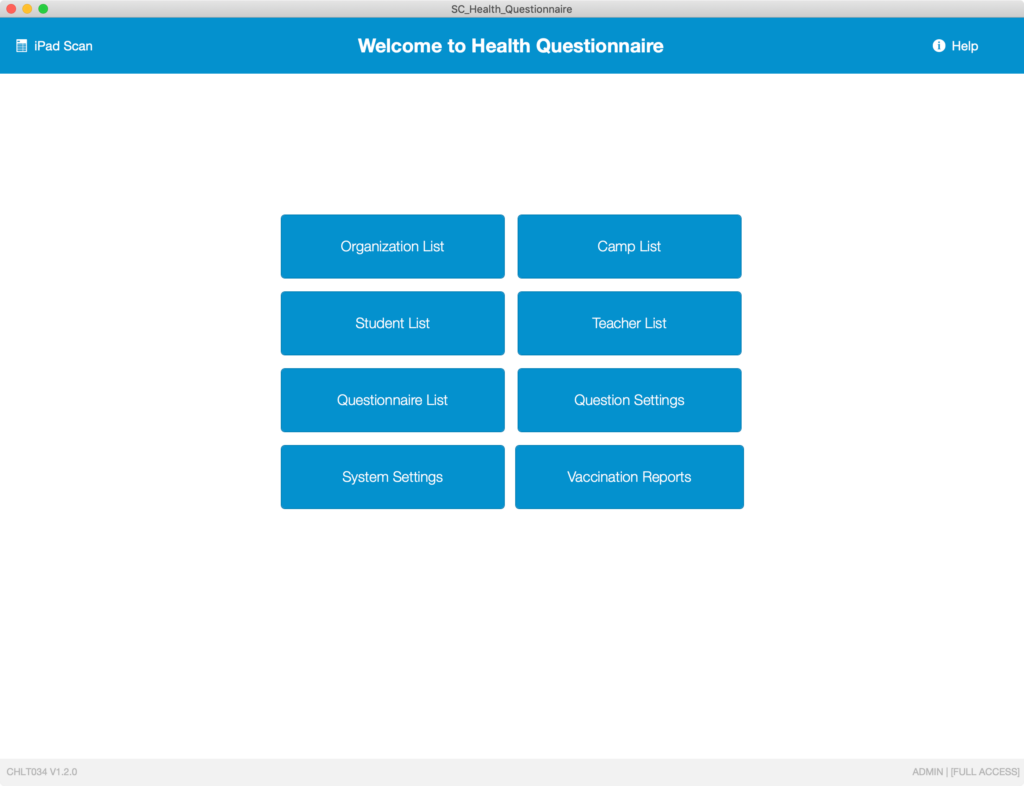
The header on the Main Menu contains two buttons:
- iPad Scan – this button provides quick access to the iPad interface for demonstration and only appears for users with [Full Access] privileges. See Security for more information.
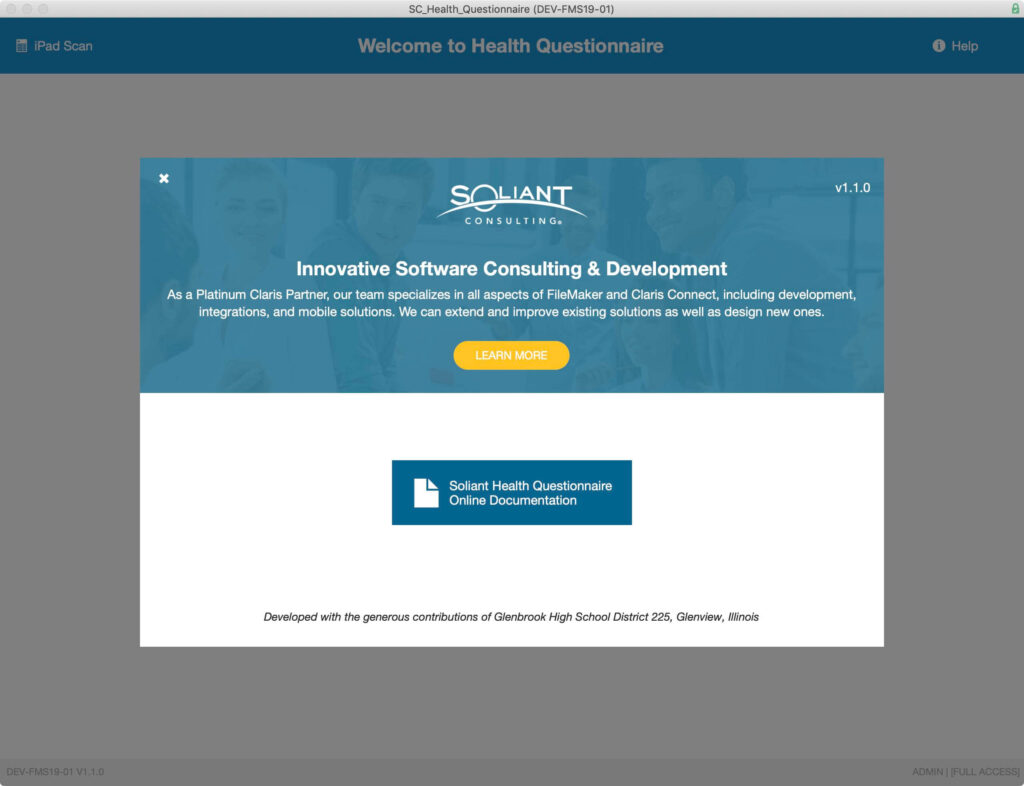
- Help – navigates to the applications Help page, which provides links to online help, shown below.
Organizations
The Organization List is accessed from the Main Menu. It displays a list of the organizations whose health admittance will be managed in this app, such as schools.

Sort the list of organizations by clicking on a column label. Click the Home button (located in the upper left corner of the header) to return to the Main Menu.
Organization Detail
Click the chevron button located along the right edge of any row of the Organization List to navigate to the Organization Detail view.
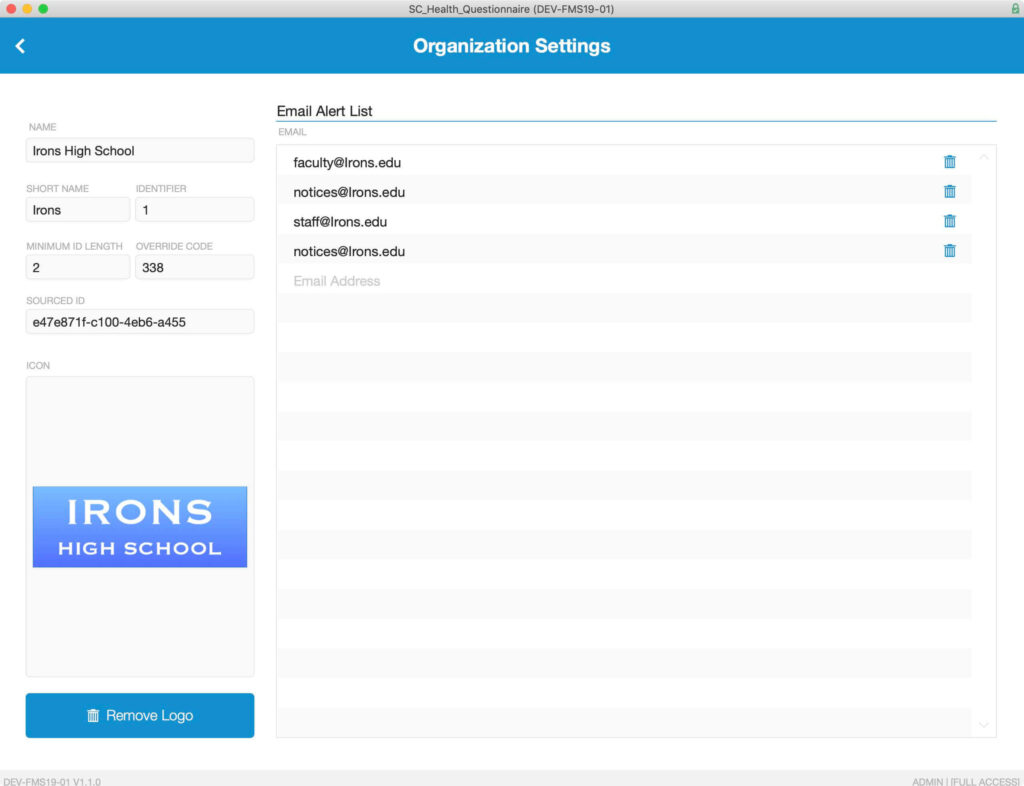
The Organization table contains only a few:
- Full Name – the full name of the Organization
- Short Name – the short name of the Organization, displayed when there is not enough space for the Full Name
- Identifier – unique serial number of the Organization, manually assigned
- Minimum ID Length – the minimum number of characters in a Student’s ID, used for validation
- Source ID – SIS identifier
- Icon – store an image file of the Organization’s icon
Click the chevron button (located on the left side of the header) to return to the Organization List.
Adding Organizations
- Manual Entry – select the menu item Records > New Record or type the shortcut Control-N on Windows / Command-N on Mac to enter Organization records one at a time.
- Import: select the menu item File > Import Records > Import File… to batch import a list of organizations.
- Claris Connect: create a workflow to automatically update Soliant Health Questionnaire app with data from your student management system.
Students
The Student List is accessed from the Main Menu. It displays a list of the students who are enrolled at one of the organizations. Sort the list of students by clicking on a column label such as “Organization”. Click the Home button (located on the left side of the header) to return to the Main Menu.
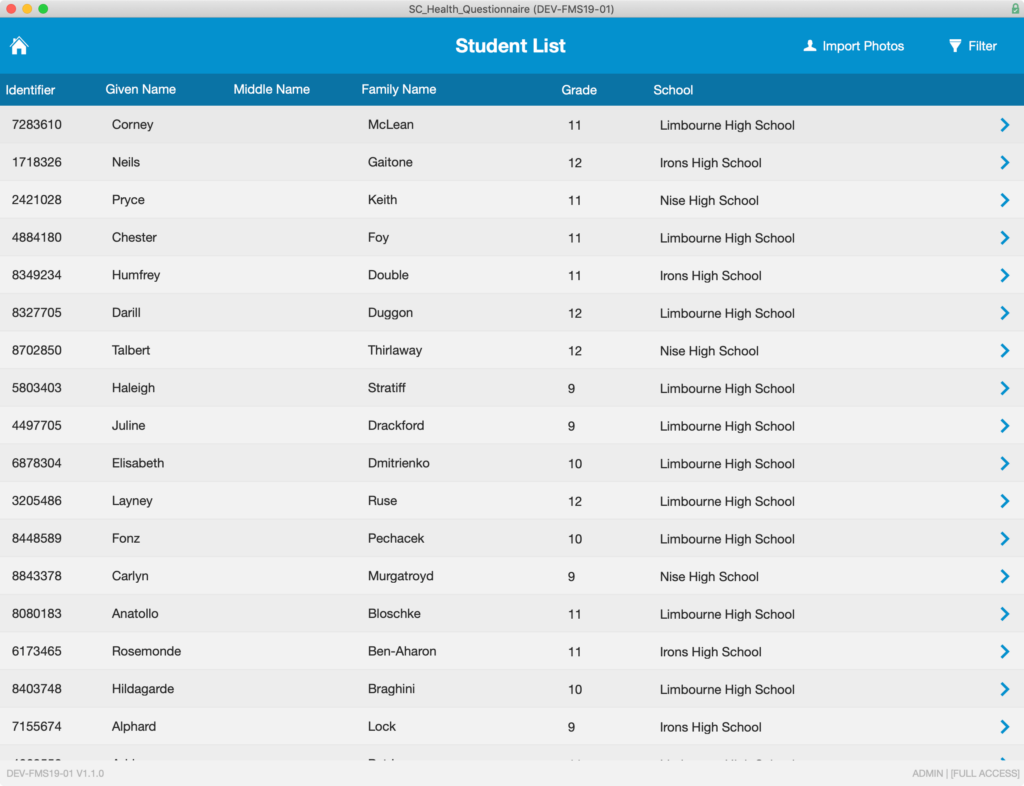
Adding Student Records
Student records can be added to the app in one of three ways:
- Manual Entry – selectthe menu item Records > New Record or type the shortcut Control-N on Windows / Command-N on Mac to enter student records one at a time.
- Import – select the menu item File > Import Records > Import File… to batch import a list of students.
- Claris Connect – create a workflow to automatically update Soliant Health Questionnaire with data from your student management system.
Import Student Photos
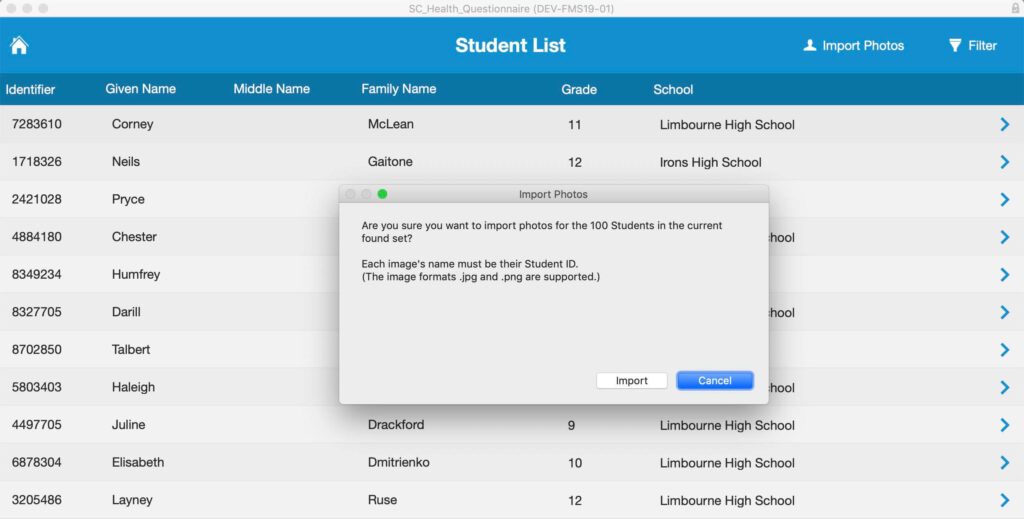
Many student management systems do not include a student photo with their data. But with Soliant Health Questionnaire you can import a folder of student photos as a batch. Each image must have the same name as the Student’s Sourced ID and must be in either .jpg or .png format.
- To begin, click the Import Photos button (located on the right side of the header). A series of dialogs provides instructions and confirms the action.
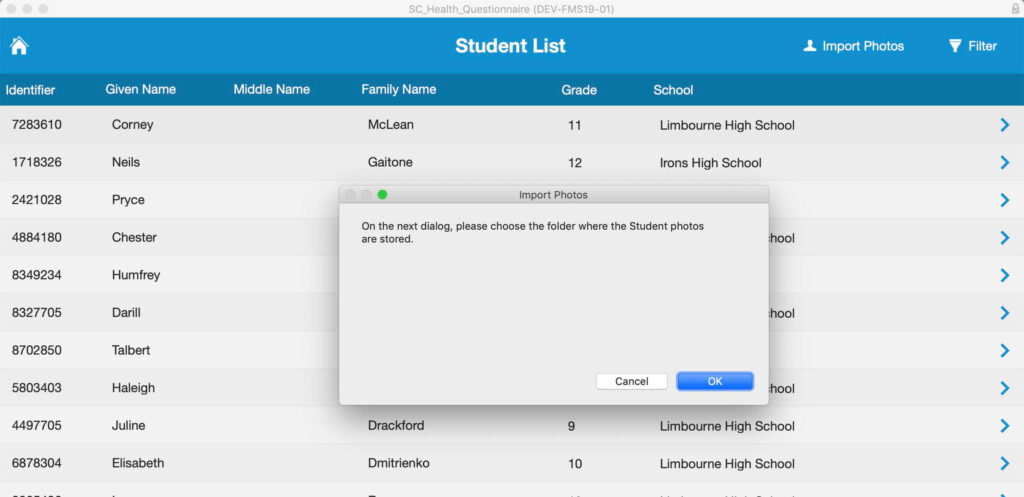
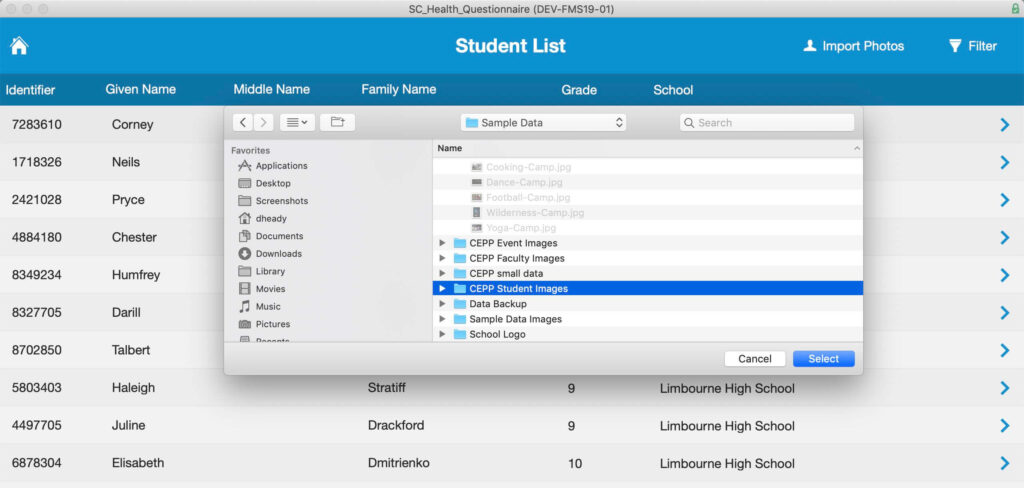
- In the next dialog, select a Folder containing the student’s images.
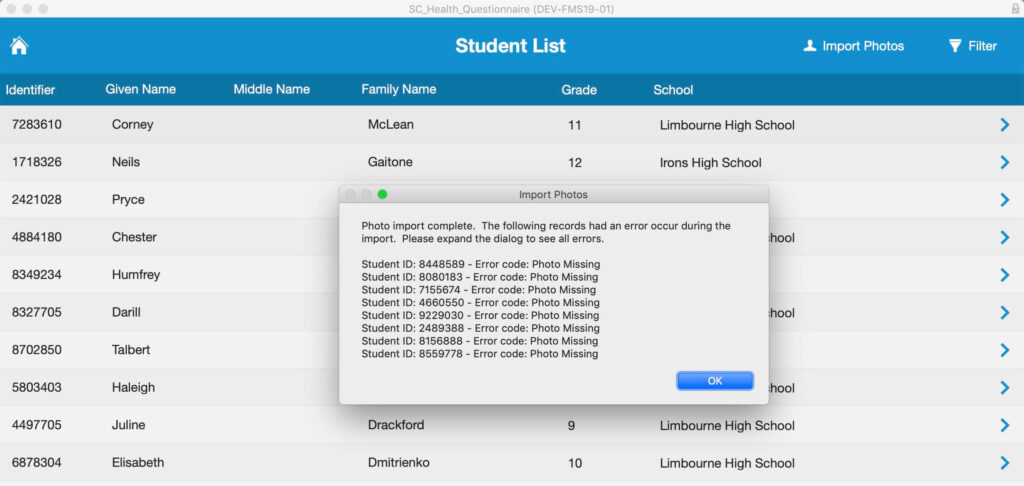
- Each image in the folder is imported into the student record where the Student ID is the same as the image file name. A dialog message will report any images that did not have a corresponding image file.
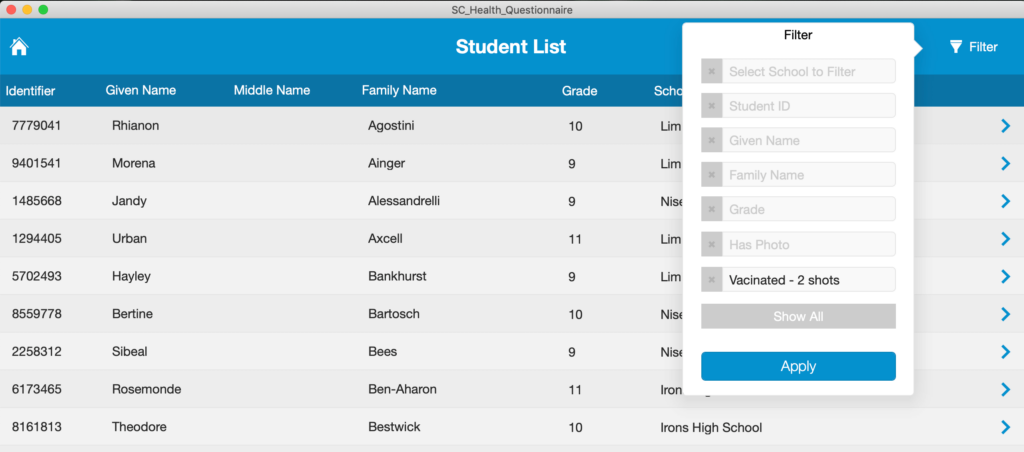
Filter Student List
To filter the student list, click the Filter button (located on the right side of the header). A popover opens where you can enter values to which will change the found set of students.
Enter one or more filter values and then click the Apply button to filter the list of students. You can clear a filter by clicking the X button to the left of the field.
The Filter dialog also includes a Show All button, that will clear all the filters and display the full list of students.
Student Detail
View a student’s detail by clicking the chevron button located along the right edge of any row of the Student List.
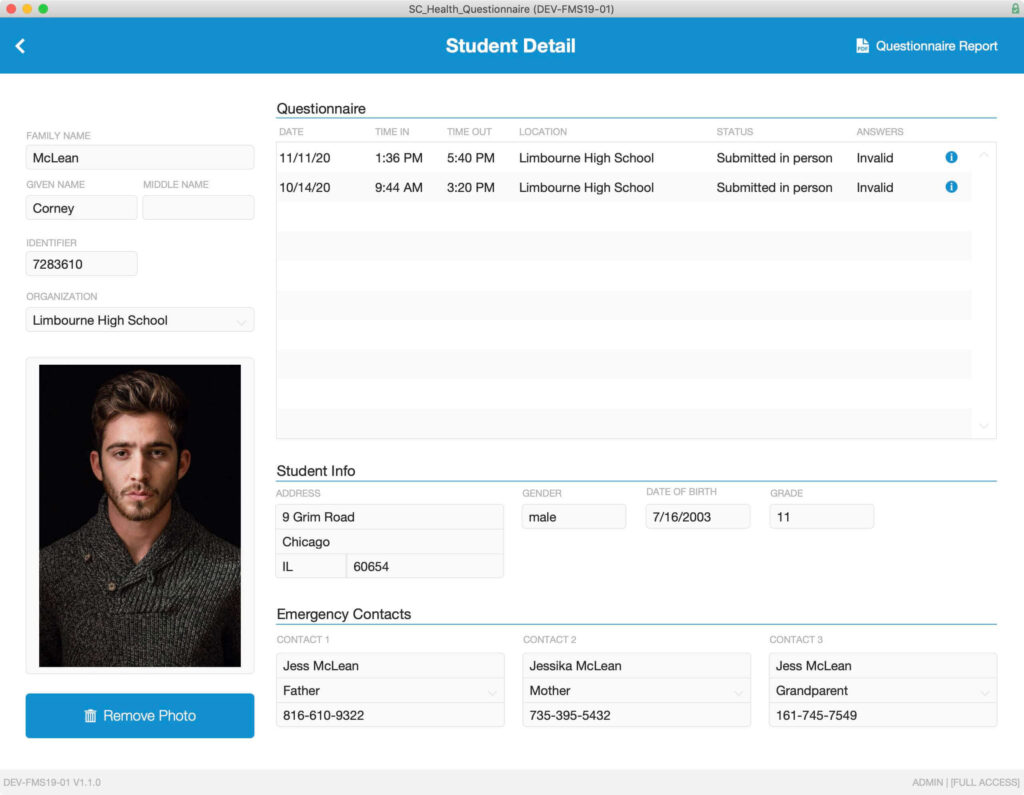
The student table contains only the basic student info and a photo which is used as a reference to confirm the student’s identity as they enter. Fields include:
- Given Name and Family Name – the name of the student
- Student ID – the unique identifier imbedded in the barcode on the student’s id badge
- Organization – the Organization ID, which links this student to an organization record
- Address – the street, city, state, and zip where the student resides
- Gender, Date of Birth, and Grade –basic info to help identify the student
- Emergency Contacts – the name, relation to student, and phone number for three contacts
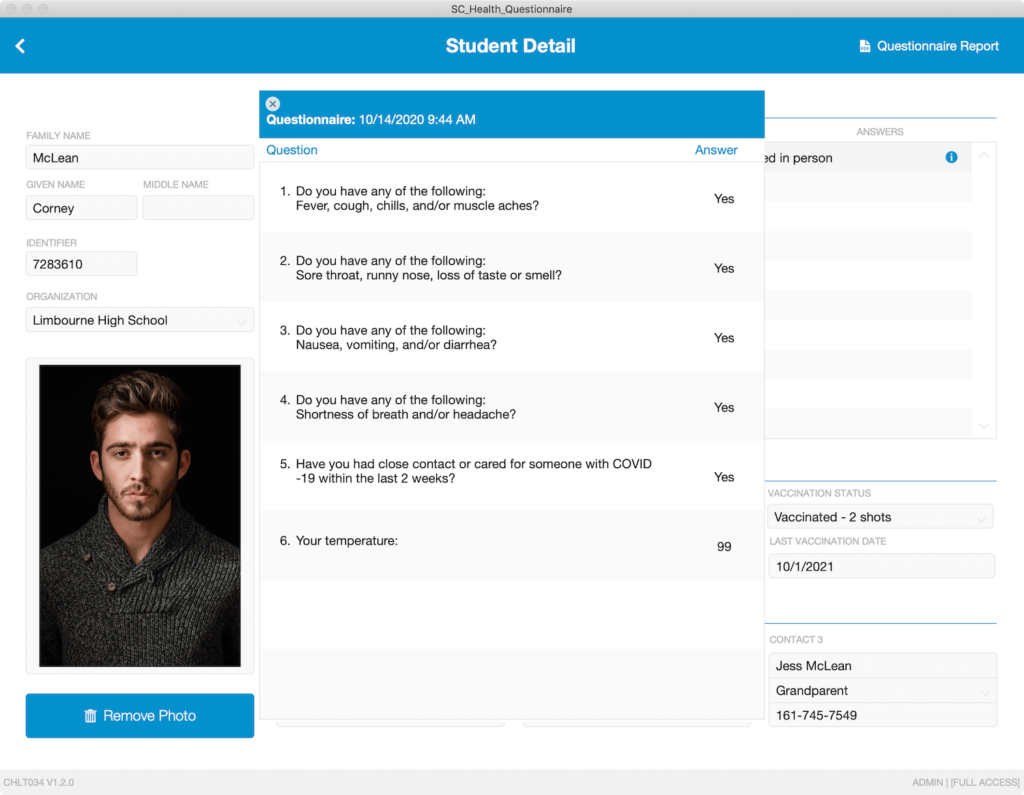
- Vaccination Status and Last Vaccination Date – description of the student’s vaccination status and most recent vaccination date
The Questionnaire will contain an entry for each time this student was interviewed about their current health. Click the Information button, located on the right edge of the Questionnaire row, to view the student’s questions and answers.
Click the chevron button (located on the left side of the header) to return to the Student List.
Student’s Questionnaire Report
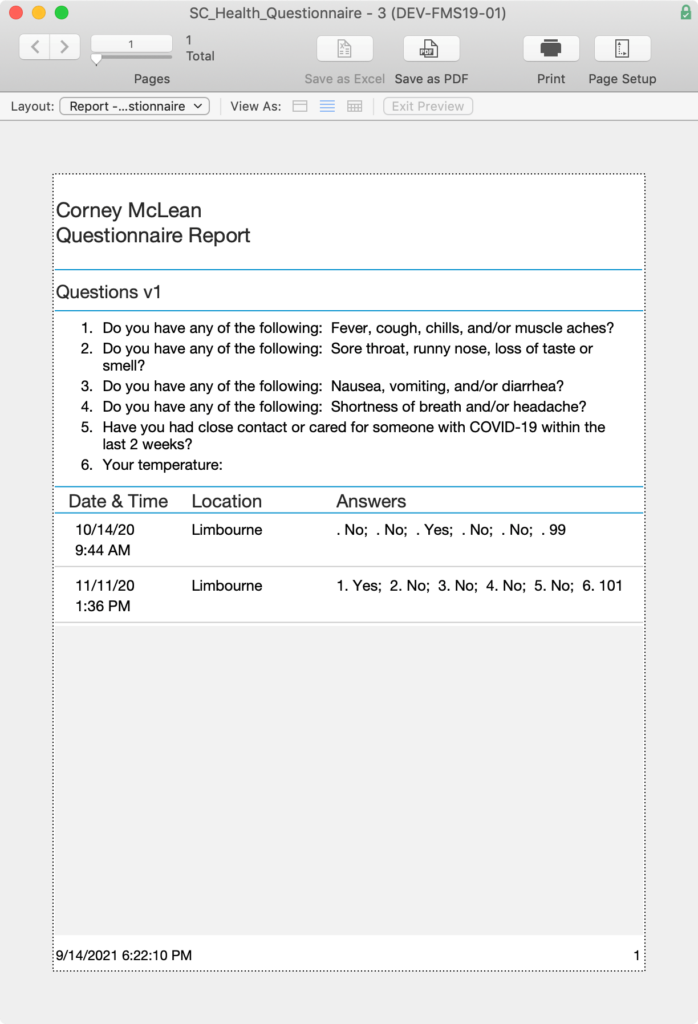
The Questionnaire Report displays all the current student’s questionnaires. View the report by clicking the Questionnaire Report button in the upper right corner of the header. The report opens in a new window and includes buttons Save as PDF and Print. Close the report window when you are done.
Teachers
The Teacher List is accessed from the Main Menu. It displays a list of the teachers who are employed at one of the organizations. Sort the list of teachers by clicking on a column label such as “Organization”. Click the Home button (located on the left side of the header) to return to the Main Menu.
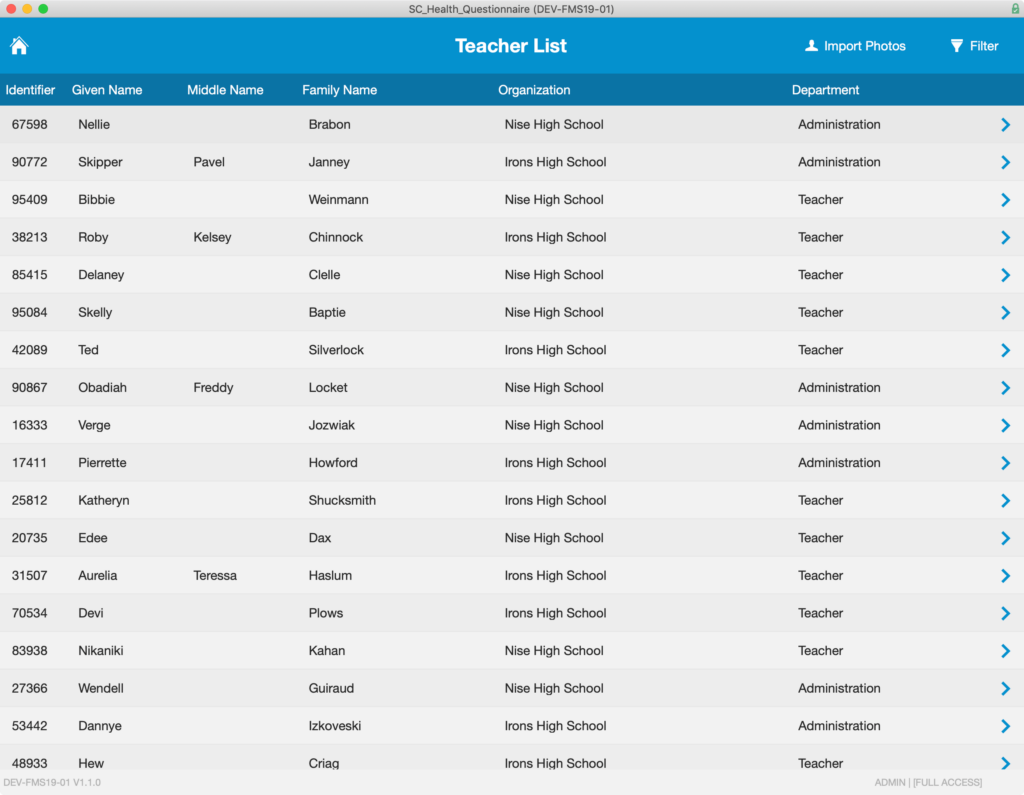
Adding Teacher Records
Student records can be added to the app in one of three ways:
- Manual Entry – selectthe menu item Records > New Record or type the shortcut Control-N on Windows / Command-N on Mac to enter student records one at a time.
- Import – select the menu item File > Import Records > Import File… to batch import a list of students.
- Claris Connect – create a workflow to automatically update Soliant Health Questionnaire with data from your student management system.
Import Teacher Photos
Many teacher management systems do not include a teacher photo with their data. But with Soliant Health Questionnaire you can import a folder of teacher photos as a batch. Each image must have the same name as the Teacher’s Sourced ID and must be in either .jpg or .png format.
To begin, click the Import Photos button (located on the right side of the header). A series of dialogs provides instructions and confirms the action. When prompted, select the folder.
Filter Teacher List
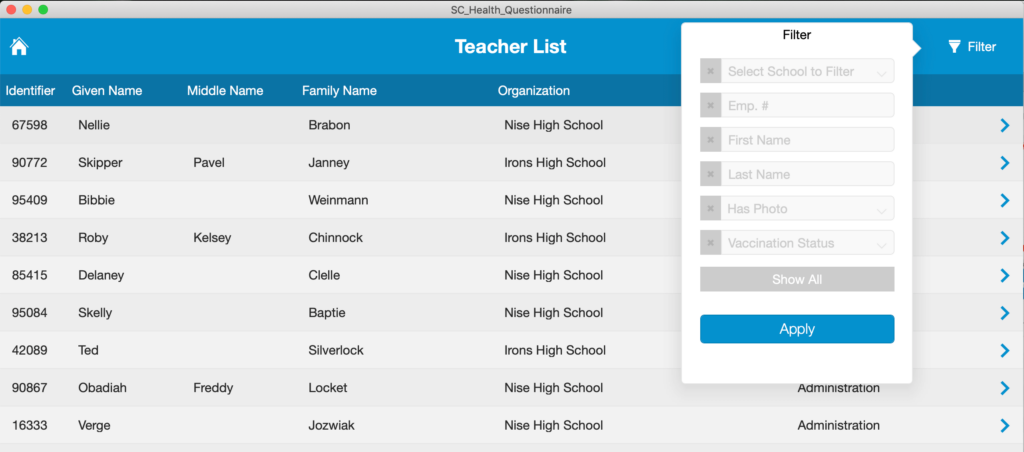
To filter the teacher list, click the Filter button (located on the right side of the header). A popover opens where you can enter values to which will change the found set of teachers.
Enter one or more filter values and then click the Apply button to filter the list of students. You can clear a filter by clicking the X button to the left of the field.
The Filter dialog also includes a Show All button, that will clear all the filters and display the full list of teachers.
Teacher Detail
View a teacher’s detail by clicking the chevron button, located along the right edge of a row in the teacher list.
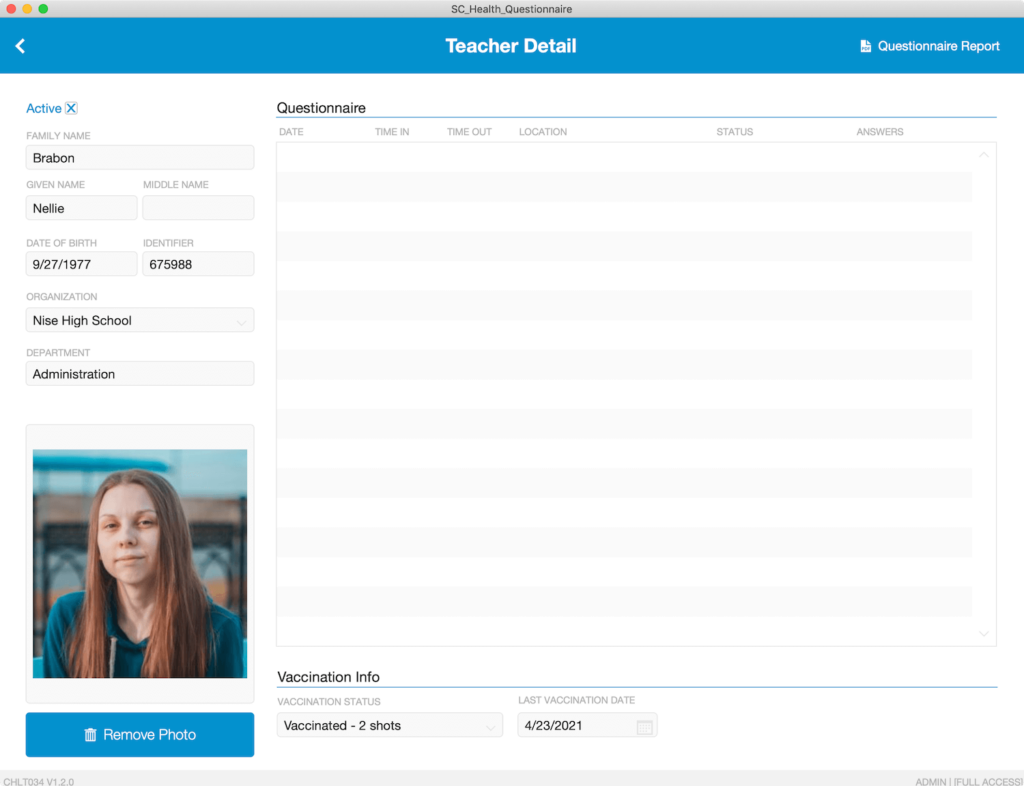
The teacher table contains only the basic teacher info and a photo which is used as a reference to confirm the teacher’s identity as they enter the facility. Fields include:
- Given Name, Middle Name, and Family Name – the name of the teacher
- Identifier – the unique identifier imbedded in the barcode on the teacher’s id badge
- Organization – the identifier of the organization, which links this teacher to an organization record
- Department – the department within the organization to which this teacher is affiliated
- Vaccination Status and Last Vaccination Date – description of the teacher’s vaccination status and most recent vaccination date
The Questionnaire will contain an entry for each time this teacher was interviewed about their current health. Click the Information button, located on the right edge of the Questionnaire row, to view the student’s questions and answers.
Click the chevron button (located on the left side of the header) to return to the Student List.
Teacher’s Questionnaire Report
The Questionnaire Report displays the teacher’s questionnaires. View the report by clicking the Questionnaire Report button in the upper right corner of the header. The report opens in a new window and includes buttons Save as PDF and Print.
Camps
The Camp List is also accessed from the Main Menu. Camps are a specialized type of school activity where you might want to check participant’s health before allowing admittance to the event.
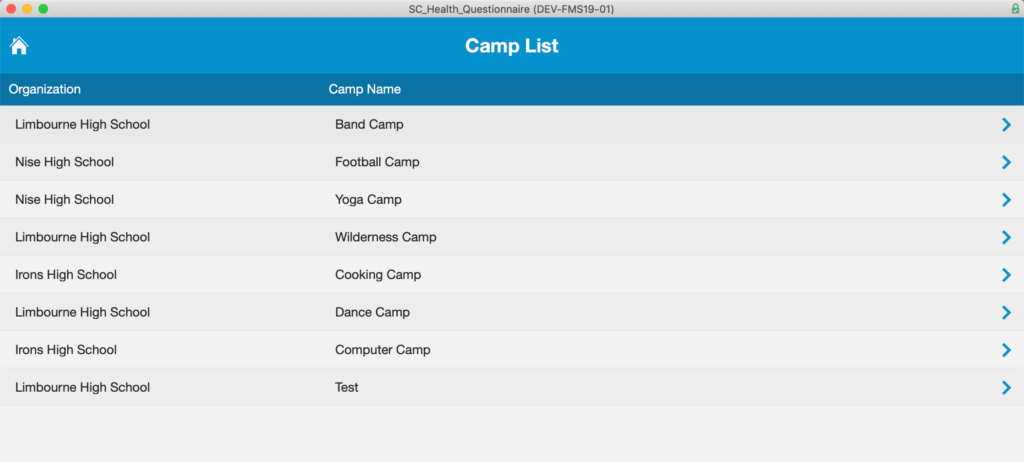
Sort the list of camps by clicking on a column label. Click the Home button (located in the upper left corner of the header) to return to the Main Menu.
Camp Detail
Click the chevron button located along the right edge of any row of the Camp List to navigate to the Camp Detail view.
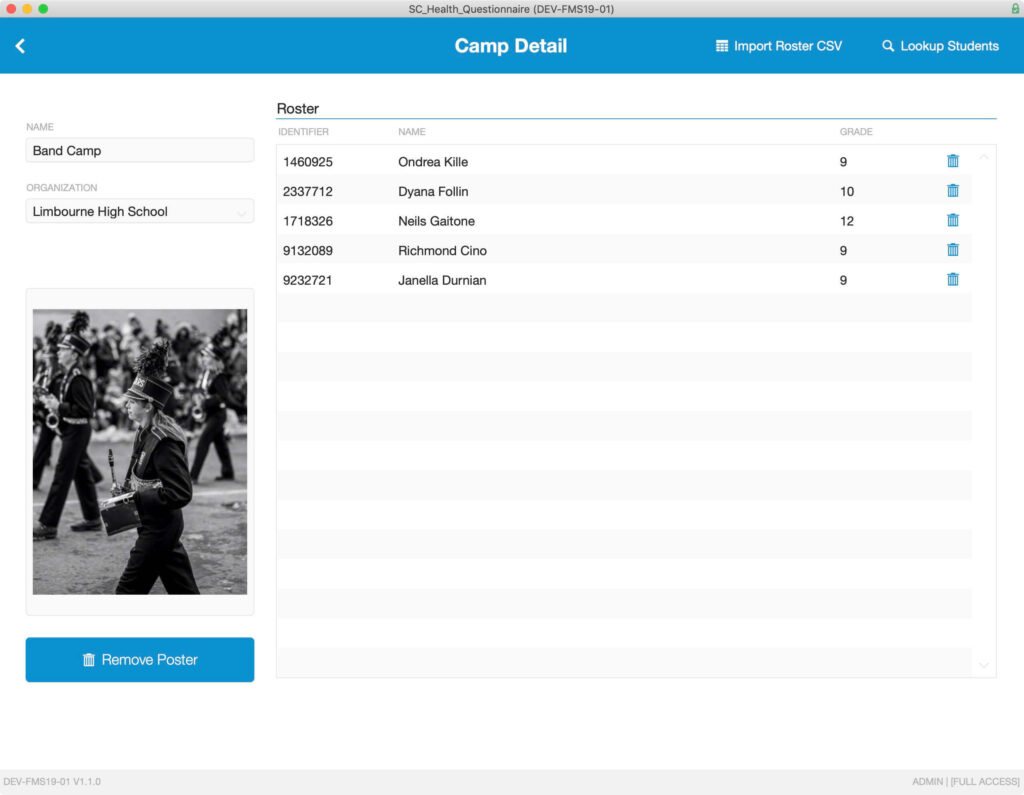
The Camp table contains only a few:
- Name – the name of the Camp
- Organization – the name of the Organization sponsoring the event
- Icon – store an image file of the Organization’s icon
- Roster – the list of students authorized to attend the event
Click the chevron button (located on the left side of the header) to return to the Camp List.
Adding Camps
- Manual Entry – select the menu item Records > New Record or type the shortcut Control-N on Windows / Command-N on Mac to enter camp records one at a time.
- Import: select the menu item File > Import Records > Import File… to batch import a list of camps.
Lookup Students
The Lookup Students feature allows you to link one or more Students to the roster for this Camp. Note that the student must already have a record in the student table before they can be added to the roster.
Click the Lookup Students button, located in the right corner of the header. The app opens a card window containing a student picker.
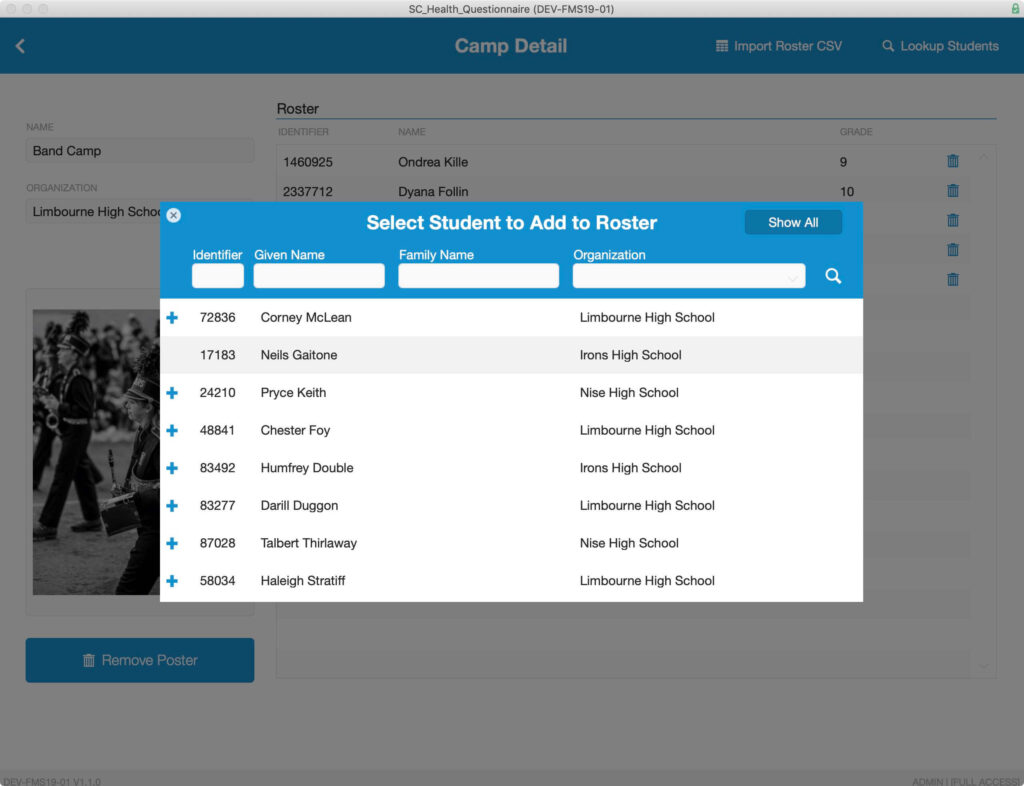
The student picker includes the following features:
- Filter the student list by specifying an Identifier, Given Name, Family Name, or Organization and clicking the Magnify Glass icon.
- Show All will clear all the filters and display the full list of Students.
- Add a student to the camp’s roster by clicking the blue + icon, on the left of the row.
- Once a student is added to the roster, the + icon is hidden, and the row is gray.
- Close the window by clicking the X icon in the upper-left corner.
Import Roster CSV
Students can also be added to the camp roster by importing a list formatted as CSV (i.e. comma-separated text).
- To begin, click the Import Roster CSV button (located on the right side of the header). A series of dialogs provides instructions and confirms the action.
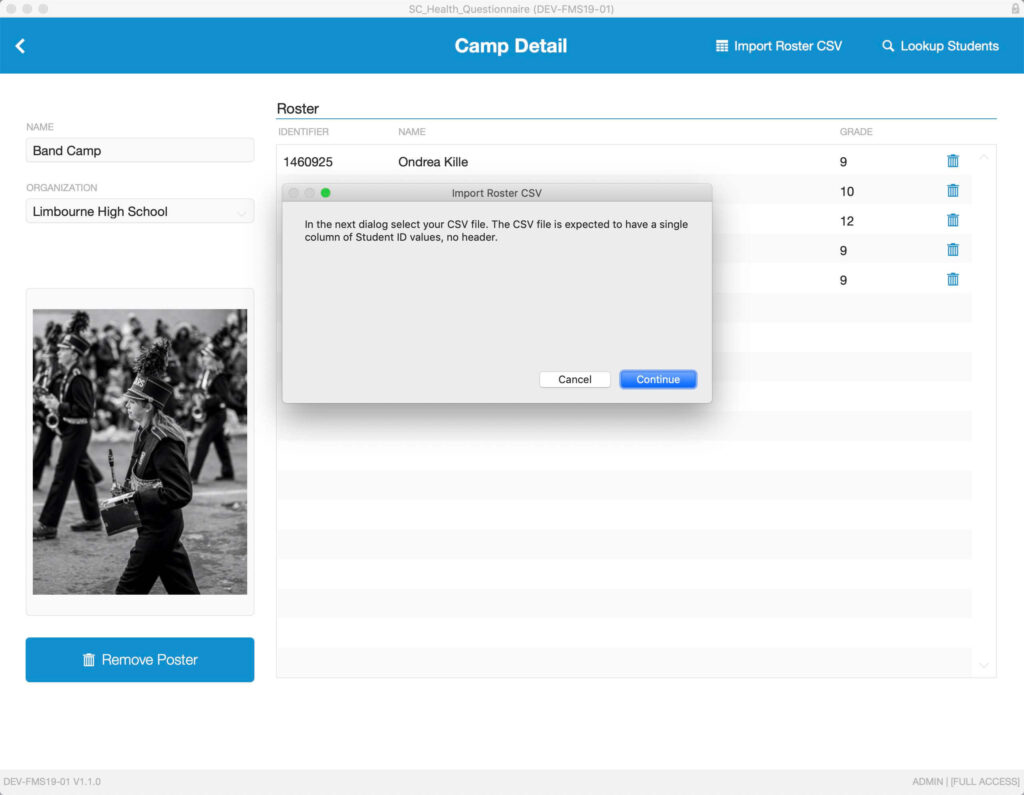
- In the next dialog, select the CSV file containing the list of student’s IDs and select the Import button
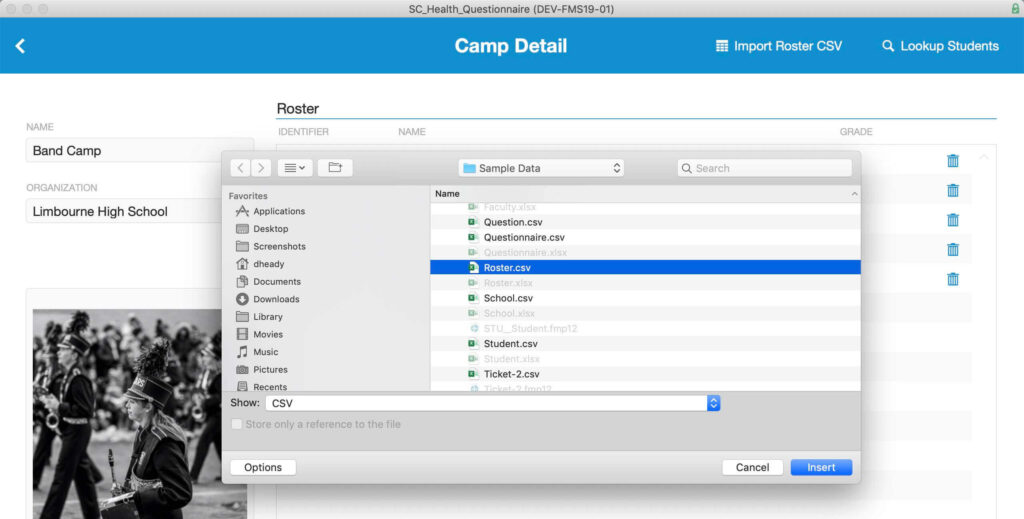
The dialog then closes students are added to the roster.
Question Settings
The Question Settings screen allows you to set up the questions to be asked during the health screening. The Question Settings screen is accessed from the Main Menu.
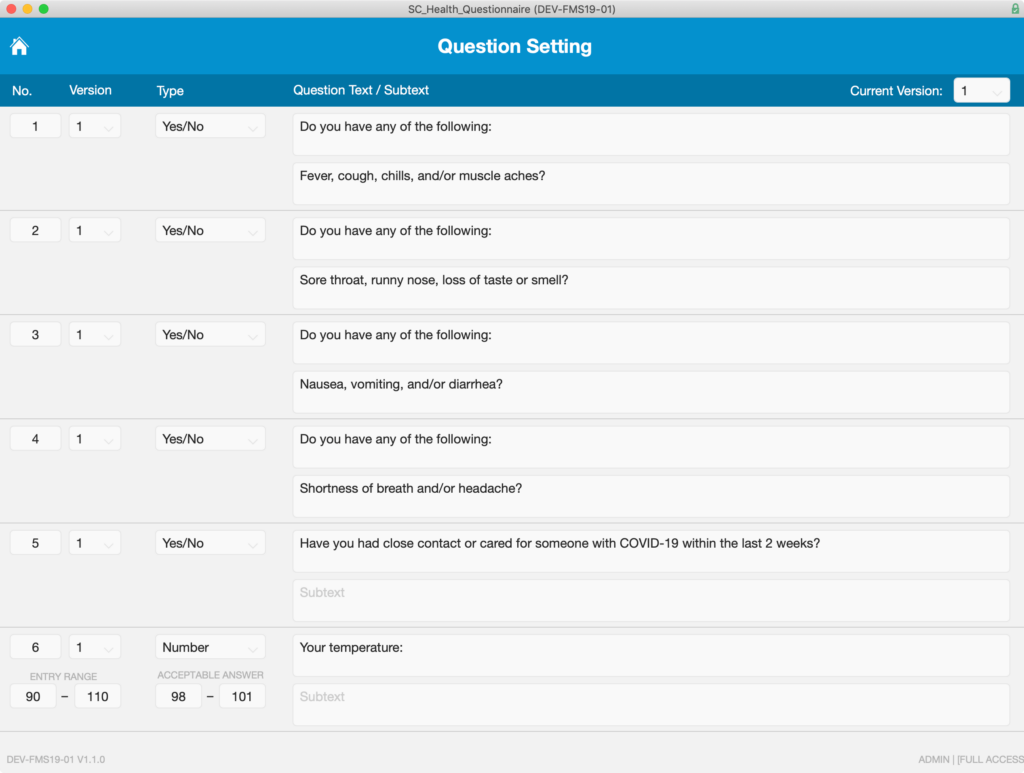
It includes just a few fields:
- No. – a number representing the order the questions are presented.
- Version – the version of the question set. Note that only 1 version is active at a time.
- Question Type – There are two types of question supported: Yes/No and Number. For Number questions, additional field display to control the required number range as well as the “acceptable answer” range. Note that for Yes/No questions, an answer of “no” is always considered the acceptable response.
- Question Text – the first line of the question
- Subtext – The second line of the question (optional)
Once a student or teacher has completed a questionnaire for a version of questions, its questions should not be modified. This will cause the record of their response to not match the question asked. Instead, create a new version.
System Settings
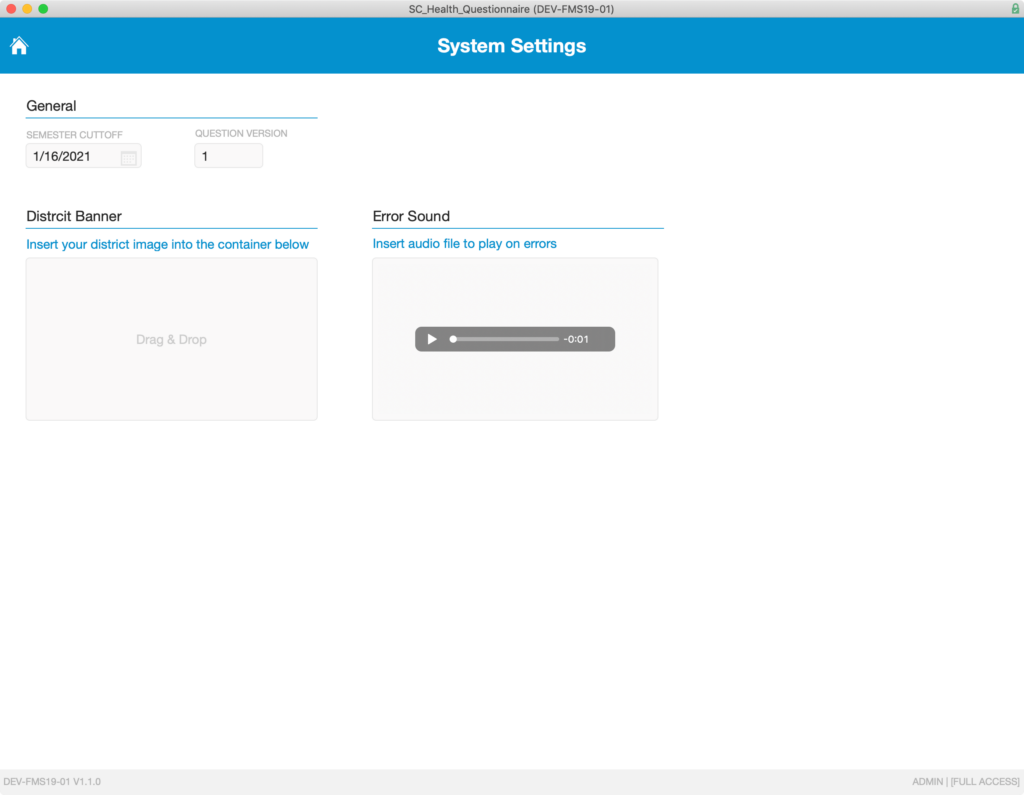
The System Settings screen is accessed from the Main Menu. It provides just a few application fields:
- Semester Cutoff – the date the semester ends.
- District Banner – the district logo or other image.
- Question Version – the version of the question that is currently active.
- Error Sound – The Error Sound file is auto-played when a student or teacher is denied access, per their health questionnaire results.
Vaccination Reports
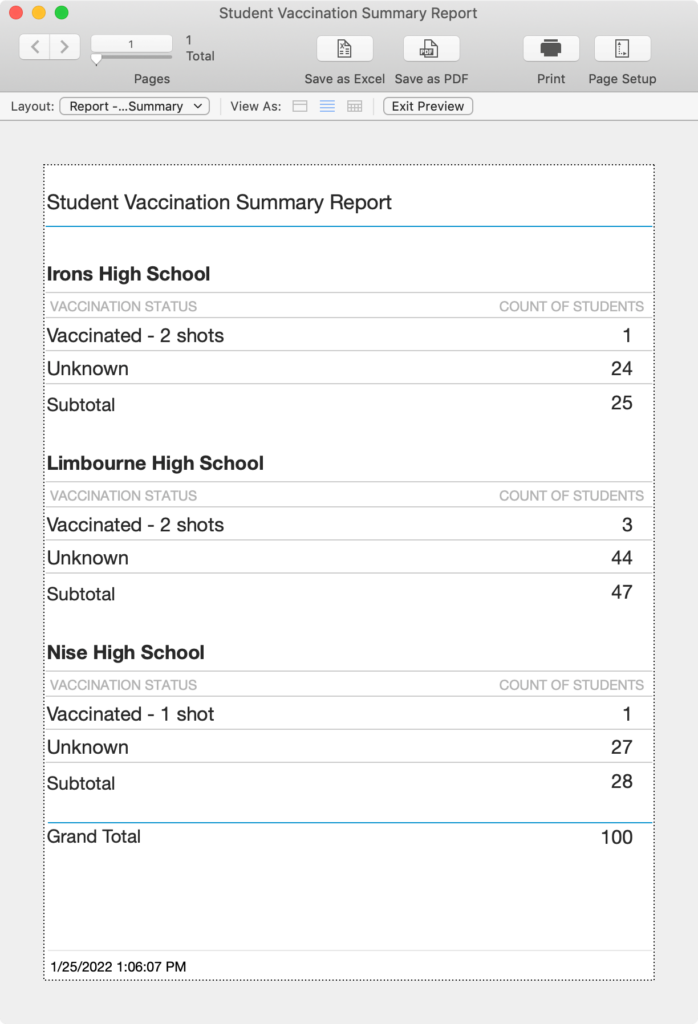
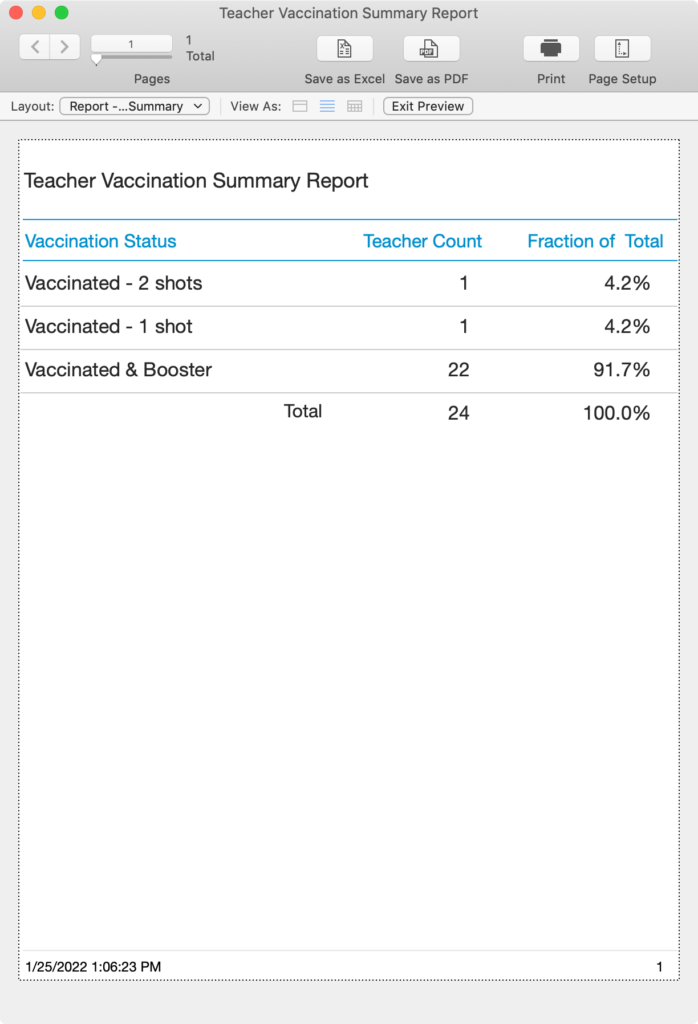
Soliant Health Questionnaire includes two vaccination reports:
- Student Vaccination Summary Report
- Teacher Vaccination Summary Report
Each of these reports produces a digital document that you can print or share with others who perhaps do not have access to Soliant Health Questionnaire. To access the reports, click the menu’s Vaccination Reports button. A popover opens where you can select a report to generate.
Admittance Interface
The admittance interface is designed for an iPad in landscape orientation, running FileMaker Go. It’s primarily intended for use as students and teachers are entering the school or camp and manage their admittance. Multiple faculty members each equipped with their own iPad can run the hosted Soliant Health Questionnaire app simultaneously and will see changes made by other users.
Check In
When you log into the Soliant Health Questionnaire while using an iPad running FileMaker Go, the app will display the interface optimized for the iPad device. Select one of the organizations previously set up using the administration interface, then tap the Start Scanning button.
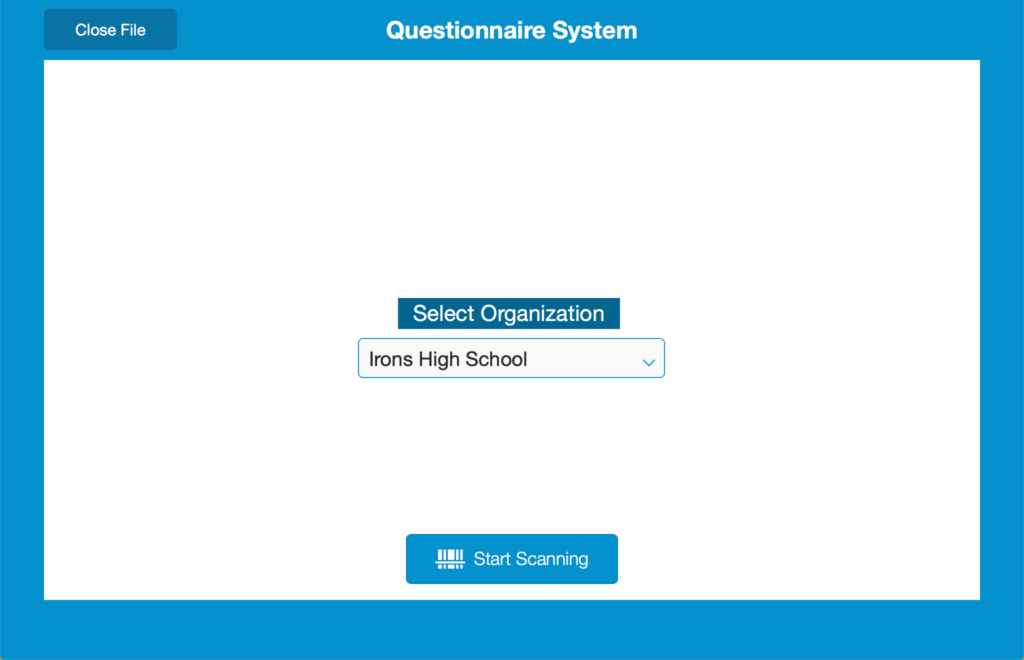
The event’s check-in interface offers several ways to locate a student’s record:
- Use the devise’s keyboard to manually enter the ID number of the student or teacher.
- Click the Camera button to use the iPad’s built-in camera to scan the barcode on the Student ID.
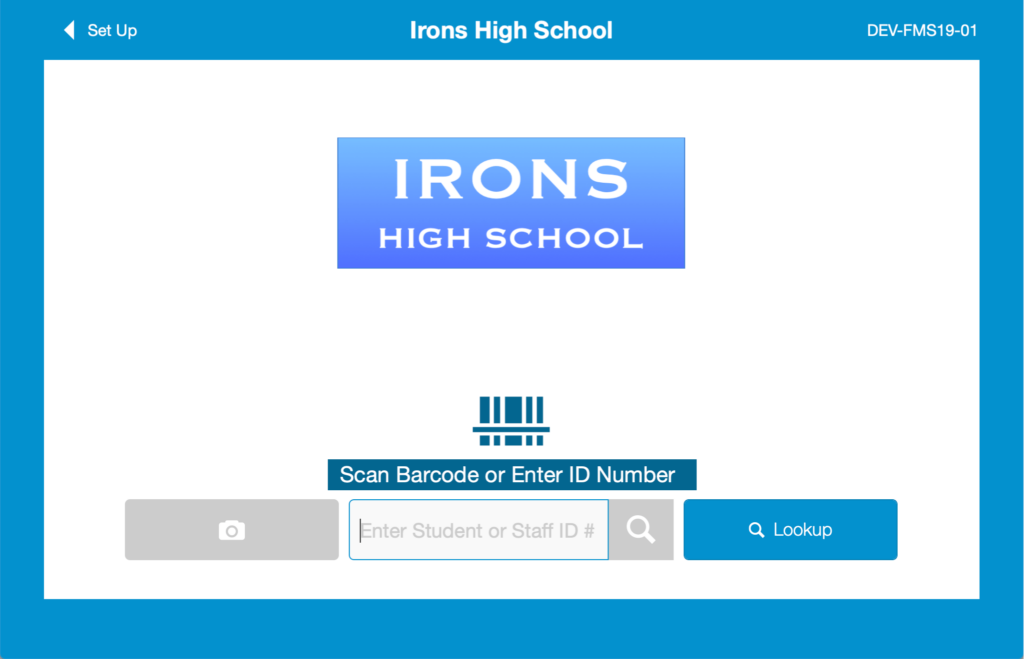
- Click the Lookup button to search for the student or teacher.
Lookup
On the lookup screen, the screen is automatically set up to search students. Tap Teach near the top of the screen to change the list that will be searched. Click the Show All button to see a full list of either students or teachers. To perform a targeted search, enter the person’s Name or ID Number and tap the Search button.
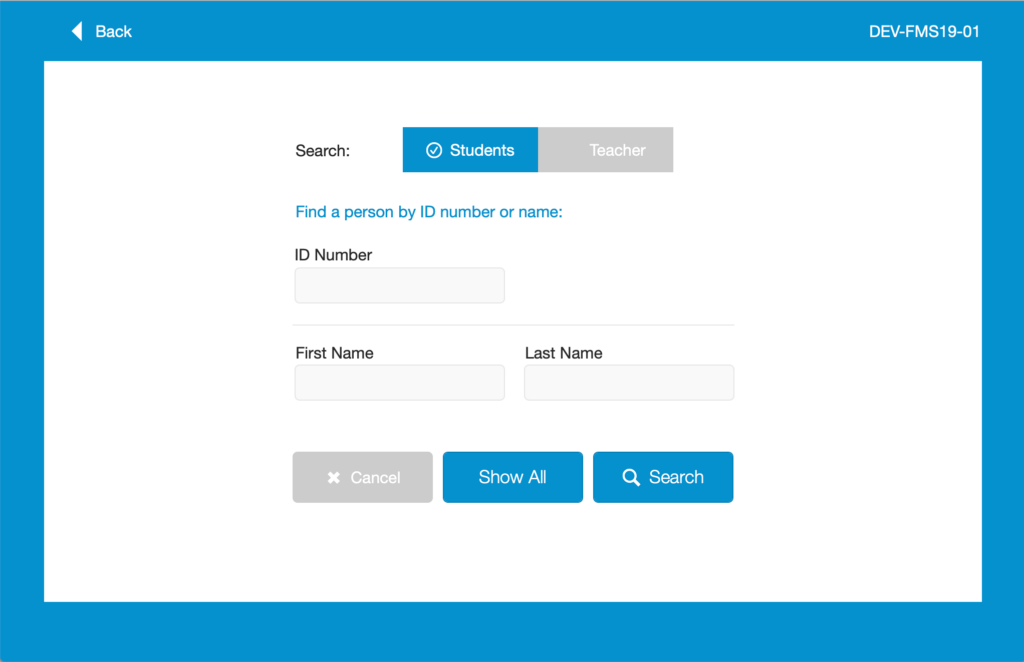
Typically, the found set is displayed as a list. However, when only one person matches the request, the person’s detail record is displayed.
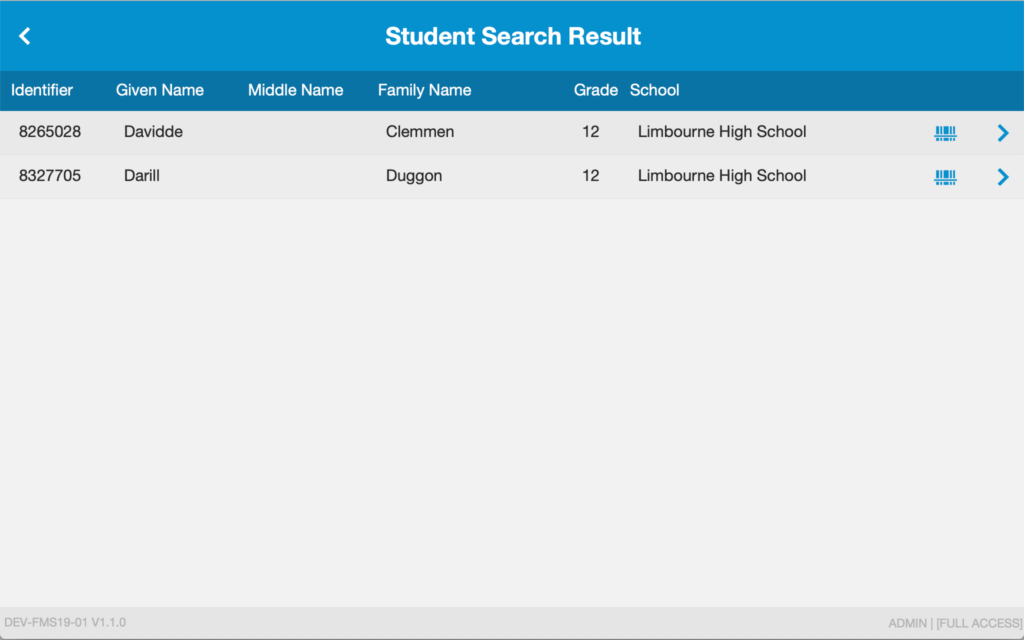
Tap the Scan button on a row to begin the questionnaire.

You can also click the Chevron on the right side of a row to view the person’s detail record.
The Student Information screen includes contact information in case the student cannot be admitted and so you need to call for pickup.
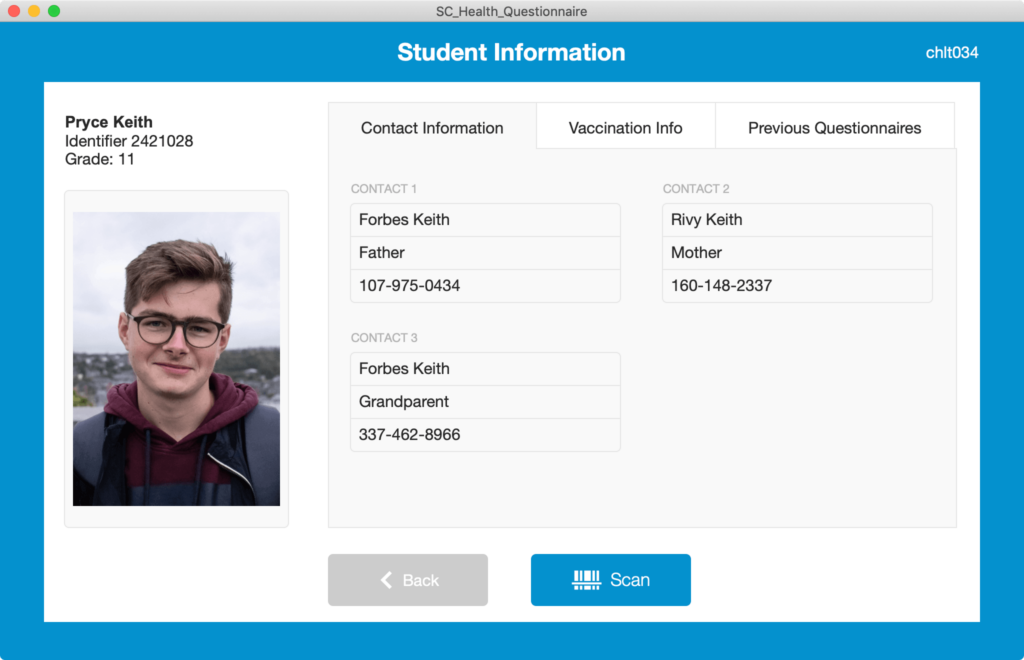
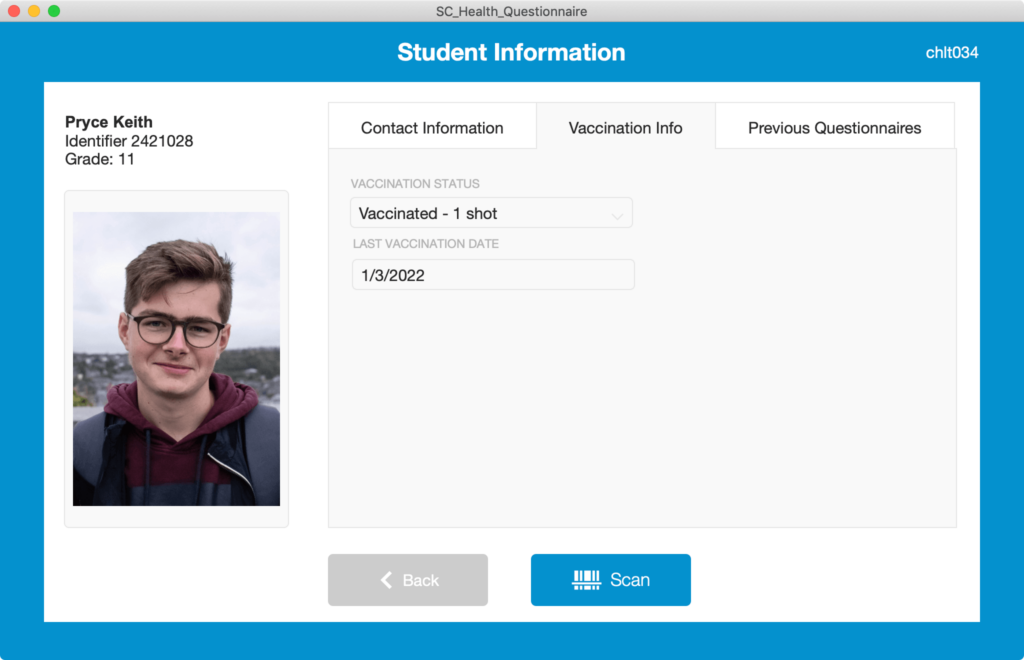
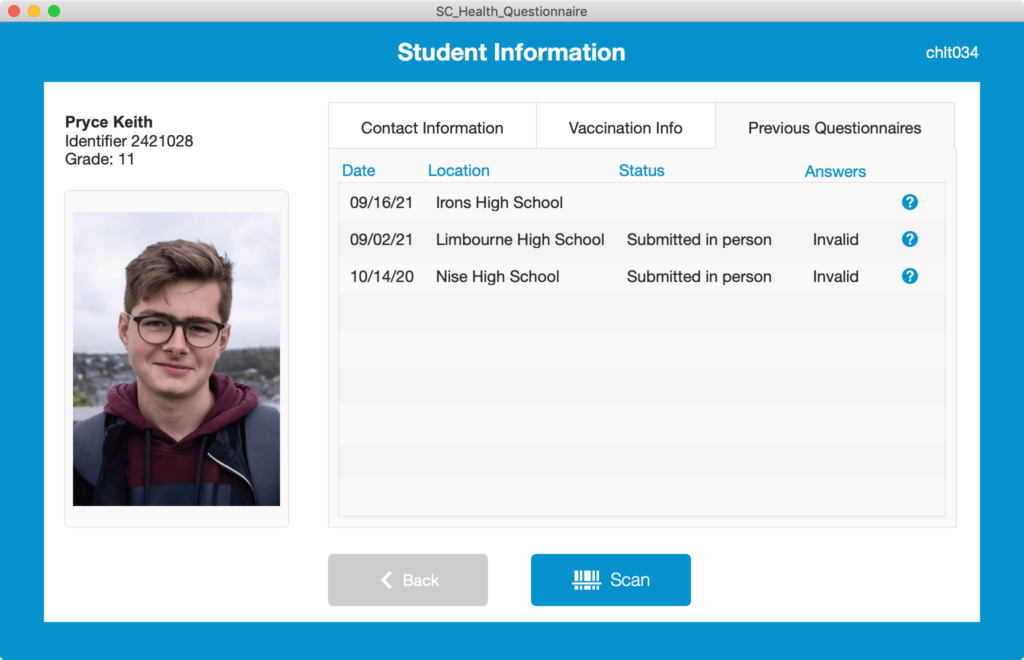
The Previous Questionnaires tab is sorted in descending order. View the specific questions and answers of a questionnaire by tapping the Questionmark icon.
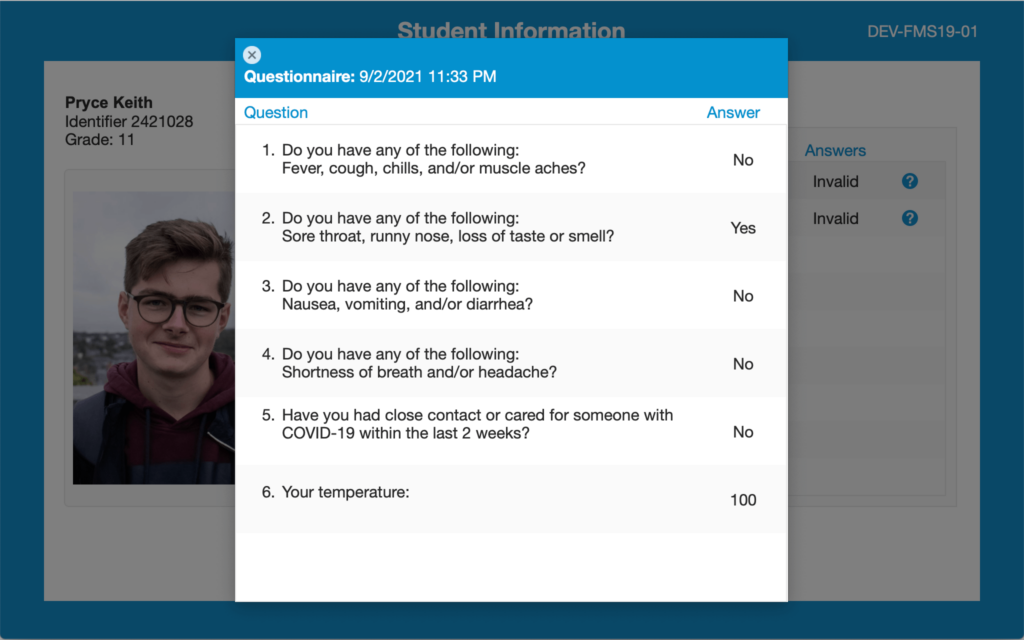
Completing the Questionnaire
Now that you’ve located the person, it’s time to complete their questionnaire. For yes/no questions, tap the appropriate response. For number questions such as temperature, enter the value using the on-screen keyboard.
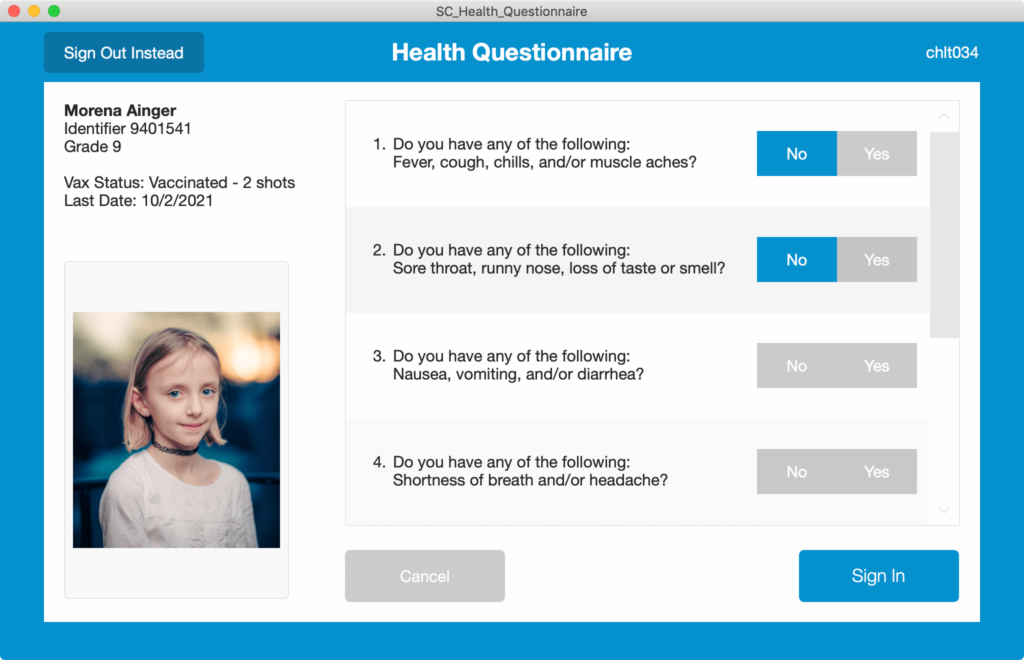
When you’ve answered all the questions, tap the Sign In button.
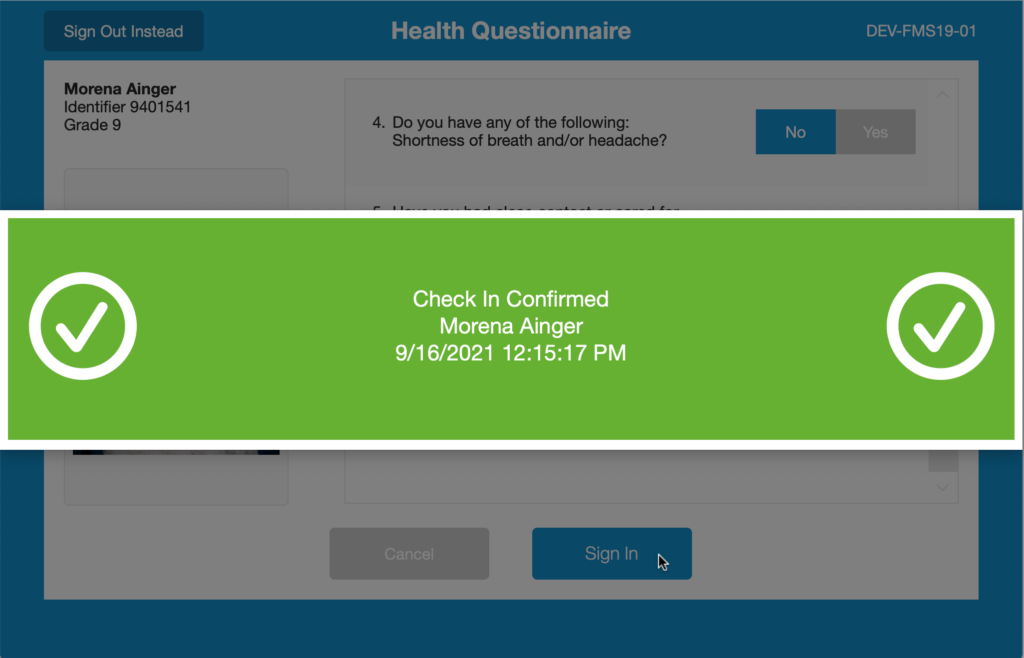
When the Check-In is Confirmed, a large green banner with a confirmation message will appear in the screen for a few seconds, and then automatically close and prepare the device for the next scan.
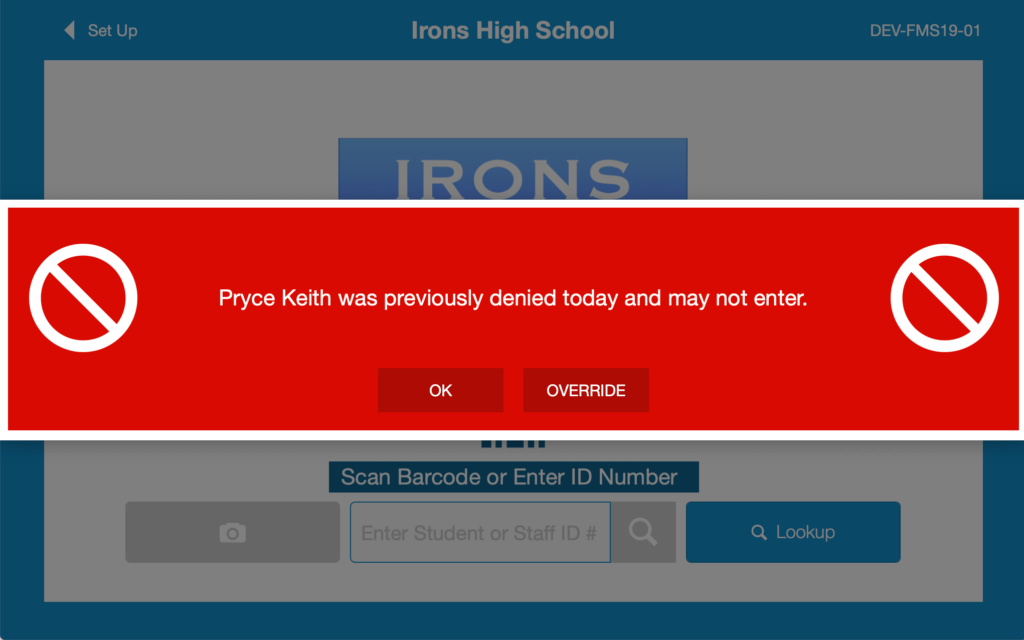
However, when one or more of the answers are not acceptable, the person is denied admittance and a red banner appears across the screen directing the student to see a school administrator. The message will stay onscreen until you click the OK button. In addition, an email is automatically sent to the administrator.
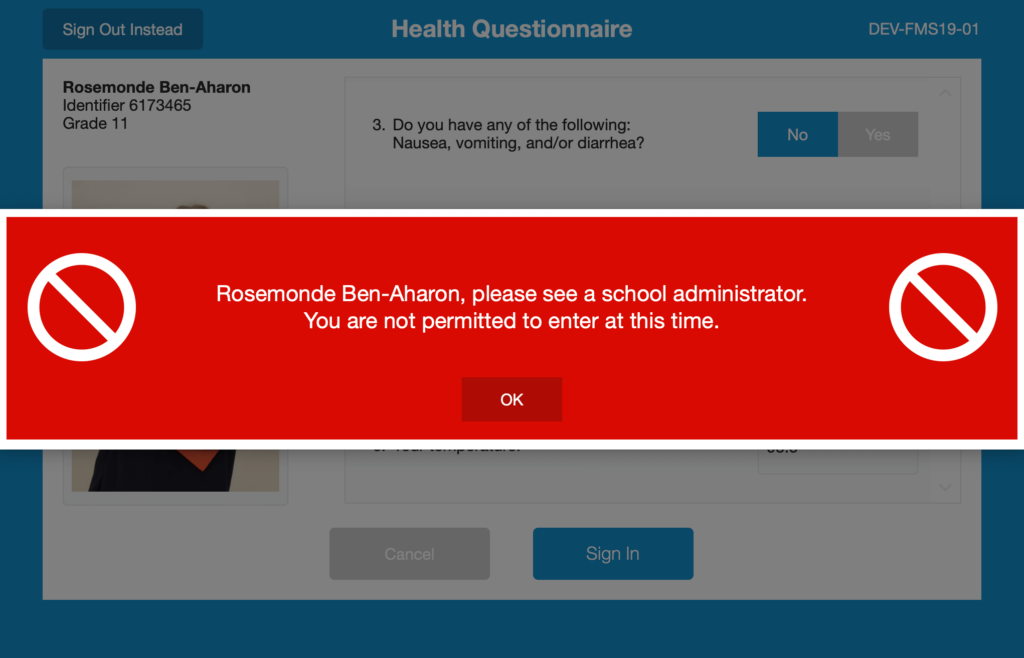
Once a person has been denied admittance, they will not be allowed to take the questionnaire again without the faculty member entering an override password.
Camp Admittance
Camp admittance uses the same admittance interface and process. The only difference is you must take the additional step of selecting a Camp for the Organization. Then tap the button Start Scanning.
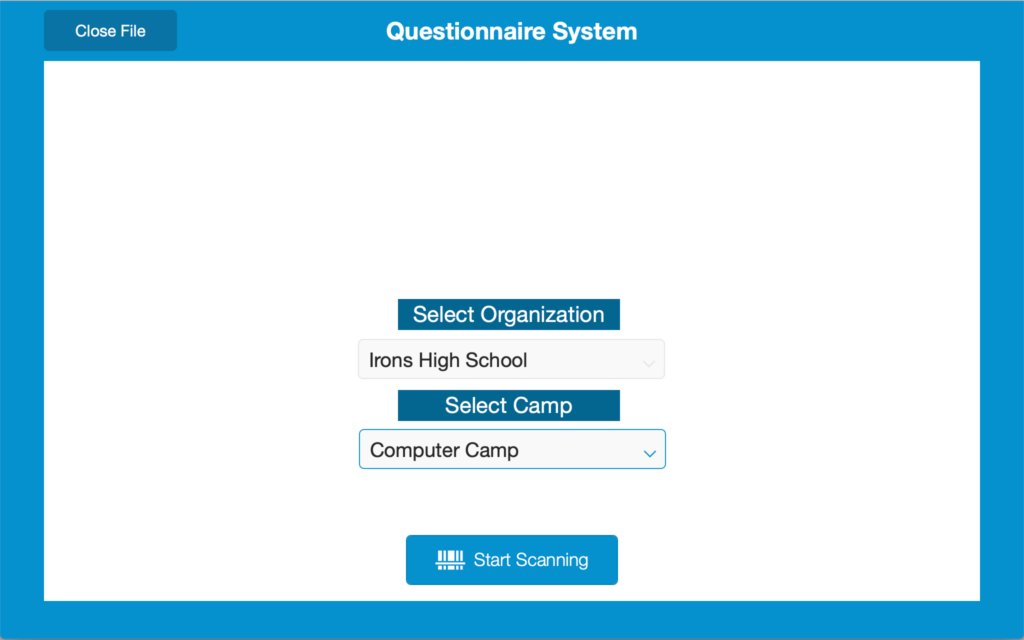
The camp admittance process uses the same admittance interface as outlined above, but with a few additions.
First of all, the camp’s image is displayed with the organization’s image.
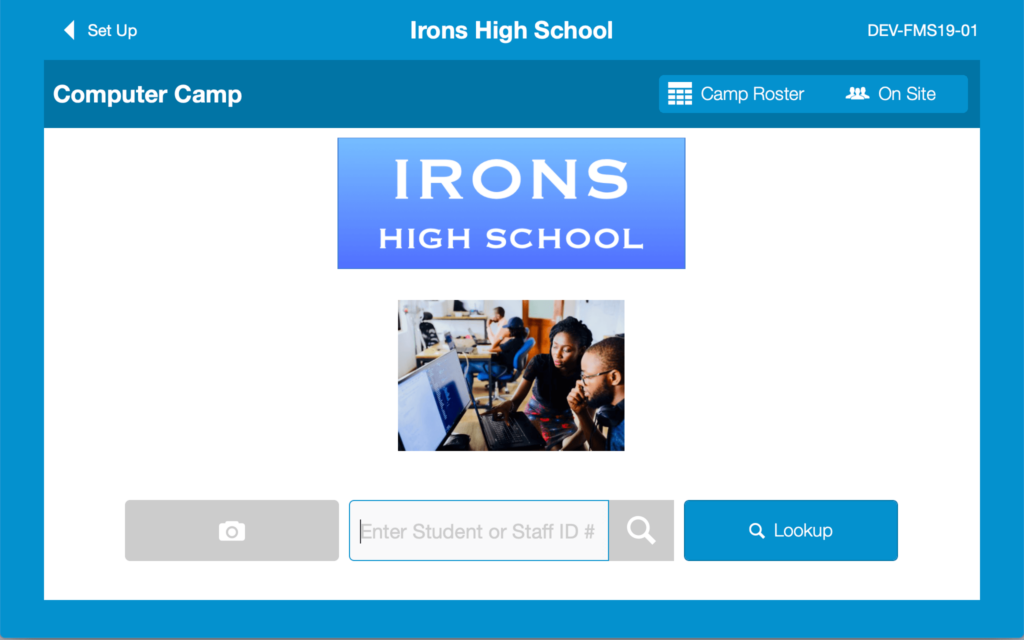
Secondly, there are a couple of additional filter buttons in the upper right corner:
- Camp Roster – will display a list of student’s included on the camp’s roster.
- On Site – will display the list of student’s already admitted to the camp.
The remainder of the scan process is identical to that outlined above.
Security
The app comes preconfigured with three privilege sets:
- Admin – [Full Access] privileges to the files.
- Kiosk – privileges for iPad user’s to scan admittance to an organization.
- Camp – privileges for iPad user’s to scan admittance to a camp.
- Roster – privileges to create, edit, and delete Organization, Student, and Event records.
See the included ReadMe document for the test credentials for each account.
Encryption at Rest
Both the files that comprise Soliant Health Questionnaire are encrypted. This helps secure the data in case the files fall into the hands of an unauthorized user. To open the files locally or to host the FileMaker Server, you must enter the encryption password, located in the ReadMe document included with the application download.
Installation
Soliant Health Questionnaire is comprised of two files:
- SC_Health_Questionnaire.fmp12
- SC_Metadata.fmp12
SC_Metadata.fmp12 is the same file that comes with our app Soliant Event Admittance. If you choose to run both apps, you only need one copy of SC_Metadata.fmp12 on your FileMaker Server.
License
Soliant Health Questionnaire is free for commercial and non-commercial use, licensed under the business-friendly standard MIT license, but cannot be redistributed nor resold. Soliant Health Questionnaire was developed by Soliant Consulting, Inc. with the generous contributions of Glenbrook High Organization District 225, Glenview, Illinois.
Customization Services
Soliant Health Questionnaire is a basic app built to meet the specific needs of one school district. Our team can work with you to customize it to meet your specific needs. This work can include:
- Integrate Soliant Health Questionnaire with your Student Information System (SIS) to dynamically refresh the student information. Note that Soliant Health Questionnaire and our related app Soliant Event Admittance share the same Student and other SIS metadata. Any integrations can be coded one time to benefit both apps.
- Integrate the student’s vaccination status into the scanning process to display a different questionnaire or perhaps skip the questionnaire.
- Display a different questionnaire for teachers and students.
- Add statical charting, such as percentage of declined admittance per day, week or month.
- Add additional reporting such as student vaccination list.
- Adapt the admittance interface to be optimized for an iPhone running FileMaker Go.
As a Platinum Claris Partner, Soliant Consulting, Inc. specializes in all aspects of FileMaker and Claris Connect, including development, integrations, and mobile solutions. We can extend and improve existing solutions as well as design new ones. See our website for more details and contact us for a free consultation and estimate.
FAQ
Can I use an iPhone running FileMaker Go to perform the health questionnaire?
No, the Soliant Health Questionnaire does not include layouts optimized for the smaller iPhone screens. However, we are happy to work with you to customize the app to meet your needs or you may customize the app yourself.
Can I automate the sharing of my Organization Information System data with Soliant Event Admittance?
Yes, you can use Claris Connect to configure a workflow to automatically refresh our app with your latest Student and Organization data.