The Road Less Traveled
Most of the focus on FileMaker 21’s AI integration will be on using OpenAI as the AI service provider.
But there is an option to host your own Large Language Model (LLM). Then you don’t have to incur subscription costs or have your data and queries leave your network.
Let’s jump ahead a little bit to what you will learn below in more detail. To use the new built-in AI scripts and functions in FileMaker 21.0, your data needs to be sent to the server that hosts the model.
If you choose an online service like OpenAI for this, bear that in mind. With the setup we share here, you can host your own model and keep your data in your control. Your new FileMaker Server comes with all the setup scripts and information you need to make this work. Let’s step through this.
Most of the AI demos from Claris up to this point were about asking the chat engines to return the proper SQL syntax that would find the data related to your question. That is also something we demoed in our blog from May 2023.
However, the AI features in FileMaker 21.0 are not about that. These new features allow you to do a semantic search.
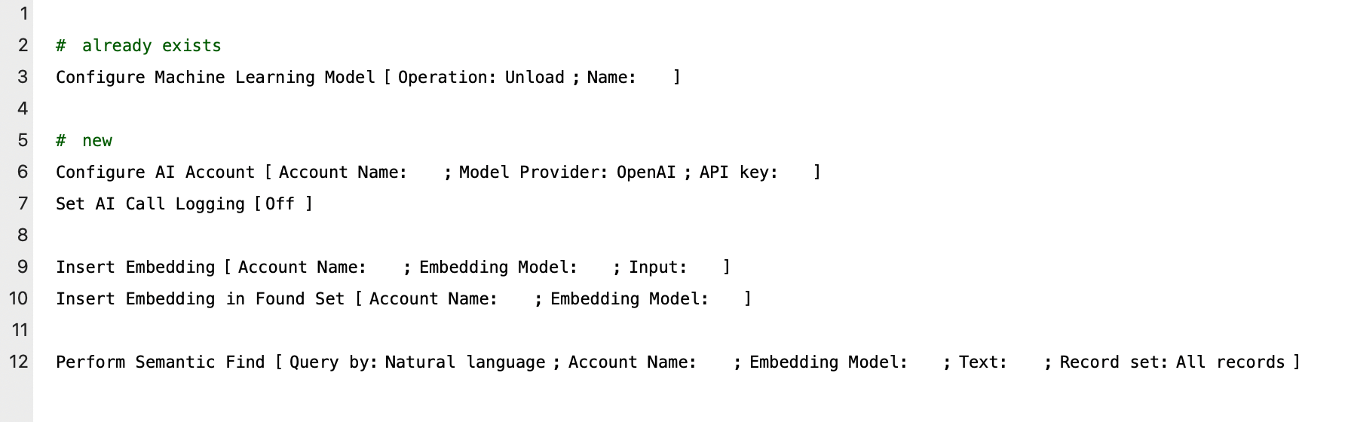
Semantic Search
The AI script steps in FileMaker 21.0 are geared towards doing a semantic search on your data. Below are all the AI script steps that you have available now:
With a semantic search, you can find relevant data by understanding the context of the search query or including synonyms. This is unlike your normal FileMaker searches that only find records based on lexical matches, meaning searching that is focused on exact matches or variations of specific words or phrases.
Semantic searches are not done on the actual data in your database. They are done on a representation of your data: an embedding.
Creating Sentence Embeddings
Before you can do a semantic search, you must create sentence embeddings for all the fields you want to do a search on. You do this ahead of time and store the embeddings as part of your record.
Then, when you set out to do the search you create a sentence embedding of your question. Then you ask FileMaker to compare that to the stored embeddings for your data. Matches between data are based on cosine similarity. You can set the cutoff of how close you want those similarities.
There is obviously a lot of math and statistics behind these concepts. I highly recommend the presentation given by Claris’ Chief Architect, Wade Ju, at the Engage 2024 conference.
Vectors
The other term you will hear often in this context is vectors. It’s how cosine similarity can be resolved by comparing vectors.
Let’s jump ahead a few steps and show you what that looks like.
If I have the string “my name is Wim, and I like baseball” in a FileMaker field, then the embedding for this will look like the screenshot below: an interpretation of the text as an array of numbers.
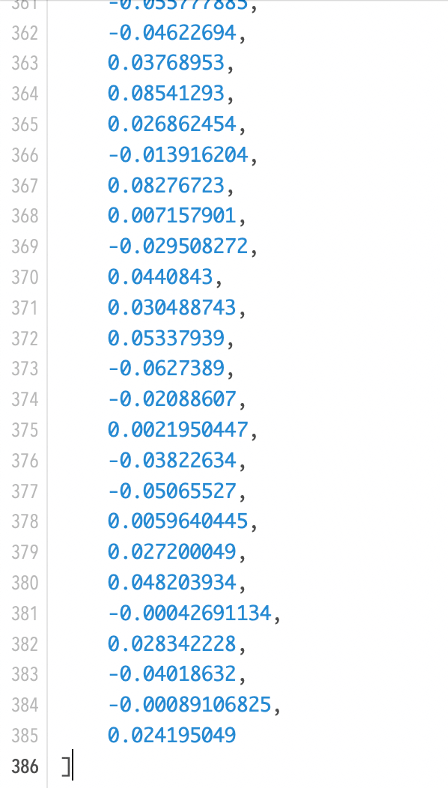
In this case, the array (or vector) has 384 elements in it. The number of elements is also referred to as dimensions. The number of dimensions is determined by the model you choose.
The more dimensions, the greater the accuracy and nuance of the answers that you will receive. However, the embedding and answering process will move moreslowly, since it must crunch more number
It is important to note that both your data and your query need to be embedded in the same vector space, meaning by the same model. Otherwise, they lack a common baseline for the comparison. Since your actual data needs to be embedded, this means that your data needs to be sent to the model so that it can create the embedding. That’s a security consideration you need to make: do you trust where your data is being sent to?
What are we working towards?
In FileMaker’s Configure AI Account script step, you will use the Custom option and provide your own endpoint:

After that, the other AI script steps work the same as if you were using the OpenAI option.
Which machine?
You may not want to run the LLM on your FileMaker Server. Some of this work is computationally heavy and will take away resources from your other FileMaker Server tasks.
The example scripts that Claris provides use Python 3, so you’ll need a server where you can support that environment. Using a Linux box with an ARM processor would be the obvious choice. You would get the most computational power bang for your buck.
Towards the end of this article, I will provide some specifics on system resources used and performance overall.
Which LLM?
The models that FileMaker can work with in version 21.0 are in the category of Sentence Transformers. And there are several of them that you can choose from.
Picking a model is an important decision. You must weigh the factors of accuracy, speed, the length of your query, and the length of your data.
The FileMaker Python script is preconfigured to use a model named all-MiniLM-L12-v2. You can find more information about it here.
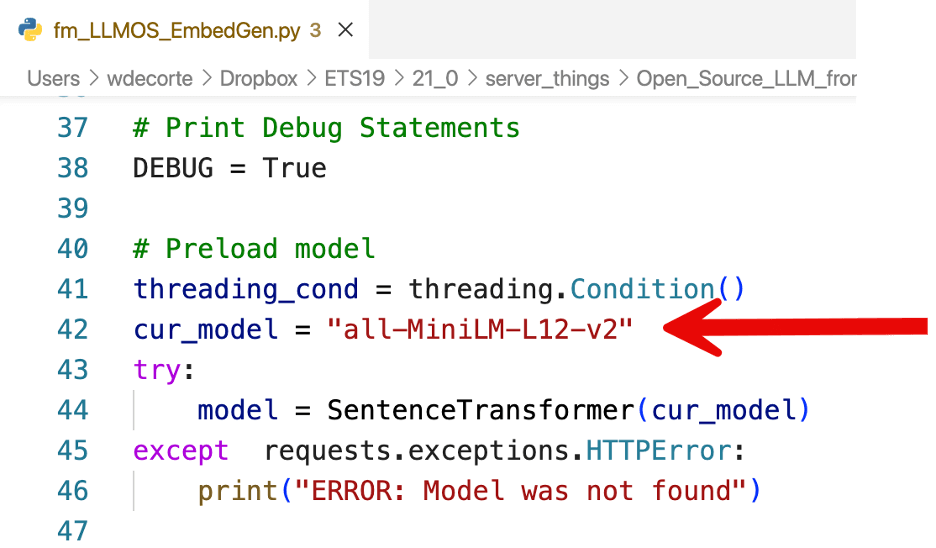
As we have seen earlier, it produces a vector with 384 dimensions. But it is also limited to inputs of 256 word-pieces, which is roughly 150 to 200 English words.
On the plus side, it’s a small model (only just over 100MB in size) and a fast one.
The readme that Claris provides lists a few other modes that Claris has tested, models that have different speeds, different dimensions, and different input length restrictions. These are listed here in descending order of performance. (Note that you can control some aspects of the performance by using a computationally powerful server to host the model).
| Model Name | Info |
|---|---|
| multi-qa-MiniLM-L6-cos-v1 | 384 dimensions Max input of 512-word pieces |
| all-distilroberta-v1 | 768 dimensions Max input of 128-word pieces |
| all-mpnet-base-v2 | 768 dimensions Max input of 384-word pieces |
It is important to note that the embeddings here are for the whole sentence provided or in FileMaker terms, for the whole content of the field. You get the 384 dimensions of meaning (for the default all-MiniLM-L12-v2 model) for the field (the sentence). That’s the meaning of Sentence Transformer.
There are other models that provide that many dimensions per word in the sentence. But those are not in play here.
Setting Up the Environment
Copy the folder named Open_Source_LLM from your FileMaker Server to the target server, the server where you will run the LLM model.
On your FileMaker Server, you will find that folder in:
FileMaker > FileMaker Server > Tools
Most of the instructions below are also in the readme from that folder, but we will provide some more context. All actions here are performed on the server where you will host the AI model.
Security
Because you will be sending your data to the model to create those numerical representations of it, the embeddings, security is very important.
The Claris script, by default, requires the use of an SSL certificate to encrypt data in transit, plus an authorization token in all calls that are made to the model. You can disable this protection in the Python script, but I highly recommend leaving these enabled. If you are currently uncomfortable dealing with SSL certificates and authorization tokens, this is the perfect opportunity to tackle that and get through the learning curve.
SSL Certificate
You’ll need to combine your SSL certificate and intermediate bundle into a single file. An example of doing that is in this blog post on deploying an Nginx reverse proxy.
Then, use the command line export command to set an environment variable to the location of both your cert and your private key:
For me, these were the two commands:
export CERTFILE="/Users/wdecorte/ets_fm_combined.pem"
export KEYFILE="/Users/wdecorte/ets_fm_key.pem"
Authorization Token
When you use an authorization token to call an API, which is what you will be doing here, then that auth token needs to be verified by the receiver so that it knows if it is a valid token.
The mechanism that Claris uses for this is the same Public Key Infrastructure (PKI) feature that was introduced for logging into the Admin Console, starting with FileMaker Server 19.6.
The mechanism works like this:
- You generate a private key and a public key.
- You provide the location to the public key to the Python script (aka the API that runs the model).
- You use the private key to generate and sign a JSON Web Token (JWT) that will be used as the authorization token for all calls to the API. With the public key, the API can verify that the signature on the token is valid. The token itself also has an expiry, so you can rotate that token periodically for greater security.
Claris has a knowledge base article that describes how to generate those keys and the JWT token using Python.
You can also use the NodeJS microservice that we have put together to make this a lot easier. We describe this in our blog post for FileMaker 19.6. You can grab the code directly from GitHub here.
The JWT token will serve as the authorization token and will be used in the FileMaker Script. You will see that later.
The location of the public key needs to be set in the machine’s environment with the export command so that the Python script knows where to look for it. For me, this was the command:
export PKI_KEYFILE="/Users/wdecorte/pub_key_ets_LLM_2.txt"Miniconda
The Claris code uses Conda – specifically: miniconda – to manage the overall environment to run the Python scripts in. It creates an isolated environment that doesn’t interfere with what else you may already have on that server, including other versions of Python. There are a few different options available here for you to deploy this, including docker images, if you do not want to dedicate a machine (physical or virtual) to host your model.
For the rest of this walkthrough, we are going to use the Claris documentation. We also assume that this is installed directly onto the OS of a server of your choice.
These are the commands that you run to make sure that you can execute Claris’ Python script and launch the model. The name that we will give the environment is twentyonezero.
First, download and install miniconda from the Conda link above. Then:
conda create --name twentyonezero
conda activate twentyonezero
From this point forward, everything you install will be inside the twentyonezero environment.
conda install python=3.9.18
pip install jwt
pip uninstall PyJWT
You may get errors here that PyJWT is not installed. That’s ok.
pip install PyJWT
conda install -c conda-forge sentence-transformers
With all of this done, you can now run the Claris python script that hosts the model and makes it available:
python3 fm_LLMOS_EmbedGen.pyIf all the prep work was done properly, you should see confirmation that the model is up and running:

Next Steps in FileMaker
Connect to the LLM server
This brings us back to the first screenshot in this blog post. In FileMaker, create a script that connects to the LLM server so that the model(s) it hosts and its functionality will be available. The connection is in the form of an account name that represents the URL where your LLM model is hosted and the authorization token for it. That account then lives in memory until you call the Configure AI Account again with different settings or you close the file. For all calls to your LLM account, you will just use the account name.
Choose Custom instead of OpenAI and add the url to your model. By default, it uses port 8080, and since you have an SSL certificate deployed, use https. For the API key, provide the JWT that you generated earlier.

You’ll note that we named the account twentyonezero to keep things simple (same name as the Conda environment). However, this can be any name you want to give it. It does not have to match the Conda environment you set up on the model’s server.
Use the Model’s Functionality
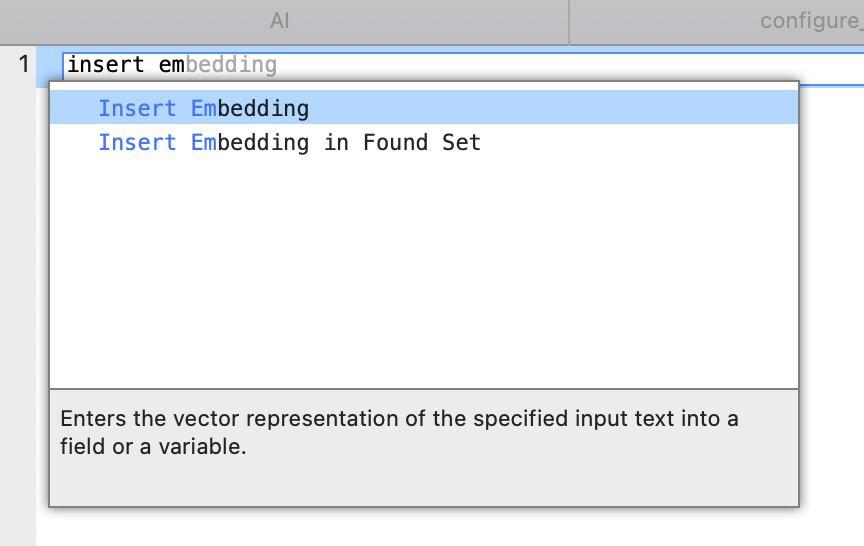
The data that you want to search on needs to have its embeddings generated. FileMaker can do that for a single record or for a found set with two script steps:
Both options let you specify the source field (where is the data?) and the target field, where the embedding should be stored. The target field can be a text field in which case the array will be just that: text. Or you can choose a container field.
For best performance, choose a container field. It will allow FileMaker to process the embeddings faster when you do the semantic search.
(Note that the _c suffix on the field name in the screenshot below indicates “container” vs. the same embedding field with a _t suffix to indicate the text version of the embedding).
In the script steps that call the model’s functionality, you have to specify both the account name and model name.

Having to specify the model’s name is a little odd since there is only one model you use in this custom setup. When you use OpenAI, however, you need to specify which of the OpenAI models you want to use. But in the scenario we are discussing here, there really is only one model, so specifying it feels a little redundant.
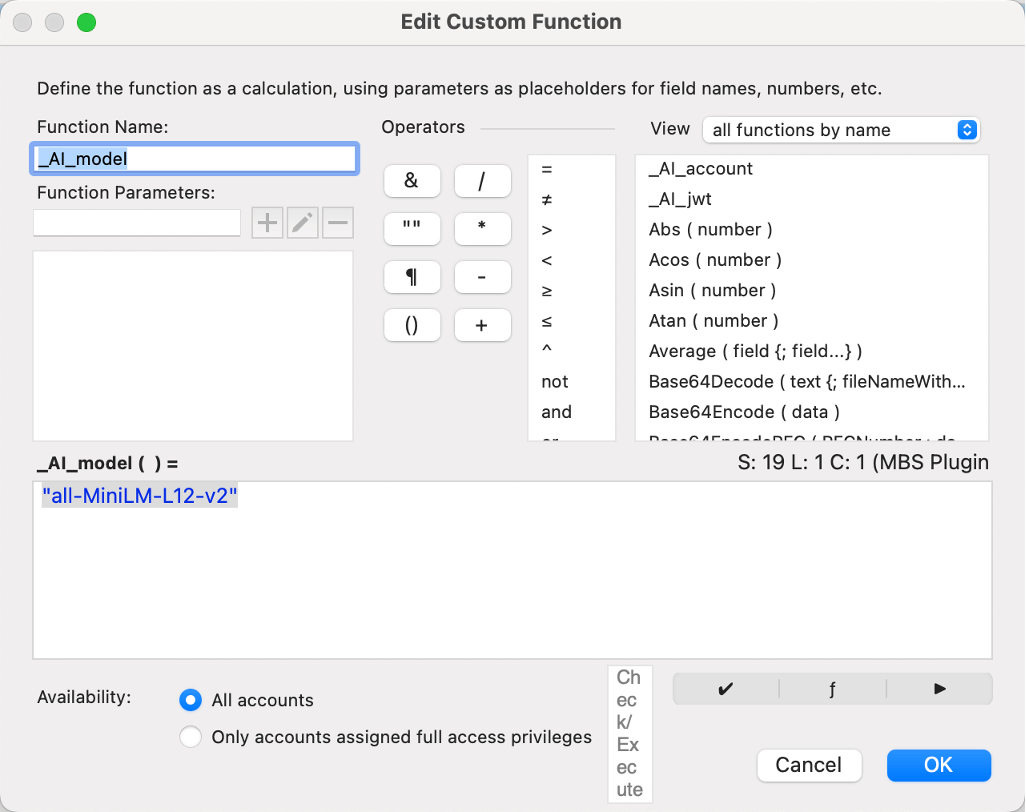
Given how many times you’ll find yourself specifying the model name and account, I suggest you store the name as a custom function and use that custom function throughout. Below, I have custom functions named _AI_account and _AI_model
So that I can use them like so:

Which model again?
Earlier, we had already covered the differences between models and how the Claris script defaults to the all-MiniLM-L12-v2 model. But you change models on the fly. When your LLM host detects that you are specifying a model that it does not have, it will download it and use it:
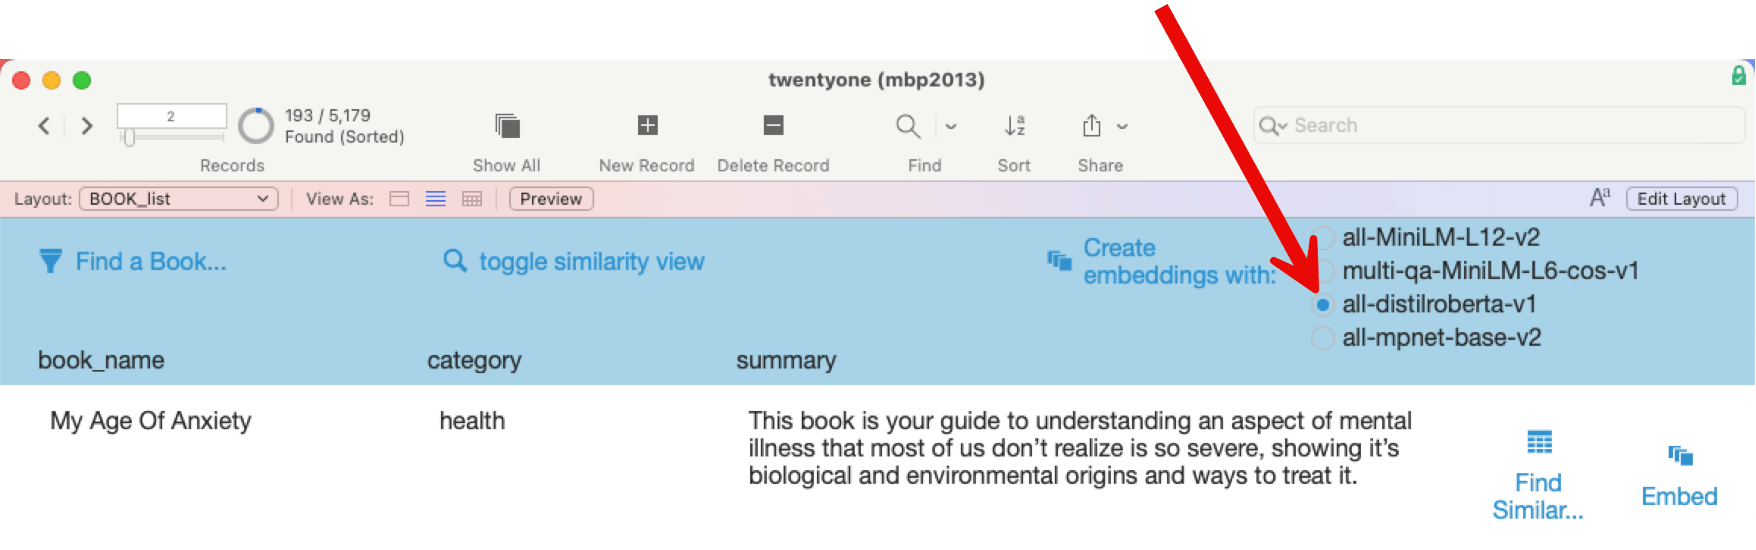
All you need to do is use a valid model name in the Insert Embedding script steps. Remember, though, what we said earlier: you’ll need to use the same model to create the embedding for your question.
Your Data is Too Structured
One thing you will find quickly is that semantic searches really aren’t meant for searching across different fields in a record or for data that has no context on its own, like an invoice total.
The Importance of Context
Semantic searches require the data to be a sentence or a story and to have context. This is why most of the demos you will find use unstructured data like movie plots. Or complete documents to search within. Or book reviews, which I will use below.
That means that you will need to provide the context in a sentence and in a field. Then, embed that field for the semantic search to be performed on.
It will take some experimentation to determine how best to do this for your data. For instance, in my collection of book summaries, I could create a field named to_embed, set up as a text calculation with this formula:
List (
 book_name ;
 category ;
 summary ;
 "This is a book record. A book has a title, category and summary."
)
Or a calculation like this:
Quote( book_name ) & " is the title of a " & category & " book, and its summary is: " & Quote( summary )Then, create the embedding on that field.
Be mindful of the limitations of the model you choose so that your sentence does not get truncated when it exceeds the maximum allowed input length.
Making High-Performance Choices
As mentioned, use the container storage option for your embedding, as it is the most performant option. For our demo file of 5,000 book summaries, with an average length of the text to be embedded of roughly 310 characters (or 53 words), this added about 21MB worth of data, or about 4 to 5KB per embedding. When you choose a model with more dimensions and a longer allowed input, then those numbers would be higher of course.
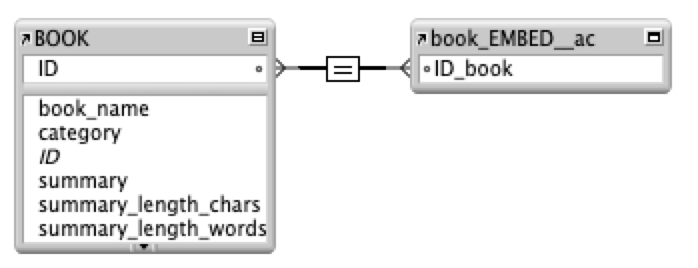
Architecturally, you should consider creating a separate embeddings table (or even file) and linking it through a relationship to its data origin instead of creating the embedding container field on the actual data record (in BOOK). This allows you to create embeddings for the same BOOK record, for instance, using different models. Like all design choices, there are pros and cons. We will highlight one of those consequences later when we discuss performance.
Given the choice above, creating an embedding for each record in my table then is as simple as this script step:

Performing a Search
The power of semantic searches, of course, is that you can ask your question in natural language. For instance, I want to find all books that deal with mental health:
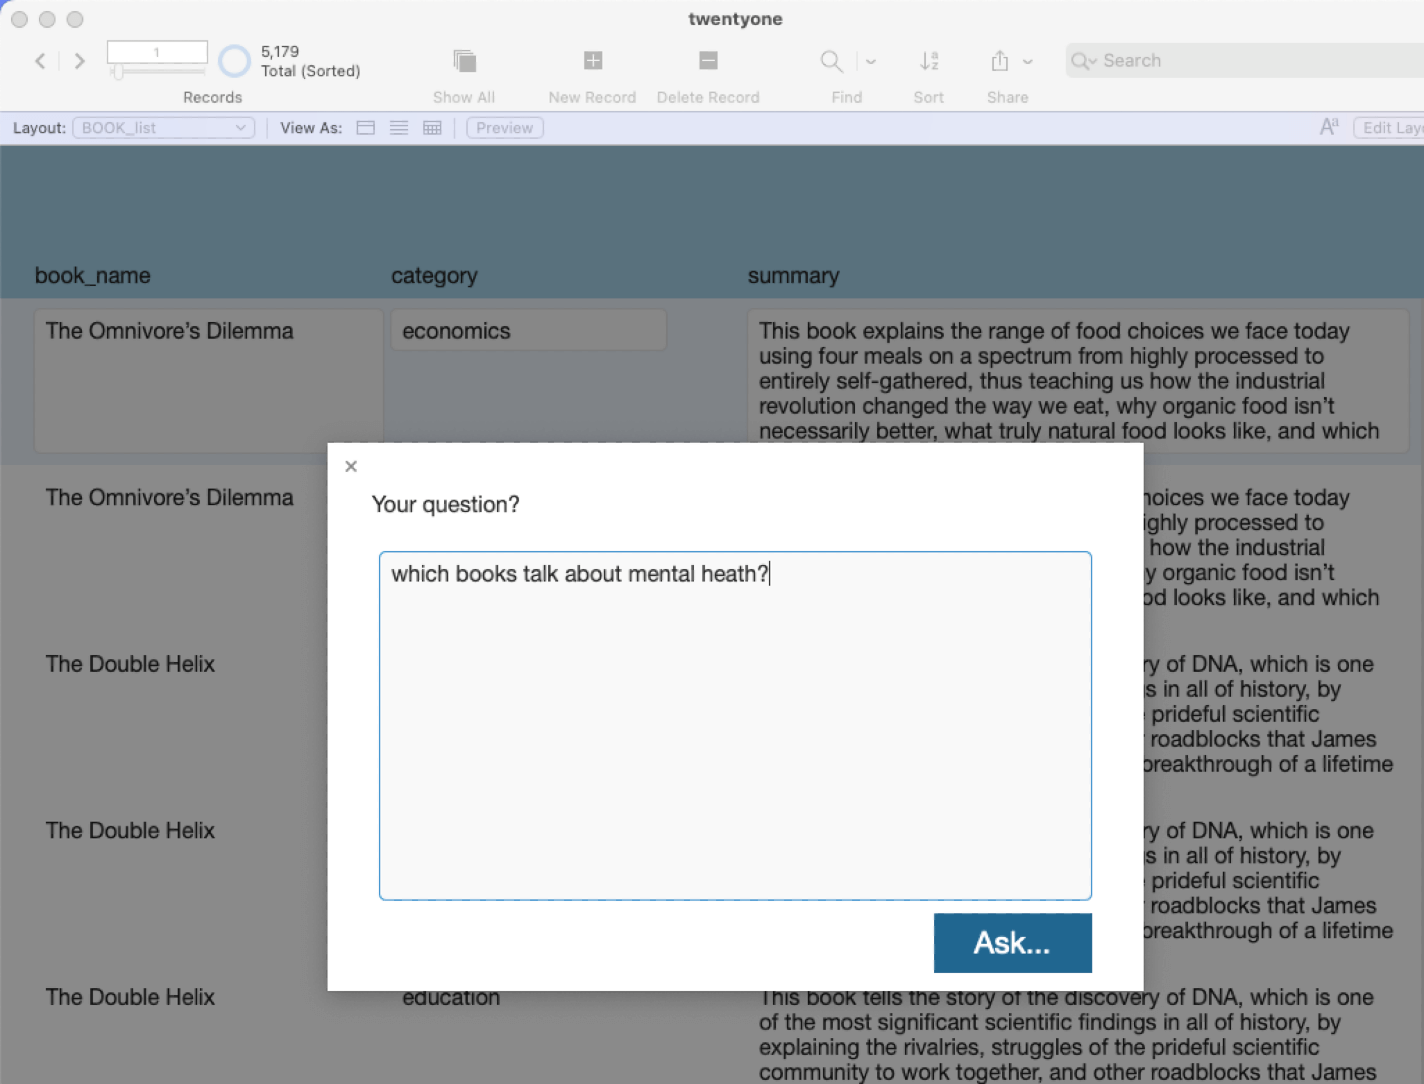
In this demo, you type in a question in a global text field named _GLO::question_gt. The script takes you to the embeddings table because the search needs access to the container field where the embedding is stored. In my setup, embeddings are stored in their own table.
Natural Language Option
By choosing the Natural language option, the question will be sent to the model to create its own embedding on the fly so that the embedding of the question can be compared to the embedding of the books.

If you have the embedding of a question or any other embedding you want to use as the input (for instance, to find similar books to an existing book), then you can choose the Vector Data option:

The next parts of the script step are where you specify the AI account and model.

And the input for the search (which only shows up when you use the Natural language option; for Vector data, you specified this by pointing to where the existing embedding is).

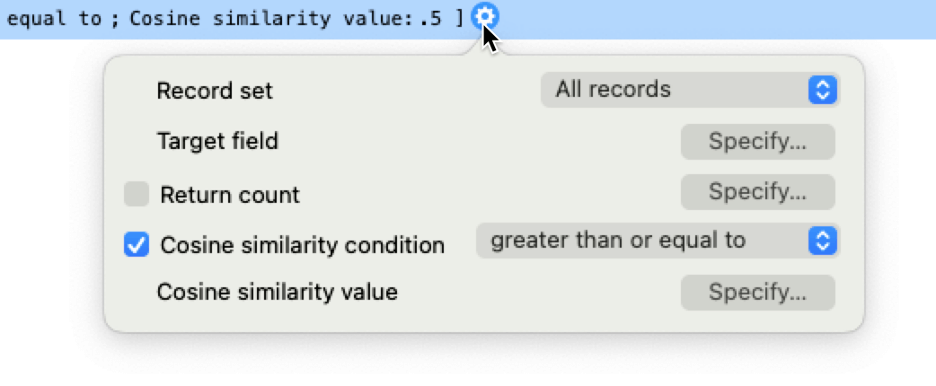
Next, you specify how many records will be searched against (all or your current found set). Then, specify which field holds the embedding to search on.

Lastly, you specify how close the matches need to be (on a scale between 0 and 1). This, too, will require some experimentation on your data to pick a cutoff that includes enough relevant records without too many irrelevant ones.

Most of these options also show up when you click the little gear icon next to the script step. However, there is one that only features there: the option to limit the number of records to be found, the Return count.
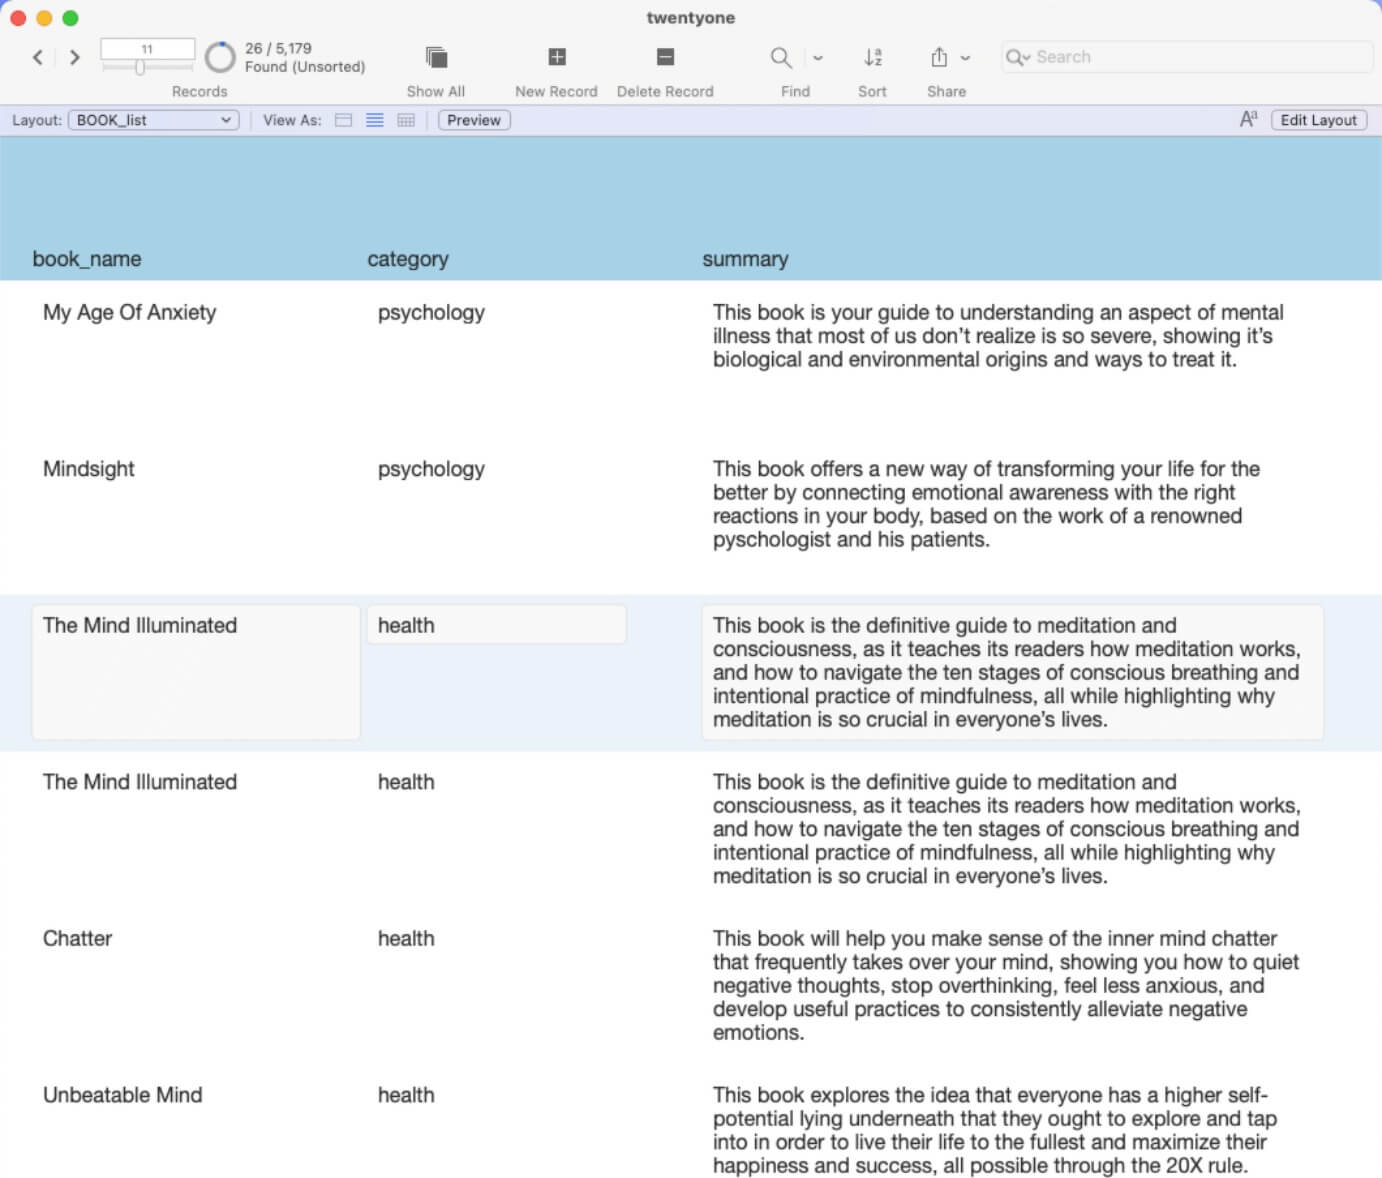
Running the search for which books deal with mental health? My book reviews give me 26 results:
Leveraging the Power of Semantic Search
This shows the power of semantic search. If I simply searched for “mental health” in a traditional FileMaker search, I would not have found many of these books.
The Semantic Search automatically sorts the found records in descending order of similarity. The most relevant match is at the top. But because in my setup, that sort is on the table with the embedding container and I use a Go To Related Record to go back to my books table, I lose that sort order. More about that under Performance.
Next Steps: A Better Deployment
As it is set up at this point, the Python script’s execution is tied to the shell session that it launched in. If you log out of that shell session or if you reboot the machine, then the model will not be available.
PM2
Just like what we do with a microservice, you can make this script a background process by using PM2. See this blog post on deploying microservices for more info.
With PM2 installed, it just takes a simple command to execute the Python script and have it run independently:
pm2 start fm_LLMOS_EmbedGen.pyWith the command pm2 list, we can check its status:

Nginx
The Python script that makes the model available can be treated exactly like an API microservice. Like with any microservice, you can put it behind a reverse proxy so that you can use the regular https port 443 and an SSL certificate at the reverse proxy. For an example of how to use Nginx in this capacity, see this blog post.
This also allows you to secure your model server behind the proxy server so that it only accepts connections from your proxy server.
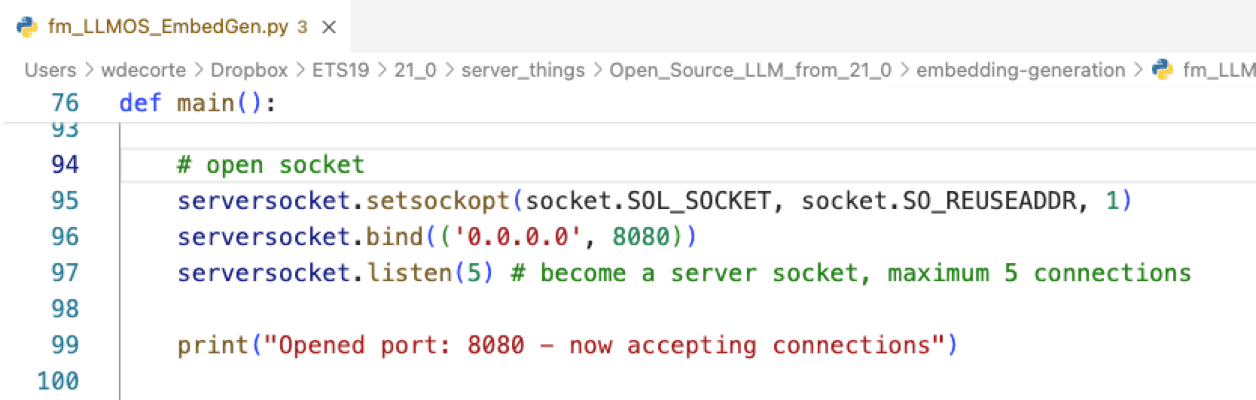
Line 96 in the Python script determines both the port that it listens on and the IP address that it allows connections from. 0.0.0.0 means from anywhere.
Performance
Creating the Embedding
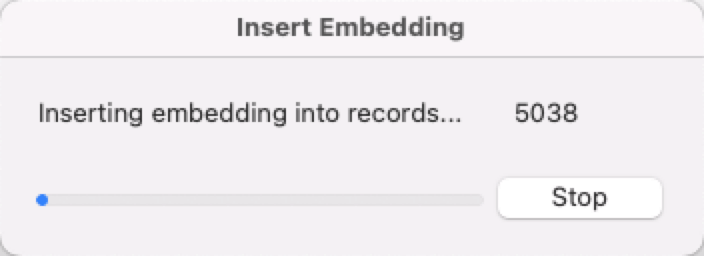
Single record embeddings are fast enough to not be a big hassle. Unless, of course, you do these in a loop, at which point it becomes like the bulk insert embedding script step.
The bulk embedding functions very much like a Replace, so you will see a dialog like this one:
The speed here then largely depends on how far your FileMaker Server is from where you are with FileMaker Pro. If your FileMaker Server is not on your network, then the traffic generated by pushing the embedding file to your server will be the slowest part of the operation, not the calls to the model server.
As an example, with the FileMaker file locally and the model server on my own network, creating a bulk embedding for 5,000 book reviews took about 30 seconds. When I used a FileMaker Server a few hundred miles away, it took several minutes. Nothing unusual about that; the speed here is largely determined by the distance (latency) between you and your FileMaker Server and you and your model server.
On the model server, the memory consumption does go up significantly, from a dormant state of consuming around 70MB to close to 1GB under load:

By default, FileMaker will send 20 records per call to the model server. You can adjust that number up or down (to a max of 500) by passing a JSON formatted parameter to the script step:
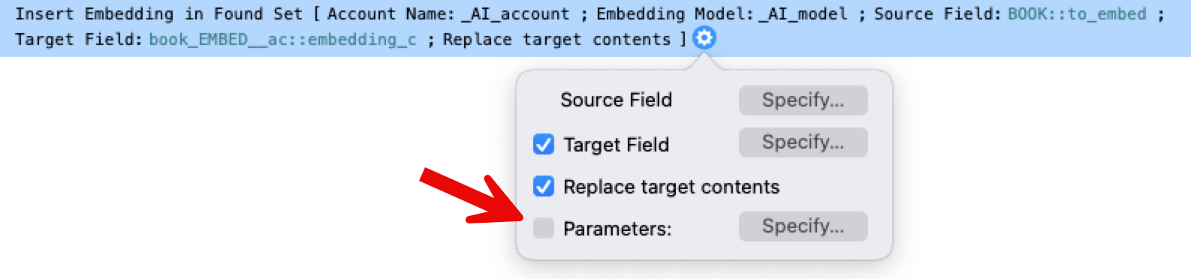
The default setting of 20 is the equivalent of using this as your parameter:

Running the Search
When performing the search, the embedding container needs to be retrieved for each record so that it can be compared for similarity. Again, depending on latency and speed, you can expect to see this kind of dialog.
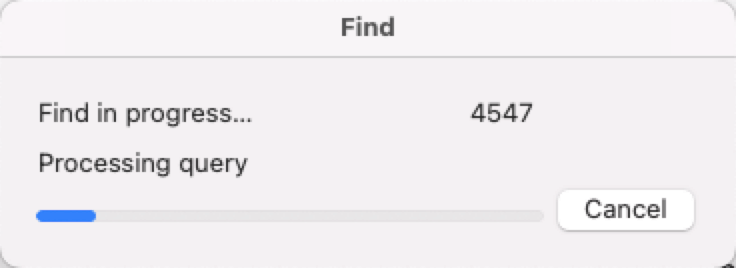
Once the data is cached locally, after the first search, then subsequent searches are very fast. The first search is where most of the penalty is incurred. This assumes, of course, that your underlying data does not change. This would require a new embedding and, thus, a cache refresh on the client for the changed records.
Hardware Considerations
Additionally, FileMaker will try to make use of advanced hardware acceleration features of your client machine if they are available (AVX, AVX2, AVX512, Neon). That means that older hardware can be significantly slower when it comes to making these comparisons if they lack these features or have older generations of these features.
FileMaker automatically sorts the found records with the highest semantic match first. If – like in my setup – you store the containers with the embeddings in their own table, this may not be useful to you because you want your actual data sorted in order of relevance. One way to achieve this is with an unstored calculation that uses the new CosineSimilarity() function:
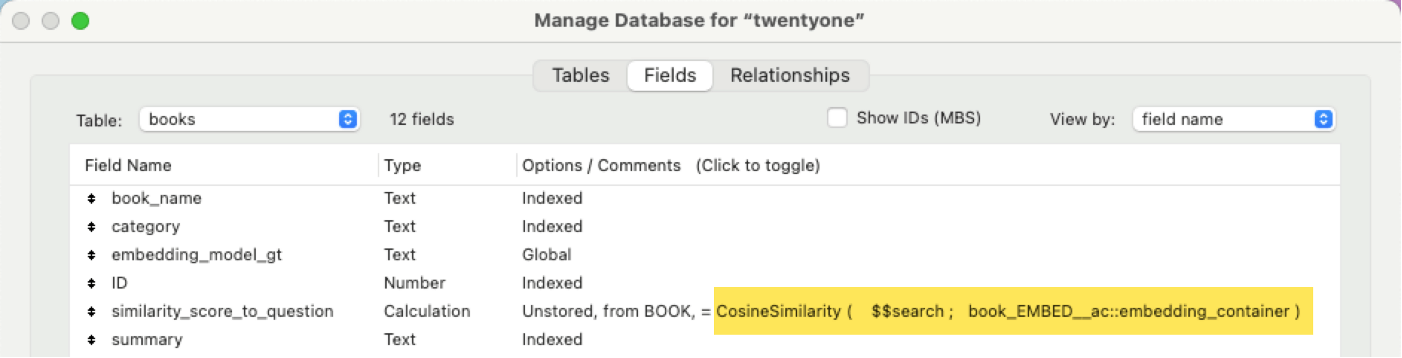
In the calculation shown, $$search represents the embedding of what I search for. (This is a question or an embedding of a book to compare to embeddings of other books). Then book_EMBED__ac::embedding_container is where the embedding of a book is stored. (It’s in its own related table).
Because this is an unstored calculation (you want it to update on the fly whenever you use it), there can be a performance impact, especially with larger record sets. So, experiment with what is the best approach for you. This could be one of the factors that makes you decide for or against storing the embedding in the actual data record or not.
Log
You can log all calls made to the model server with this script step:
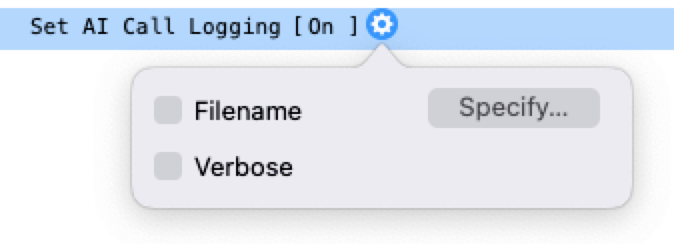
If you do not specify a file name for the log, it will go into the user’s Documents folder under the name LLMDebug.log. The log has a max size of about 30MB and rolls over into a new log when it hits that approximate size.
With the Verbose node turned on, the log will record every single request to and response from the model server. That means all the data that you wish to have embedded will be logged in plain text. Tread carefully here.
For semantic search calls, only the natural language query is in plain text.
Only one roll-over log is kept. If you are sending a lot of data to be embedded, you may lose some valuable info in verbose mode. Consider sending data in batches so that you have a chance to inspect the log.

When you run these AI script steps through PSoS or a server-side schedule then the LLMDebug.log file is in the standard FileMaker Server logs folder.
Moving Forward with AI Semantic Search in FileMaker
Our FileMaker consulting team believes that knowing how to set up a private LLM server is a critical skill. It protects all data flows, especially for creating the embeddings necessary to perform semantic searches and similar future features that may require the same level of protection and privacy.
Our team of FileMaker developers and AI experts are excited to put these new FileMaker 21 features to work. We can help you build an AI strategy for your operations and applications to enhance your workflows. Contact us to talk with a consultant today.
Hi Wim, your writeup is fundamental reading! One note, there is a typo in the model name under “Which model again?”.
There is an underscore where there should by a hyphen. Found out by being a lazy typer and copying it into my script
Thanks, Salvatore. Good catch, we’ll get that corrected.
Another great post Wim!
I have followed everything and have have a conda instance up and running with the final terminal response of “Opened port: 8080 – now accepting connections “. In my FM script the Configure AI Account step runs without error but the Insert Embedding returns an error of “Timeout was reached”. I’m only embedding a field in a single record with a short paragraph of text – have you run into this before?
Thanks, Kirsten!
No, I haven’t run into that. Sounds like it is either a networking issue or a processing power issue. When you make the embedding call, do you see the machine that runs the LLM generate more CPU activity?
No – the CPU does not seem to be affected at all! There is plenty of CPU available as the baseline is under 2%, plenty of RAM available as well.
I also tried Set Field with GetEmbedding, which just returns ‘?’
Wim, thanks for this excellent information!
I’ve had this running on a test server for a while and I noticed that the Python script running with pm2 frequently goes into a state where it is using 100% CPU. It will stay this way indefinitely (days) until I stop it or run the pm2 start command again. It doesn’t seem to be related to an actual request, the process just randomly pegs the CPU.
Have you run in to anything like this? For now, I’m working around it with a cron job that does a pm2 start every hour.
Hi Greg,
We haven’t seen that (yet?). I have several machines running pm2 with variations of that python script.
Best regards,
Wim