The Force.com IDE is one of two IDEs that we use here at Soliant Consulting. The other one is MavensMate. I personally prefer the former at the moment, mainly because of the Synchronize perspective, which, as mentioned below, can be very useful in different situations. Some of my colleagues prefer the latter, so you may want to try both by yourself and then decide. (Also, keep in mind they may both undergo changes with the release of the new Tooling API in Spring 13.)
In this post I will explain how install and configure the IDE to work on projects with and without version control. Of course, we would recommend the use of version control, especially if you are working with a team of developers. Version control will allow you to store all changes (that have been committed to the repo) and be able to roll back to previous versions. If you are in a team environment, you can also use version control to transfer changes between different orgs through version control, as described in the post Team Development in the Force.com platform.
Note: The Force.com IDE was created on top of Eclipse. We might refer to it by either name.
Important Note: if you are going to have both MavensMate and the Force.com IDE installed do NOT share their workspaces. Have a separate workspace for each, even if you think you might try alternatively working with both in one project.
Force.com IDE Installation
To start setting up your SFDC development environment with the Force.com IDE, follow these steps:
- Download either the full Force.com IDE or, if you already have Eclipse installed, the Force.com plugin, and install it
- Install the SVN Eclipse plugin:
- Open Eclipse
- Go to Help > Software And Workspace Center
- Enter sub in the Quick-Add Popular Plugins section. You will see the Subeclipse and Subversive plugins listed. Either one works
Setting up your project
Once you have the IDE all set up you will need to set up a project to work on. We give you the steps for setting it up with or without version control. These are your options:
- If you are not planning on using version control: A
- If you are planning on using version control, but the project is not yet under version control: A + B
- If you are planning on using version control, and the project is already under version control (but you don’t yet have your own working copy in your workspace): C
A. Creating a new project from an org not using version control
Here you are just setting up a project in your local workspace and connecting it to your org:
- Go to the Force.com perspective (Window > Open Perspective)
- Right-click on the Package Explorer view > New > Force.com Project
- Enter credentials
- Optionally, increase timeout to 600 (the max)
- Click Next
- Now you can either go with the default metadata or choose the metadata you’d like to retrieve selection the radio button “Selected Metadata Components” and clicking Choose
- Click Finish
B. Committing the code to the version control repository for the first time (1st commit)
If you are not planning on using version control, that’s as far as you need to go in this section (don’t forget to check out the “Salesforce-specific Force.com IDE views,” though). If you are planning on using version control, the first thing you need to do is to create a version repository (we will be using Subversion here). You can create it from the code repositories view in Eclipse:

Once the repository has been created you need to do the first commit. This is quite simple once the project has already been created in the previous step. Just do as follows:
- Right-click project > Team > Share project
- Select repository location or create a new one
C. Creating a new project FROM version control
Remember, this is the case where we assume that the code has already been committed to the repository (the first commit has already been done). In that case, to create your project in the IDE you should do this:
- First you will need to add the repository to check out
- Go to the “SVN Repository Explorer” perspective
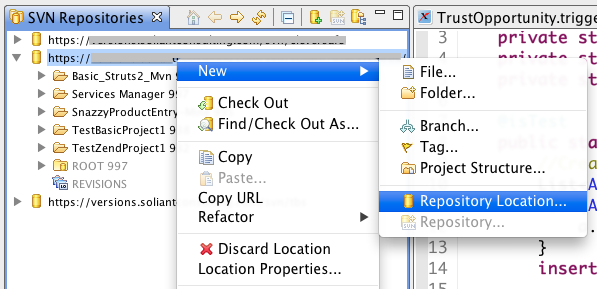
- Right-click the SVN Repositories view > New > Repository Location > Enter details and click Finish
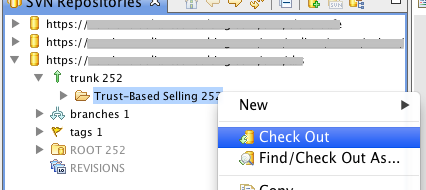
- Select the project, right-click and choose Check Out:

- Once the project has been checked out in your working directory go back to the Force.com IDE perspective
- Right-click project > Force.com > Add Force.com Nature
- Right-click project > Project Properties > Enter credentials
- When the IDE asks if you’d like to Override/Refresh everything from server select NO
- Go to the Force.com synchronize view (right-click src folder in project > Force.com > Synchronize with Server)
- Review any changes that need to be pulled from your org or deployed to your org from the project
Using Version Control (specifically SVN)
Committing changes to SVN
Once you have done some work on the project you will want to commit those changes to the repository. To do so, I’d recommend that you go to the SVN Synchronize perspective (Right-click project > Team > Synchronize with Repository) and look at the outgoing changes. Review any outgoing changes, select those that should be committed, and click Commit.
Updating changes from SVN
If there are other developers working on the same project you will want to retrieve the changes that they have committed to the repo. For this I’d also recommend using the SVN Synchronize perspective, so that you can see what changes are coming in from the repository.
Once you update with new changes from the repository the IDE will automatically deploy them to your org.
Salesforce-specific Force.com IDE views
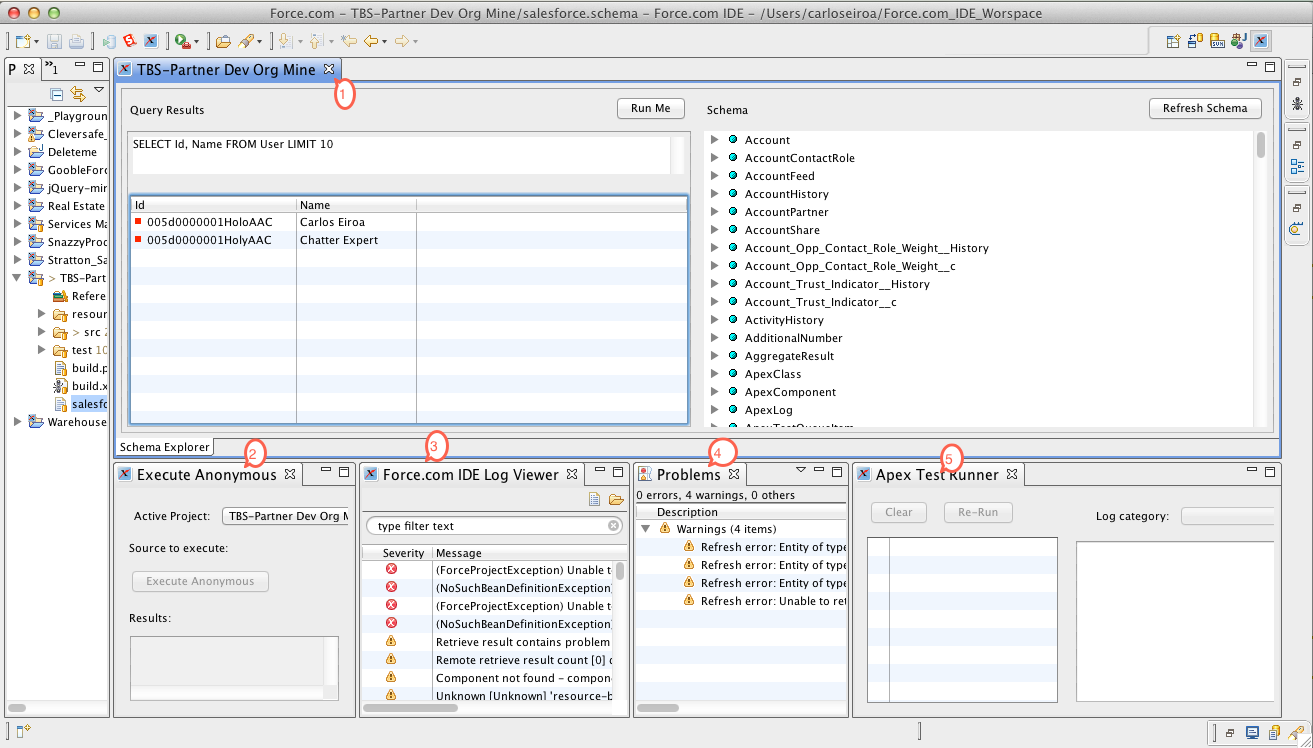
These are all the Salesforce-specific views (sections) in the Force.com IDE (they are all very useful for development):

- Salesforce Schema: you can run SOQL queries and see the field on each object
- Execute Anonymous: allows you to run anonymous Apex
- Force.com IDE Log Viewer: shows you the application logs
- Problems: shows you problems (errors and warnings) for each project. The view itself is not Salesforce-specific, but the problems listed are
- Apex Test Runner: you can run tests for here. I wouldn’t recommend you to run all tests for a project here (it’s kind of slow – much faster to run them through the web interface), but you might want to use it to run tests one at item. For example, if you see through the web a test fails you can go and re-run it from here, since you don’t get logs in the web UI by default, but you do get them in the IDE.
Hi Carlos,
Thanks for your posting. Very useful info. One question I have is are you assuming here that each developer’s Force.com IDE project is tied to their own personal developer org?
Otherwise I am thinking once the developer does a “Synchronize SVN” from their project, any changes pulled down from SVN will cause a ‘build/save’ of any updated assets back into the cloud. “Once you update with new changes from the repository the IDE will automatically deploy them to your org.”
If there are multiple developers working in the same org/sandbox, this could cause problems if an older version of a file in SVN is synced to a new developer’s IDE project which then subsequently overwrites a ‘newer’ file in the cloud that another developer is still working on and has not yet committed.
Have you encountered this scenario before?
Thanks,
Lionel
Hi John,
That's correct. We assume that each developer will be working on his/her own development environment. We have tried having multiple developers working in the same Sandbox (this happens in cases where the client has only one Developer Sandbox and Developer Orgs cannot be used because of some AppExchange app that cannot be installed in these orgs), and we have encountered the problem you describe. Take a look at my post on Team Development in the Salesforce.com/Force.com Platform for more info on how to organize the development environments.
Regards,
Carlos
Hi Carlos,
Great article, one thing we noticed is that the salesforce.schema is outside the source folder, when we click on it in the force.com ide, it seems to show what is on our server, but the file is empty, so we cant commit it to svn.
Is there any trick you have other than manually downloading and uploading it back up?
thanks
Joel
Hi Joel,
The salesforce.schema file is just a placeholder file. It's used by the Force.com IDE to let you see the database schema (objects and fields), as well as run queries against it. However, it’s not really empty. It you open it with a text editor you will see that it contains the text “place holder.” Therefore it’s a valid non-empty text file and you should have no problem adding it to the repository. I have added it to the code repository in all my projects. Did you by any chance remove the “place holder” text?
Regards,
Carlos
Also, you can try JetForcer. This Salesforce IDE based on Intellij platform and have lots of cool features.
https://jetforcer.com/