FileMaker 2024 (i.e. FileMaker 21.0), was released on June 4, 2024. Learn more about FileMaker 2024 on the Claris website. If you’re exploring a new solution on the Claris platform, we encourage you to sign up for a free trial here.
At the February 2024 Claris Engage conference, I taught one of the pre-event Training Day classes. It focused on some of the new and interesting features that have come out in the last few versions of FileMaker. We covered topics like Layout Calcs, OnWindowTransaction, the Execute Data API script step, script Transactions, and Performing JavaScript in WebViewer.
For the OnWindowTransaction (OWT) class exercise, I had the class build a basic delete logging system. Not only is it a great exercise for learning about OWT, but it’s also a practical one since capturing deletions is otherwise very cumbersome and difficult. It’s also simple to add this functionality into an existing system of any complexity.
I’ve been meaning to write this up as a blog post since Engage and am finally getting around to it. You can download the exercise and solution files if you want to cut to the chase. In the rest of this blog, I’ll teach you a bit about OWT and my recommendations for best practices.
OnWindowTransaction
OnWindowTransaction is a file-level script trigger added to the product in FileMaker 20.1. It’s activated any time a transaction is committed in a file. This give us some cool abilities like creating basic log files and triggering workflow notifications. It’s great for troubleshooting data issues, and it’s easy to retrofit onto existing solutions.
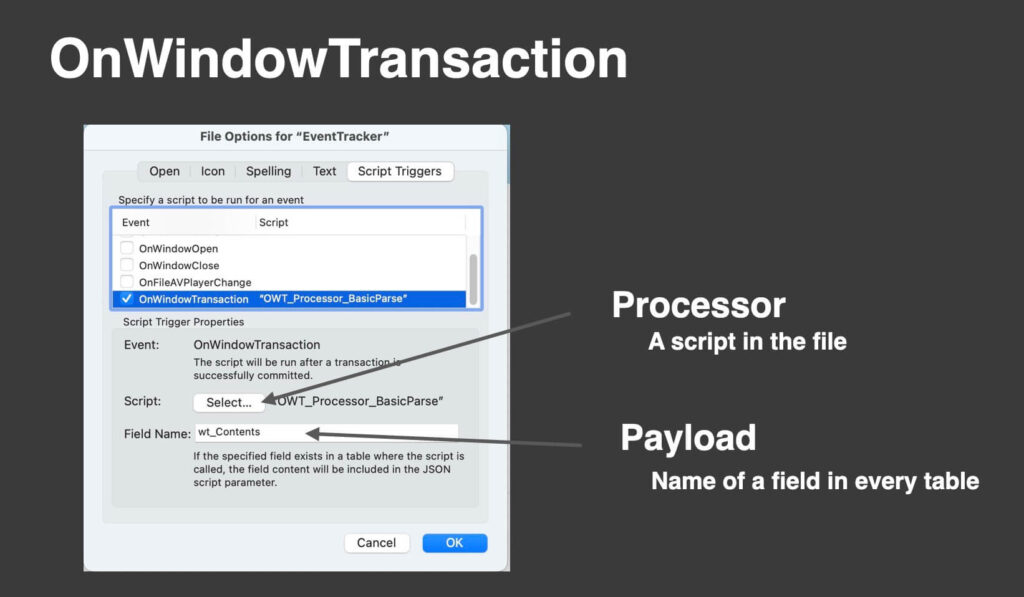
You enable OWT in the File Options dialog, the same way as you do other file-level script triggers. There, you specify a script to run whenever a transaction is committed. I’ll refer to this as the “Processor” script. Then, you specify the name of a field, which you will add to every table in the solution. The contents of the field will be passed to the processor as a script parameter. I’ll refer to this field as the “Payload.”
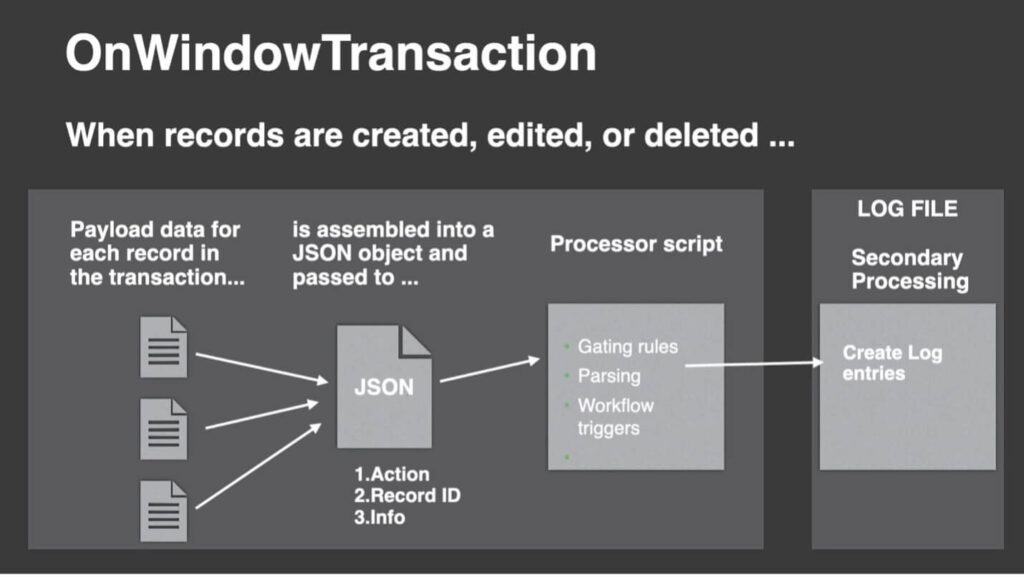
With this enabled, any time records are created, modified, or deleted, the Payload data from those transactions will be sent to the Processor script. Then the Processor script can do whatever it wants to with that information, like writing it out to a log file.
About the Payload
As mentioned above, the Payload is a field that you will create in every table in your solution. (This includes tables in externally referenced files). You can name it anything that you’d like; just be sure to name it exactly the same in every table. This field allows you to specify what record information is sent to the Processor script when that record is created, modified, or deleted. If you do NOT have a Payload field in a table, the only information available to the Processor will be the Action that occurred (“New,” “Modified,” or “Deleted”) and the RecordID.
The Payload field should be an unstored calculation, set to “evaluate always.” (See Wim Decorte’s post on this for more on the difference in behavior between stored and unstored calcs for this.) Typically, you will define it as a JSON object that contains pertinent data and metadata about the record. Do NOT include any summary fields or unstored calcs in the JSON. It could have a severe impact on performance.
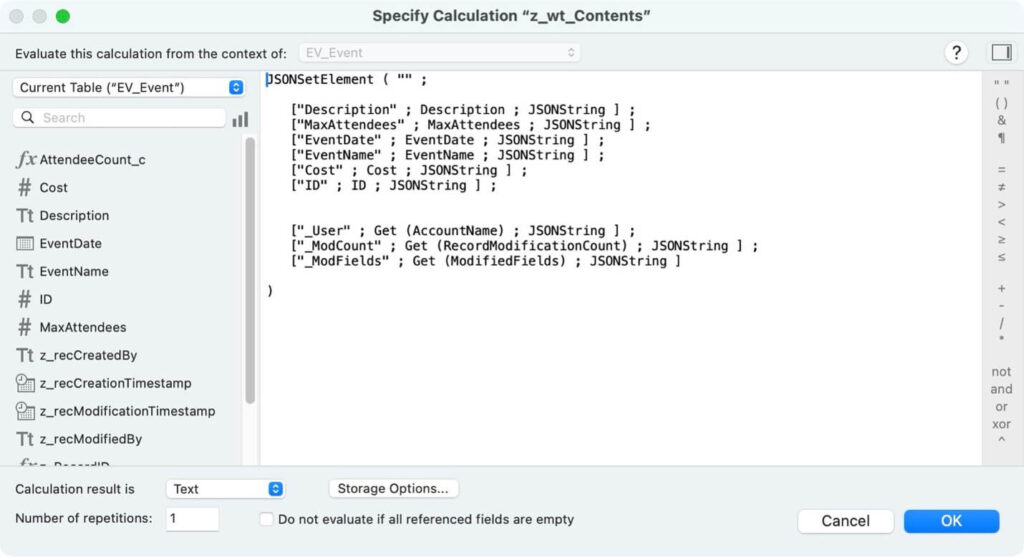
For example, here is the Payload field (named “z_wt_Contents”) from the Event table in the demo file:
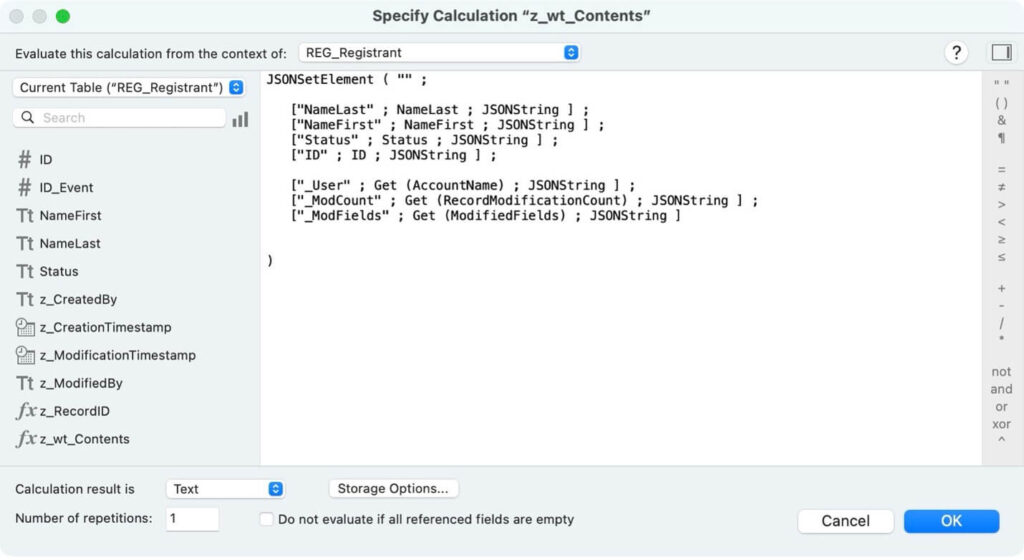
And here’s the identically named field from the Registrants table:
You’ll see that in addition to some field data, the calc includes some useful metadata. This includes the AccountName that changed the record, the record modification count, and a list of the modified fields. The underscore in the key names is a simple convention I use to easily distinguish data from metadata. This is handy if you’re trying to do more elaborate logging.
Keeping Your Payload Lean
Avoid the temptation to include EVERY field and possible piece of metadata in the payload. And the temptation to retrieve a list of field names with metadata calls, or to build any sort of complex abstraction tools for assembling the JSON payload. This calculation will be evaluated EVERY TIME a record is modified. It needs to be as fast and lean as possible. Less is more…just include what you know will be useful.
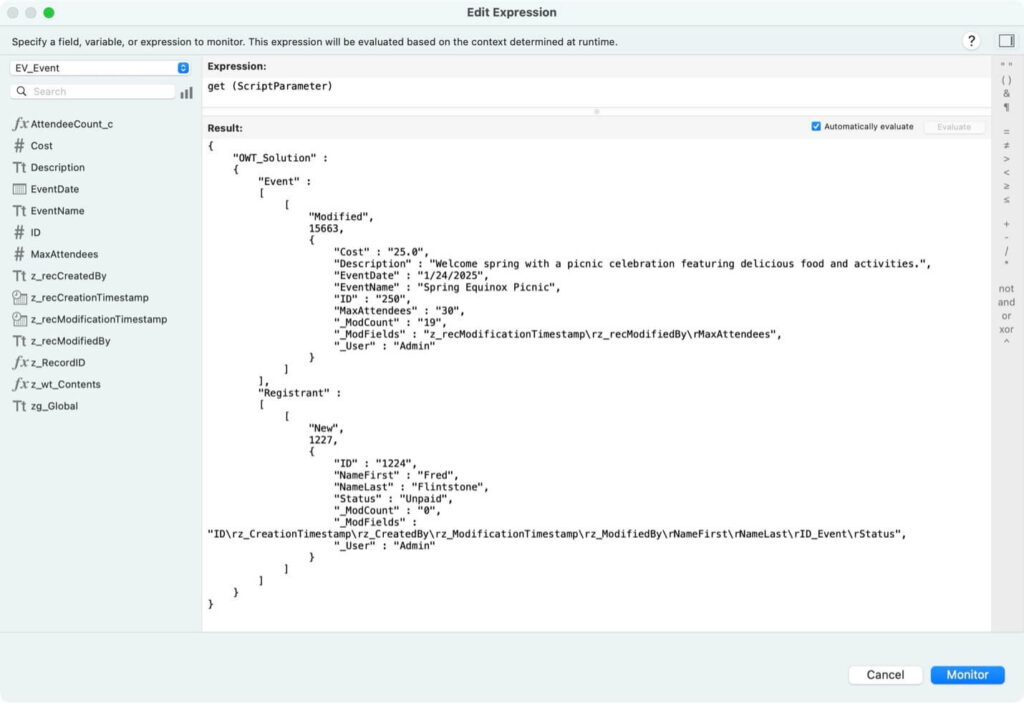
To recap: for every record in a transaction, the results of this calculation, along with the Action taken and the RecordID, will be incorporated into a JSON object that will comprise the script parameter sent to the Processor script. For example, if an Event is modified and a related Registration record is created in a single transaction, the parameter might look like this:
About the Processor
The script that you designate as the Processor will be triggered every time a transaction is committed. Bear in mind that this includes records modified by users as well as any scripted record changes and even bulk record changes such as import or replace field contents. (I won’t go into details of what constitutes a transaction here since it’s a lengthy and nuanced subject.)
Here, though, are a couple of useful details and caveats about the Processor script:
- Runs at the END of the script stack
- Triggered on ANY commit
- Might get triggered multiple times for bulk operations
- Has to be a script in the file (i.e., not in an external file)
- FileMaker Data API and OData do not trigger the OnWindowTransaction event. However, scripts run using FileMaker Data API or OData can trigger the OnWindowTransaction event.
- Truncate Table doesn’t trigger it.
The Processor script can do whatever you’d like it to do. Generally, you’ll want it to parse out information from the Payload JSON and do something with it, such as logging. The Payload may contain information about a single record or multiple records that were part of a single transaction. And while you could just log the entire payload, it’s probably more useful to parse out each record action. You’ll see that my demo files come with a couple of different Processor scripts that you can try out. The FullPayload script simply logs the entire payload. The BasicParse script filters for just the Delete actions and logs those. And the FullAuditLog script captures every add, change, and delete. You can easily experiment with these just by changing which script is specified to be the OWT trigger.
BasicParse and FullAuditLog Scripts
In the BasicParse and FullAuditLog scripts, the bulk of the script is looping over the various JSON nodes to isolate the individual record changes. There are two places in particular where you can do some useful filtering. The first is filtering at the BaseTable level. It’s likely that there are some tables in your solution for which you wouldn’t need logging. These may be utility tables, resource tables, tables to render virtual lists, or just information of low importance.
I recommend – as you’ll see in the demo files – setting a variable in the Processor script with a list of the tables that you DO want the processor to handle. The script can check the base table of any record change against this list and skip it if it’s not something you care about. My recommendation is to filter IN rather than filter OUT: the variable should contain a list of tables you want to log rather than a list of tables to exclude.
The other filtering opportunity is by action. The JSON for each record change consists of an array with three values: the action, the RecordID, and the result returned by the Payload calc. The action is either “New,” “Modified,” or “Deleted”. Because the purpose of the demo file is to only log deletions, the script ignores other actions.
Logging in a Separate File
I strongly recommend that logging be done in a separate file[WD1] . The obvious benefits are that it’s modular and prevents your main files from bloating. It also obviates the recursive risk of having your log table trigger your logging routine: if the log table is in the file being logged, then every log action you do will trigger the OnWindowTransaction script. Using a separate file also has a big performance benefit in a busy system because the data file won’t incur a file lock for every log entry.
The log file itself can be very simple. Every time the Processor script comes across an action that you want to log, it calls a subscript in the Log file that creates and populates a new record. It’s also possible to have the Log file do additional parsing of the JSON payload if you want to try to make field level comparisons. Just keep in mind there’s a potential performance impact, especially if you have dozens or hundreds of users making changes all day long in your system. You might also be able to have secondary logging or parsing done via separately scheduled batch routines.
Wrapping Up
Adding a Delete Log to an existing solution is a great way for you to start exploring the OnWindowTransaction trigger. Because it’s narrowly filtered to only log deletes from tables you specify, you shouldn’t have to worry about performance implications or log file sizes, but please be aware that these are both potential concerns if you do more elaborate logging processes. The files that accompany this blog post were meant to be used as training class exercises, so please explore and improve upon them however you need.
The best way to start learning is to turn on the Script Debugger and then try adding/modifying/deleting records and see what happens. Then, explore using the other processor scripts and see how they differ.
Good luck. I hope you find it useful! If you need any help, reach out to our team of FileMaker consultants.
Hi Bob. Thank you for the guide. It is super useful. The AuditLog file, referenced in the “Extra Credit” section of the instructions, is not included in the download.
Thanks for catching that, Steve. We’ll get that file added to the download files ASAP.