Over the last few years, I have posted quite a bit of content on using OAuth identity providers to manage your FileMaker users. Steven Blackwell and I have also co-authored a series of white papers on how to use a variety of them.
Keycloak an Open-Source Solution
Among those identity providers, one of the more interesting ones is Keycloak. Since it is open-source, you can install it yourself on-premise or in the cloud under your control. And because it is a Red Hat project, it is also top-notch and ready for production use. When you are looking for a good account management system for your FileMaker server solution, and you do not want to subscribe to or depend on any of the cloud-based ones (Azure AD, Okta, Ping, OneLogin, Auth0, etc.), consider Keycloak.
Keycloak can also be put to excellent use as a broker to allow group-based authentication into FileMaker but with identity providers that do not provide groups of their own, such as LinkedIn, Sign in with Apple, Facebook, Google, and so on. Or as a Federation provider when the actual identity provider, for instance, only supports LDAP or SAML.
In our Engage 2020 session on “effective identity and access management,” Steven and I used Keycloak to demonstrate a completely password-less login into a FileMaker solution.
For developers who want to get familiar with setting up external authentication for their FileMaker solutions, Keycloak also makes an excellent testing ground.
And that is where this blog post fits in. I needed to set up a new Keycloak environment for FileMaker beta testing and decided to press one of my spare Raspberry Pis in action for this.
Setting Up Keycloak
Setting up Keycloak from scratch is covered in-depth and extremely well in this series of blog posts by Duncan Baker. Note the addition to the series for how to install an SSL certificate for the latest version of Keycloak (16 at the time of this writing). The guide uses Ubuntu as the operating system for the Keycloak server. These days I default to the Ubuntu Server version of Linux for my Pis; it allows me to align with the Linux version that we can also use for FileMaker Server.
Out of the box, Keycloak works on port 8080 for HTTP and port 8443 for HTTPS. HTTPS – and thus the use of an SSL certificate – is required for making authentication calls, and recent versions of FileMaker Server require using port 443. You cannot use a non-default HTTPS port. We need to change Keycloak to use an SSL cert and listen on port 443. And that happens to be where I got stuck. From when I first dabbled with Keycloak a few years ago now, I do seem to struggle in getting Keycloak configured to respond to port 443 and use the SSL certificate that I want.
Unlike Duncan’s example, I am not using a Let’s Encrypt certificate but rather a wildcard cert that I have for all my machines (including FileMaker Server). Perhaps that plays a role, but I didn’t want to burn too much time figuring it out. I decided to use a reverse proxy in front of Keycloak to handle the secure traffic.
Reverse Proxy with Keycloak
Reverse Proxy sounds fancy, but the concept is simple. Instead of talking directly to Keycloak, incoming requests go to a service that inspects and routes the traffic based on the rules we provide. It’s a traffic cop, in essence. We can hide and shield our Keycloak service while leaving the installation as easy, default, and secure as possible. With a reverse proxy in place, I could also change or move my Keycloak deployment without having to update all integrated apps. The URL wouldn’t change.
Deploying a Reverse Proxy
Fortunately, deploying such a reverse proxy is easy too. Here’s how.
The three commands below will install nginx (pronounced engine X) and enable it as a daemon so that it will start every time the machine boots.
sudo apt update
sudo apt install nginx
sudo systemctl enable nginx
At startup, nginx will automatically load all virtual hosts that are configured in its default folder:
/etc/nginx/sites-enabledCreate a new file there named keycloak, to add a virtual host configuration:
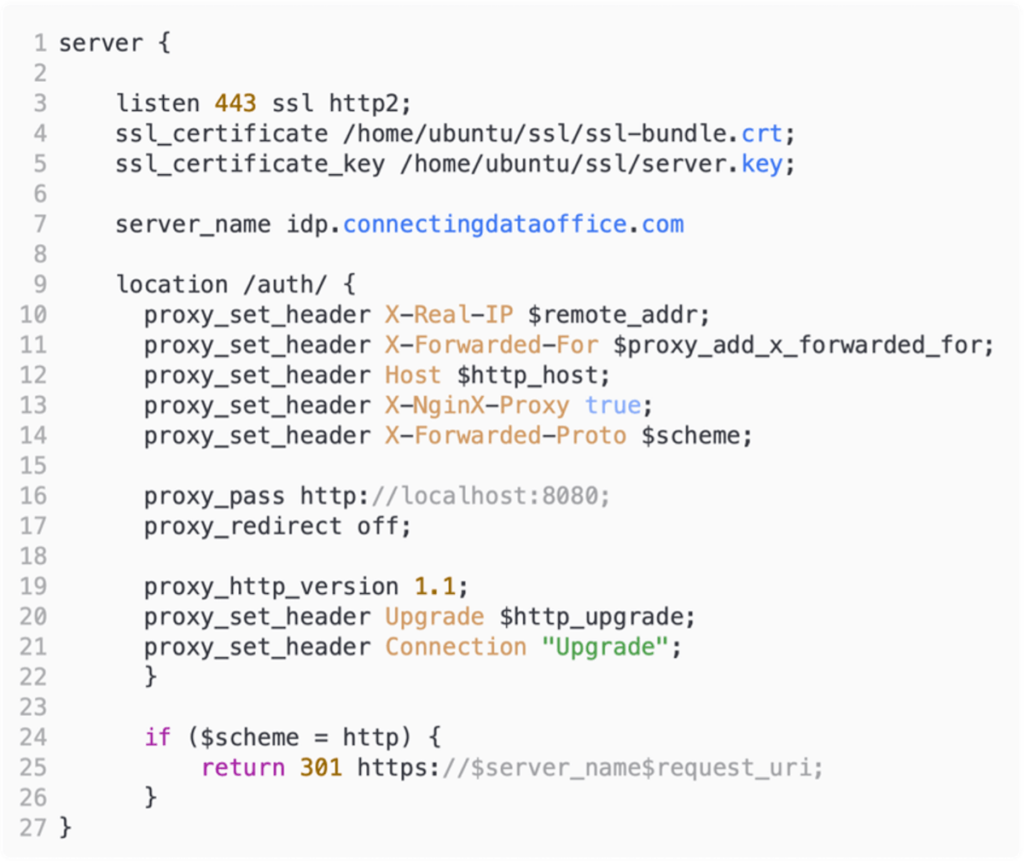
sudo nano /etc/nginx/sites-enabled/keycloakand add content like what I have below, changing the DNS name on line 7 and the locations of your SSL certificate on lines 4 and 5.

That’s really all there is to it; with this, you have a full functioning reverse proxy.
New Traffic Flow
The traffic will now flow like this:
Line 3 instructs nginx to listen on port 443. You could have other virtual hosts listening on other ports. However, all OAuth communication typically is done on the default HTTPS port 443.
Lines 4 and 5 tell nginx where to look for the SSL certificates. The ssl-bundle.crt was created by appending the actual certificate with the intermediate bundle from the certificate authority. Doing that is as easy as this:
cat my_cert.crt intermediate_bundle.crt >> ssl-bundle.crtserver.key is the private key that was generated when the original certificate signing request was created. If you are familiar with SSL certificates for FileMaker Server, that would be the serverKey.pem file.
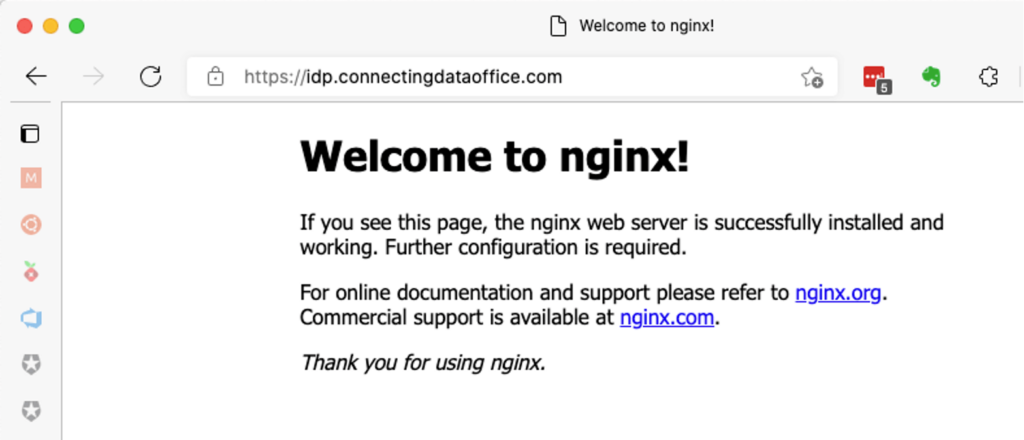
Line 9 tells nginx that the block underneath it only applies to URLs that start with /auth, which is where Keycloak lives. If we use a URL that doesn’t have that, like the base URL, nginx will not forward the traffic to Keycloak, and you’ll see the default nginx page (or your custom page if you add one).

The passthrough of the traffic to Keycloak happens on line 16. Since we have Keycloak running on the same machine, we can use localhost and its default port of 8080.
You can secure Keycloak to only respond to localhost requests so that the proxy cannot be bypassed by trying to reach Keycloak directly.
Lines 10 through 14 are crucial for Keycloak; it sets headers so that Keycloak will know where the original traffic came from. This allows it to redirect properly with the result of the authentication request.
Necessary Configuration Changes
You need to make several configuration changes in Keycloak so that it is aware that the traffic it receives comes from a proxy server. These changes are described in the official documentation.
There are several different mechanisms for changing the configuration. However, given how minor these are, I will edit the standalone.xml file directly.
If you have followed Duncan’s installation steps, then the command to edit the file is:
sudo nano /opt/keycloak/current/standalone/configuration/standalone.xmlLocate the section with urn:jboss:domain:undertow:12.0
(with nano, hit ctrl-w and paste in that string, hit enter)
Add the two entries indicated below in the http-listener section:redirect-socket and proxy-address-forwarding.

(The redirect-socket entry may already exist; if it does, change its value as indicated).
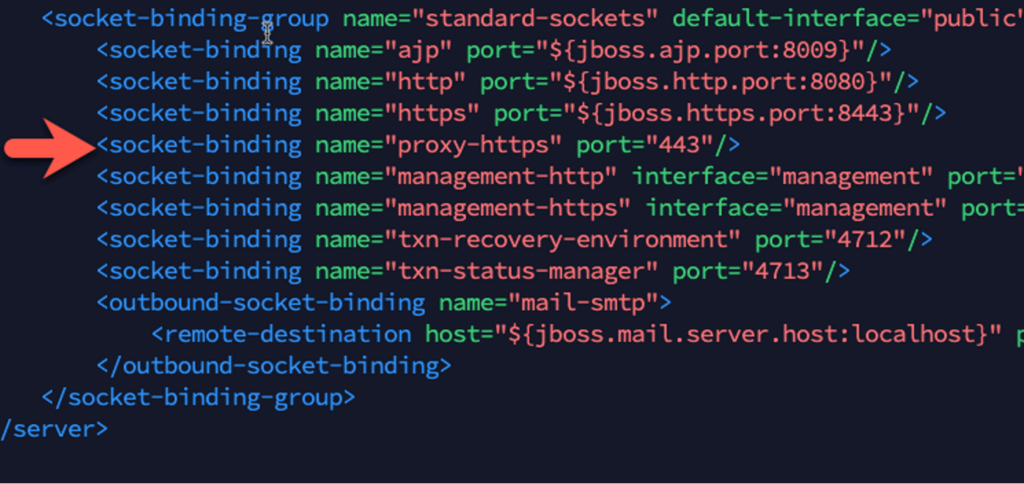
Next, locate the socket-binding-group section and add a socket-binding element with proxy-https as the name so that it matches with the entry we just added above and set 443 as the value.

Save the changes (nano: ctrl-o, enter, ctrl-x), and reboot the server to restart both keycloak and nginx.
After your server has rebooted, use a browser to navigate to the keycloak url that shows all available service endpoints:
https://your_server_dns_name/auth/realms/master/.well-known/openid-configurationIt should show the proper HTTPS url for those endpoints that you use, for instance, in your FileMaker Server configuration. They will all be https on the default port of 443.

Next Steps in FileMaker
As always, feel free to ask any questions in a comment below and on community.claris.com. If your business needs FileMaker support or custom development, please contact our team of certified experts.
You hurt my head. Great job!