Judging by the questions on the Claris Community forum, there continues to be a lot of confusion around SSL certificates and difficulty with the process of getting one issued. This guide, full of our FileMaker consultants’ best practices, tackles the most common issues.
- What Does an SSL Certificate Do?
- But My FileMaker Server is Only Used Inside My Network!
- But it Costs Money!
- Some Fundamentals
- My company Insists on Self-issued Certificates.
- What Else Do I Need to Use an SSL Certificate?
- Getting an SSL Certificate
- Establishing & Launching Your SSL Certificate
What Does an SSL Certificate Do?
You get two benefits from an SSL cert. First, it assures you that the server you are trying to talk to is, in effect, the server you intend to talk to and not some impersonator. Secondly, it sets up the encryption of the data as it flows between the clients and the server. Name validation and encryption are both equally important.
For a full primer in both text and video, check out this Devcon 2017 presentation from Mislav Kos.
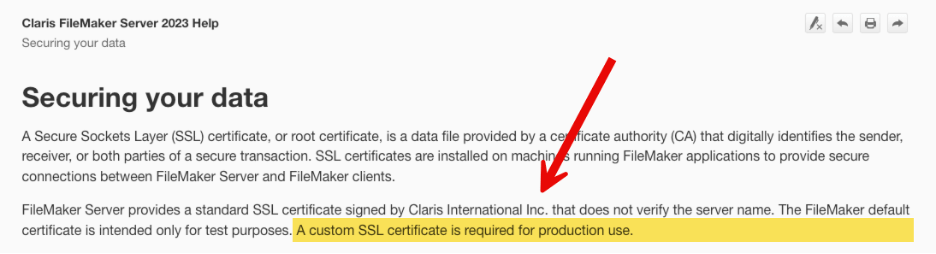
Even if you don’t care about encryption or name validation, the world does. If you deploy your FileMaker Servers without a custom SSL certificate, it will be regarded as an odd duck. Progressively, some functionality will begin to fail. For instance, many browsers now make it very difficult to connect to an address not properly covered by a valid SSL certificate. IT departments that you interact with will expect it, probably demand it.
Also, note that Claris clearly states that a custom SSL certificate is not an option; it’s a requirement.
But My FileMaker Server is Only Used Inside My Network!
This is one of the biggest objections that gets voiced, and it is completely bogus. The underlying assumption here is faulty: namely that inside the perimeter of your network, everything is safe. There is no need to check that you are connecting to the right server and no need for traffic to be encrypted. That is a fallacy; the era of relying on perimeter defense is gone and has been for a while. We need to adjust our thinking. Where your FileMaker Server is and how it is accessed is totally irrelevant.
How Attacks Happen
For the past 10-15 years, every single security report has emphasized how attacks and compromises work by burrowing inside the network and spreading from there. It is unlikely that someone or something will try to breach your server or its traffic directly from the outside. That will happen from inside your network.
Take the anatomy of a ransomware attack, for instance. Typically, these attacks start with phishing or similar prying probes to see if some account or machine somewhere can be compromised. Or it’s some unpatched IoT or convenience device like a camera or a fridge. Once the attackers are inside the network, they will probe further and spread out, moving sideways to other machines using a library of known exploits. They will learn the network and what goes on. And all of this happens weeks or months before the actual ransom event gets triggered.
The MITRE ATT&CK overview gives you a good explanation of how these attacks happen and how complex and multi-layered they are. Only the first column deals with getting access; all the others are once the attacker is inside your network.
And “your network” these days isn’t one homogenous area. It’s a collection of different devices across a wide area of remote workers. I talked about this in my Engage 2024 Security session: Identity is the new perimeter.
If you choose not to use an SSL certificate, you make it much easier on the attackers. They already have the upper hand; you don’t need to help them.
But it Costs Money!
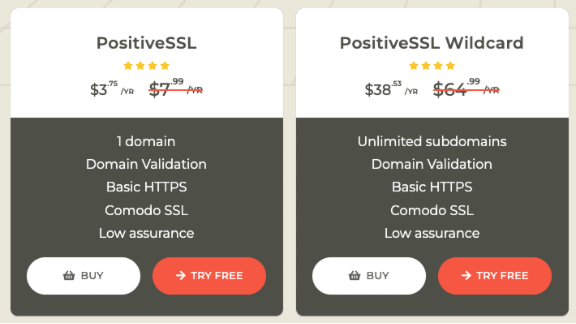
No, it doesn’t. Not real money anyway. The screenshot below is from one of the many SSL vendors. Typically, a proper single-domain certificate costs between $5 and $15 per year. That’s it. If you want a wildcard certificate or a specialized SAN certificate (more about what that means later), you may be looking at $50-75 per year for a certificate covering multiple servers.
Sure, there are SSL vendors that charge more. GoDaddy comes to mind, where you typically spend upwards of $100 for a yearly certificate. But there is nothing that these more expensive SSL certificates do that the cheaper ones do not for your intended purpose. Often, the difference with more expensive ones is the amount of ownership verification they do to increase the assurance that you are who you say you are. Or they charge more because of the ease of use and tight integration with the rest of the products. But from a functional point of view, it makes no difference. We’ll talk some more about the verification process later.
You can always use the free Let’s Encrypt option if you do not want to pay anything at all and are ok with the 90-day renewal cycle. Claris FileMaker Server 2024 comes with a set of scripts for Ubuntu and macOS that can make the Let’s Encrypt request and renewals. At Soliant, we build our own version of these scripts that use the dns challenge instead of the http challenge because you don’t want to expose your server to the world as you must do for the http challenge. You can read the (important!) details about that here. And we’ll cover the concept of challenge a bit later.
Some Fundamentals
Fully Qualified Domain Name – What You’ll Put on the Certificate
Before we go further, we must cover some fundamentals, especially around the name validation aspect. You cannot get an SSL certificate for an IP address. You can only have an SSL certificate issued for a fully qualified domain name (FQDN). What does that look like?
There are three parts to an FQDN:

- The Top-Level Domain (or TLD), which is the last part of the name: .com, .cloud, .fm, .whatever
- The domain name: usually the middle part of the name
- The host name: the first part of the full name
Together, they make a fully qualified domain name: server.domain.com. Or fms01.soliant.cloud, or community.claris.com
That FQDN is the name that you want to put on the certificate. It’s a unique name for a single resource. This is the most typical SSL certificate you’ll ask for: to cover a single host.
Avoid asking for a certificate for just the domain name and TLD for specific resources such as a FileMaker Server. Always use a host name. The domain name and TLD (say soliant.cloud) are more typically used for websites (as in: for use as https://soliant.cloud). Stay away from such a name for your FileMaker Server. Always give it a host name on your domain (someserver.soliant.cloud) to avoid confusion and to allow yourself to add more servers.
Wildcard and SAN Certificates
If you have many FileMaker Servers (or other resources), then consider using a wildcard certificate. Wildcard certificates allow you to cover any and all hosts on a domain. In our example, the SSL certificate would be issued for: *.soliant.cloud
Note the *, which means an unlimited number of hosts. With this certificate, I can cover FQDN names such as fms01.soliant.cloud, fms02.soliant.cloud, and more. I can also install the same certificate on all of them instead of having to go through the issuing process for each one.
Some companies don’t like using wildcard certificates because of security concerns. A big company typically has many resources that they want to have covered by an SSL certificate, so a wildcard would seem to be the obvious choice. But if that one wildcard certificate gets stolen or otherwise compromised, it would then be easy to mimic any of that company’s resources. So, they ban the use of wildcards. You may run into that.
You can still get an SSL certificate that covers multiple host names in the form of a SAN certificate. A Subject Alternative Names certificate requires you to explicitly list all the names you want to cover. What it shares conceptually with a wildcard is that it covers multiple host names. However, unlike a wildcard, you must name them ahead of time.
FileMaker Server supports all three types of certificates: single host name, wildcard, and SAN.
Chain of Trust –Why Would We Trust the Issuer of the SSL Certificate?
You buy a certificate from a vendor. The certificate itself, however, will be issued by one of the leading Certificate Authorities (CA). For instance, my wildcard cert for all my Claris beta testing servers (*.ets.fm) is purchased at ssls.com but issued by Sectigo:
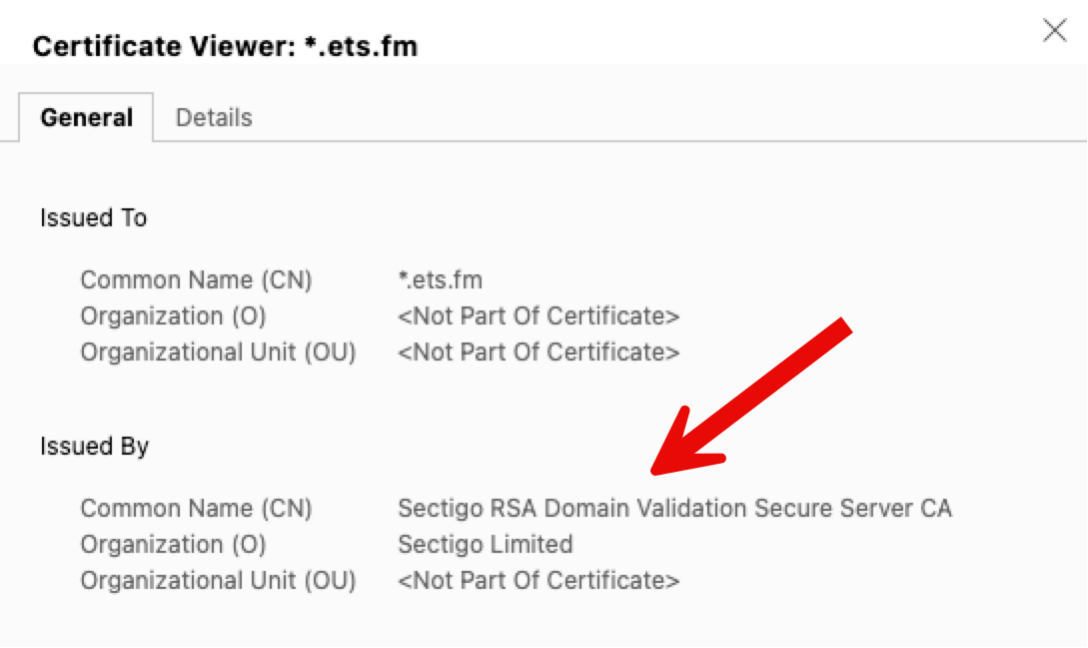
Clearly, to trust my SSL certificate, you must trust that Sectigo is real and can be trusted. How come my browser and your browser and FileMaker Pro or Go client are willing to trust Sectigo to issue certificates and provide the verification service to verify that I am who I am?
The Infamous Intermediate Bundle…
Sectigo has its own certificate to prove its trustworthiness. This only moves the problem further up the chain: do we trust whoever issued a certificate to Sectigo? And do we then trust whoever issued the certificate to the issuer of the Sectigo certificate? And do we then… You see the problem here.
To solve this problem, there are a limited number of Root Certificate Authorities, which are universally trusted by choice. Otherwise, this would remain a Catch-22. There is a root key signing ceremony that helps establish this public trust in the Root CA keys.
All operating systems have a set of these Root CA certificates embedded in them. When you ask a Certificate Authority to issue you an SSL certificate, they will provide you with an intermediate bundle that contains all the certificates that prove each step of the chain of trust from the issuing Certificate Authority to a root Certificate Authority. And that is how your browser and your FileMaker Pro and Go know that they can trust the certificate issued to you.
Some vendors automatically include this intermediate bundle. Some do not and just provide it as a download on their website. Make sure you have it. You will need it when uploading the SSL certificate to FileMaker Server.
Combining SSL Cert and Intermediate Bundle
There is a lot of misinformation in the community (and some of it in the Claris Knowledge Base) about the need to combine your SSL certificate and the intermediate bundle into a single file. You do NOT need to do this.
My company Insists on Self-issued Certificates.
As mentioned earlier, many big companies do not allow the use of wildcard certificates. Often, it is because of an effort to reduce costs and facilitate the issuing process. If you are in such an environment, you cannot get a commercial certificate.
In this setup, the company acts as its own Root CA. Because of that, it must make sure that each device has a copy of the company’s Root CA certificate. It will not have it by default since the company is not part of the list of universally trusted Root CAs.
In and of itself, there is nothing wrong with this scenario, except that, in our experience, it’s often difficult to get it right. Most issues come from that chain of trust that we just discussed. Missing or incomplete intermediate bundles and the lack of a Root CA certificate on devices can all lead to troubleshooting efforts that last hours or days.
Some of the most common issues we see are missing SAN attributes in the cert or setting a validity that is longer than accepted (> 397 days).
Given the low cost of a commercial cert, this kind of troubleshooting rarely makes sense. Even at a low consulting rate, one hour of troubleshooting would easily pay for 10+ years of a commercial certificate. If you get stuck for even 15 minutes, push for a commercial certificate.
Isn’t There a List of Claris-approved Certificate Issuers?
Not anymore. All standard certificates should work provided you have a valid certificate in the right format (see later) and there is an intermediate bundle to prove the chain of trust to a Root CA.
What Else Do I Need to Use an SSL Certificate?
Before we go through the process of having an SSL certificate issued, there are a few prerequisites to consider. Infrastructure is assumed to be in place before you can use an SSL certificate. This is another area that trips people up or leads to implementations that suffer from poor performance. Here is why:
DNS – the Domain Name System
Because an SSL certificate is issued to a name, you must use that name when you connect to the server. If you do not do that, the name validation part will fail, and you will get errors. Browsers especially will now often just block the connection and not let you continue. FileMaker Pro and Go will display a warning message to the user.
The Job of DNS
FileMaker Clients and FileMaker Server, however, communicate over TCP/IP, which uses IP addresses and not DNS names. At some point, therefore, the name on the SSL cert needs to be translated into the proper IP address for the connection to be made. That’s the job of DNS. DNS records marry a name to an IP address.
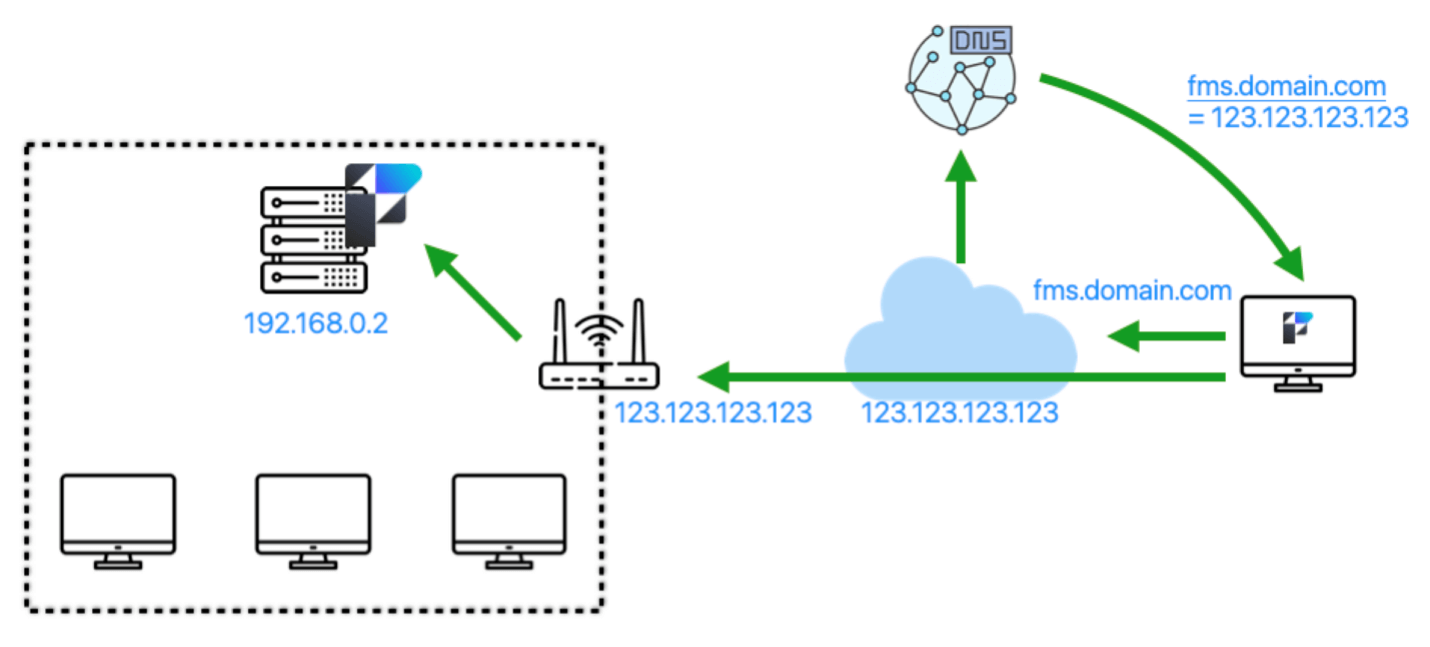
When a FileMaker client then wants to connect securely to your server, it will first have to get that name translated (resolved is the accurate term). This is how it works from the outside:
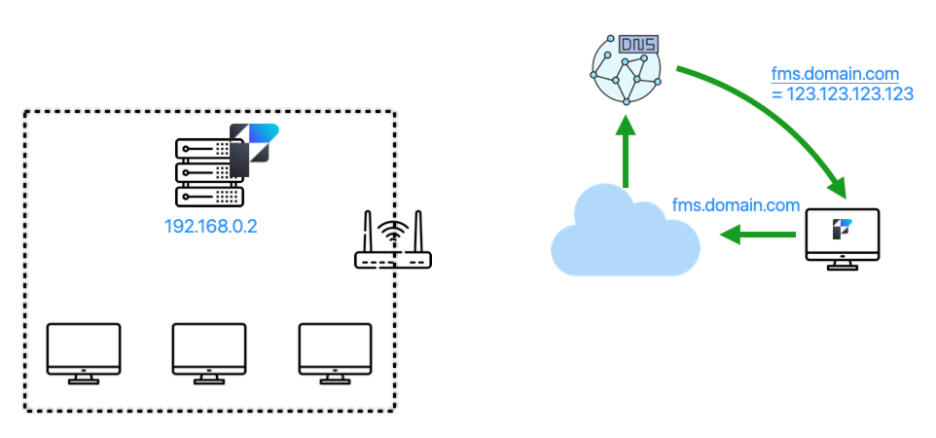
By using the fully qualified domain name (fms.domain.com), the operating system will make a call to the DNS server it is configured to call, which will reply with the IP address for that name. From that point forward, communication will be done on that IP address. In this case, it is the WAN IP address of your network. The router at the edge of your network will see the traffic, look at its port forwarding rules, and forward the traffic to the internal IP address of your server:
Clients Inside the Network
But what of the clients inside the network? To get the benefit of the SSL certificate, these clients must also use the DNS name of the server: fms.domain.com.
The worst thing that can happen, then, is that resolving that name for those clients results in the same external WAN IP address:
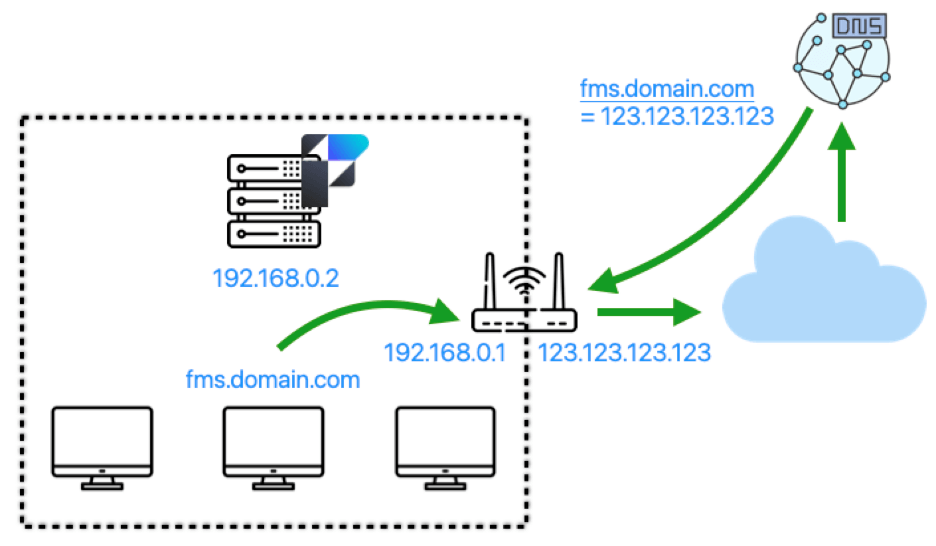
This will lead to the traffic flow below, where *all* of the client’s requests leave the network to come back in because the only IP address known for the DNS name is the external IP address. This will be magnitudes slower than when the traffic can stay on the network.
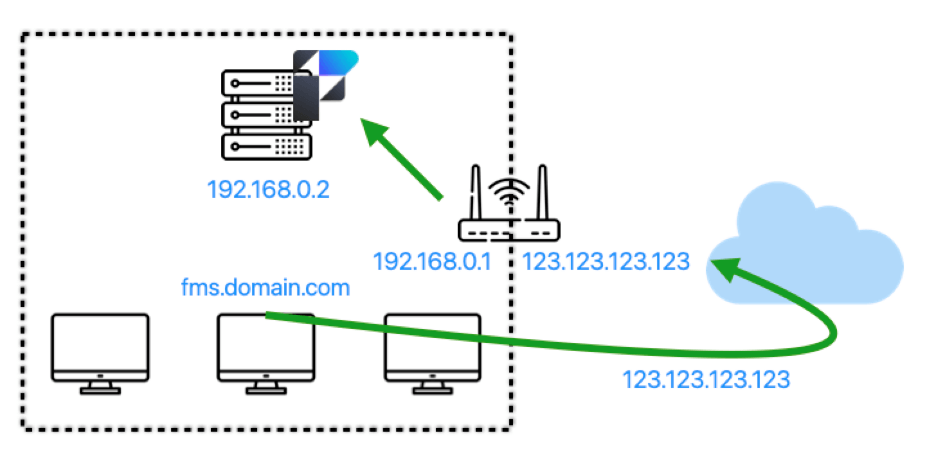
If you are fortunate, your router is smart enough to detect that the ultimate destination is a server on the network and can do hairpinning to avoid the traffic leaving the network.
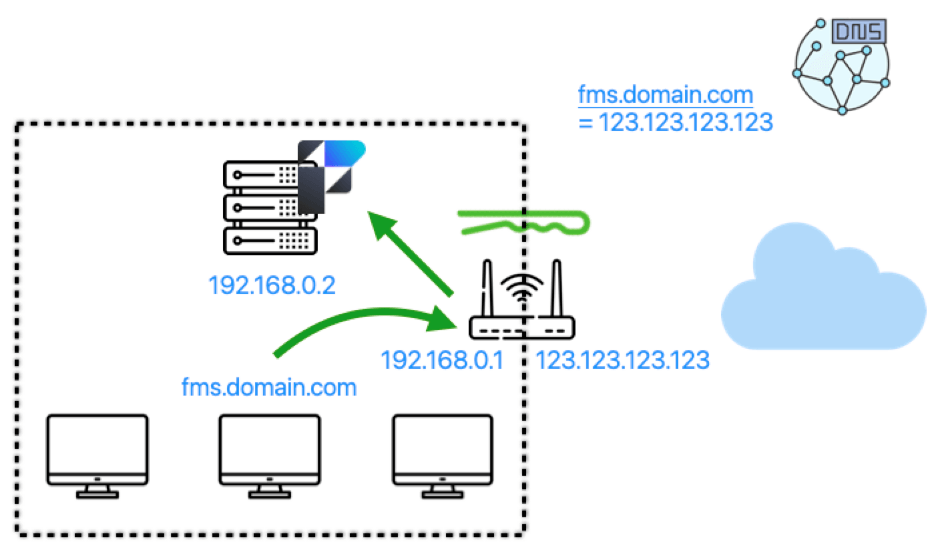
However, the best solution is to have an internal DNS server that can have its own name records that point directly to the internal IP address of your FileMaker Server.
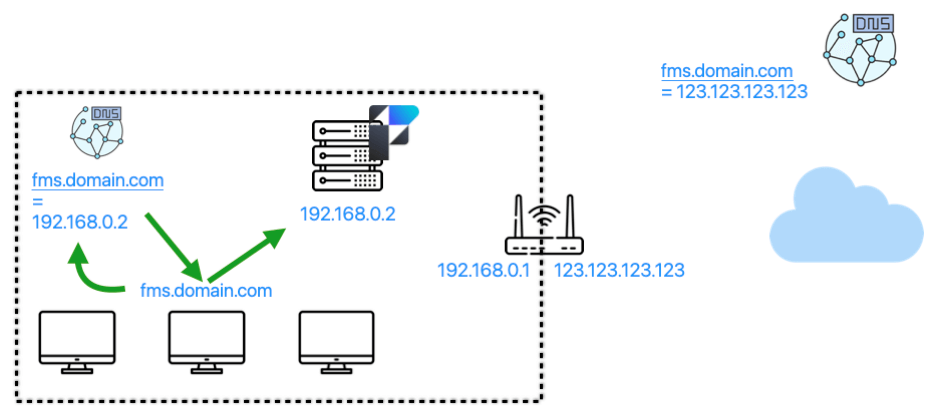
In the scenario above, any external users will receive the WAN IP address for the name. All internal users will receive the LAN IP address for the name.
Setting Up an Internal DNS Server
Setting up an internal DNS server is not complicated or expensive. But it needs to be done. Running Pi Hole on a Raspberry Pi 4 will do. Or, you may already have the DNS capability on your NAS device or Wi-Fi router. (Ideally, you’ll want to add some redundancy for a service as critical as this, too).
All server operating systems also have DNS server capabilities that you can install and configure. Internal DNS servers are configured to forward requests for records they don’t have to an external DNS server. It is completely ok for both the internal and external DNS servers to have a DNS record for the same name.
Can’t Use Bonjour – You Must Use a Favorite Host Entry
Inside FileMaker Pro and Go, you must use a favorite host entry. It is the only way to have Pro or Go connect using the proper name on the certificate and thus benefit from both the name validation and the encryption.
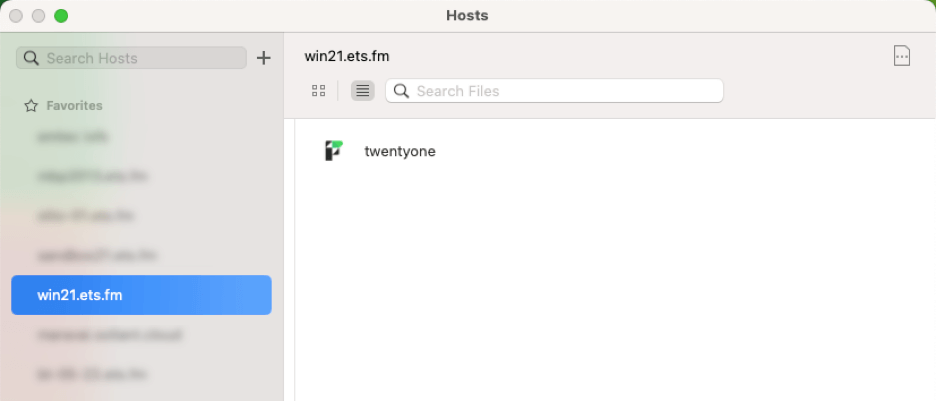
Another way to achieve this, of course, is to use a launcher file where you embed the file reference using the DNS name or an fmp url that uses the DNS name.
When you use the Local section of the Hosts dialog, you invoke Bonjour, which uses mDNS (multi-cast DNS) to find local resources, but it doesn’t use actual DNS. Bonjour uses the special .local top-level domain which is different than the top-level domain that you have on your SSL certificate, and because of that, the name validation will always fail.

To avoid issues with this, don’t install Bonjour on your server if you use FileMaker Server on Windows, or disable AutoDiscovery in your FileMaker Server when you host on Linux or macOS. This way, your FileMaker Server will never show up when a client uses the Local section of the Hosts dialog.
Getting an SSL Certificate
Now that we have all the theoretical and fundamental stuff out of the way let’s talk about the actual process of obtaining an SSL certificate.
Vendor vs. CA
What is commonly referred to as “buying an SSL certificate” is really buying the rights to have an SSL certificate issued to you. You can buy those rights for multiple years to get a good discount, but you will still have to renew your certificate every year.
For instance, when I buy an SSL certificate at ssls.com, this is what I pick:
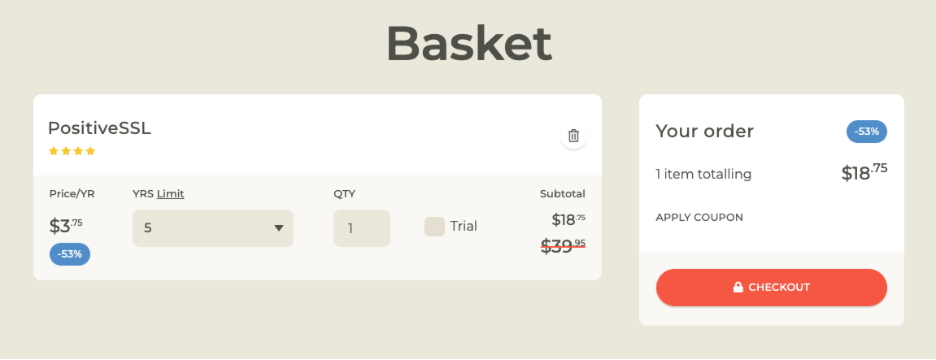
It’s for a single domain name for 5 years.
Validity of an SSL Certificate
But that does not mean that I will get an SSL certificate that is valid for 5 years. I just paid for 5 years’ worth of an SSL certificate. Commercial SSL certificates are typically valid for one year and need to be renewed before they expire. Not too long ago, you could get an SSL certificate that was valid for two or more years. You could even get an SSL certificate for an IP address. But to enforce better security, Certificate Authorities have decided you now no longer can. One year is what you get. For Let’s Encrypt certificates, that is even shorter at 90 days.
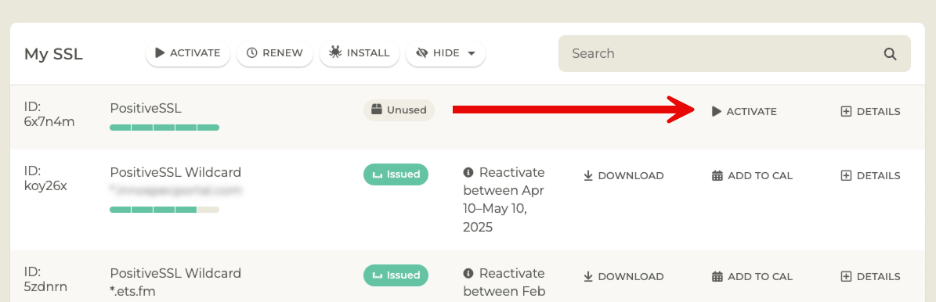
After going through the purchase process with your vendor, you will see something similar to below: a placeholder that shows you your purchase and where you can start the process to issue a certificate.
Certificate Signing Request
The next couple of steps vary a lot by vendor. Most typically – but not always – you will be asked to provide a Certificate Signing Request (CSR). That is exactly what it sounds like.
You submit a request to have a certificate signed (and issued to you), and in the request, you specify who you are and what name you want on the certificate.
Some vendors like ssls.com don’t bother with this step. They generate one for you on the fly, and you never have to submit a CSR.
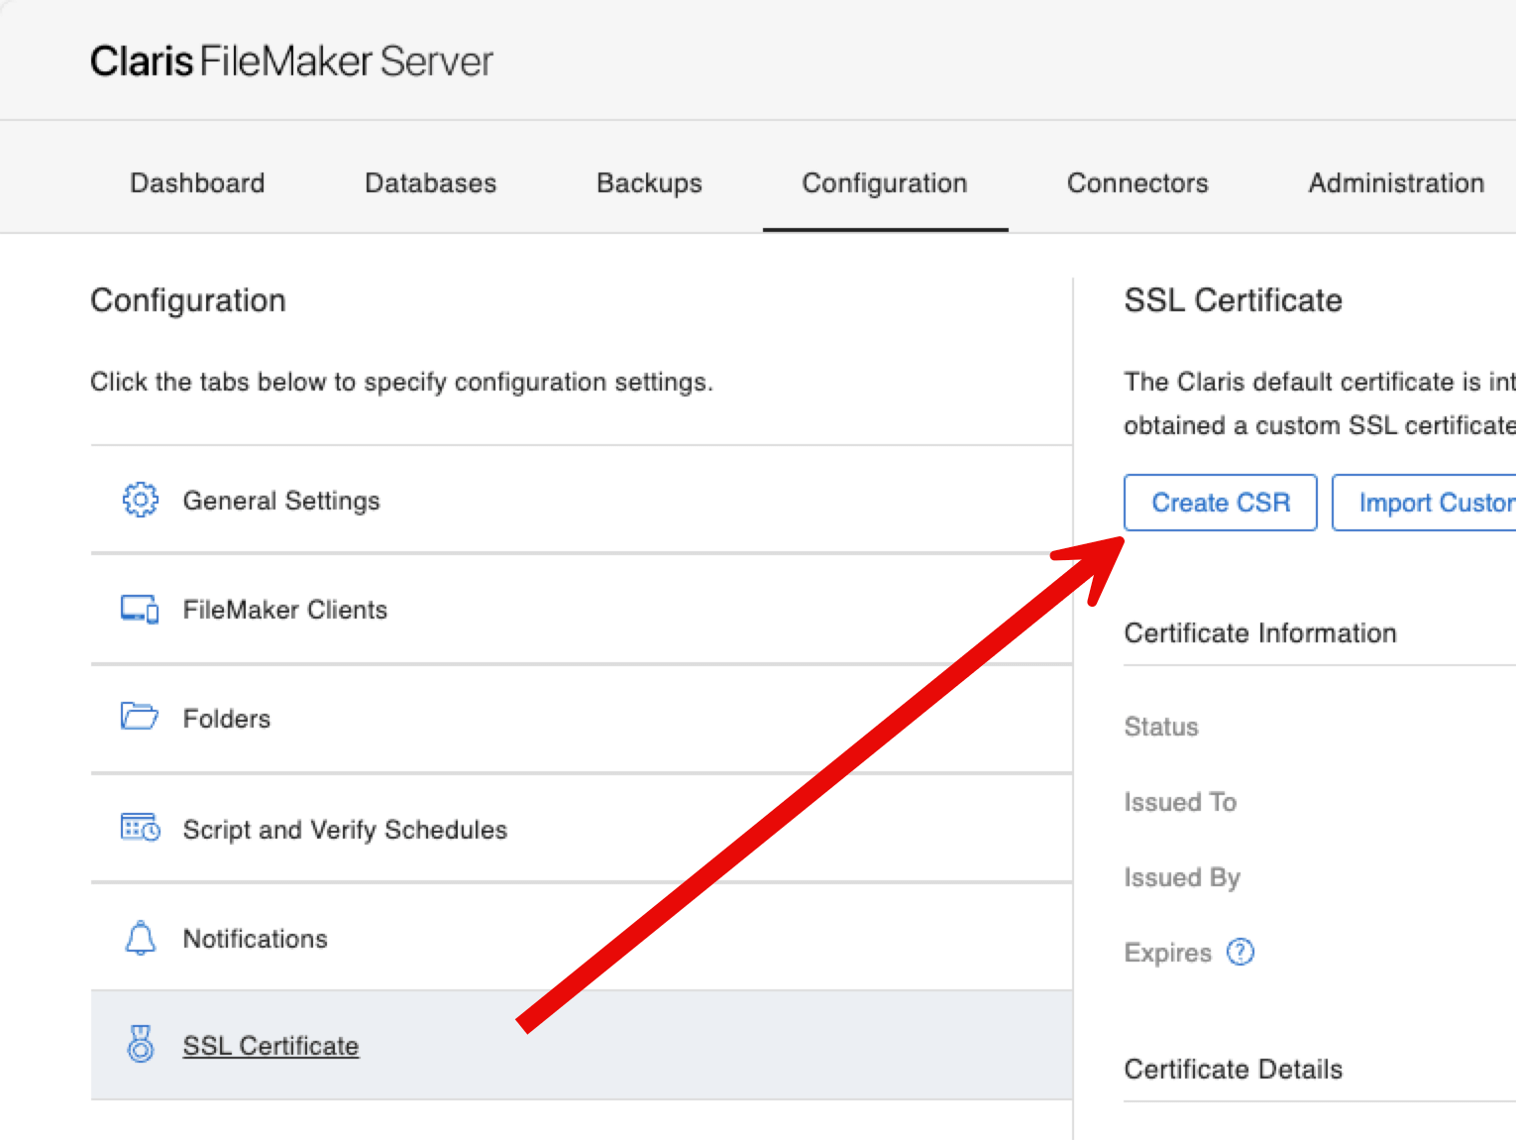
But, assuming that you have to, it is important to know that you can generate such a CSR from anywhere. The FileMaker Server admin console has a place where you can do it from:
The dialog will ask you to provide some information, but only the domain name and the organization name are required:
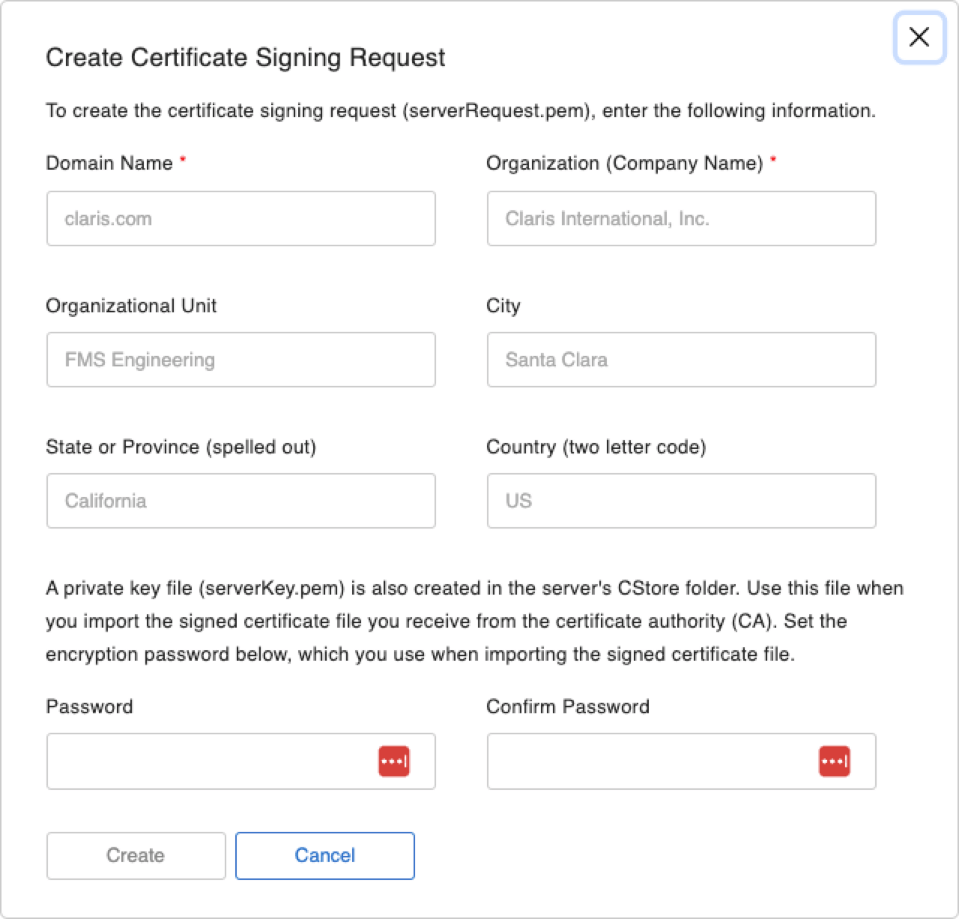
Important: Always Use a Fully Qualified Domain Name
One important thing to note, though: the example that Claris provides for the domain name is misleading. Earlier on, we made a big point of emphasizing that you should always use a fully qualified domain name, including the host part. So please don’t follow Claris’ lead here, and always use an FQDN in the form of host.domain.com, not domain.com.
Also, pay attention to the note at the bottom about the private key. We’ll come back to this.
Generating the CSR
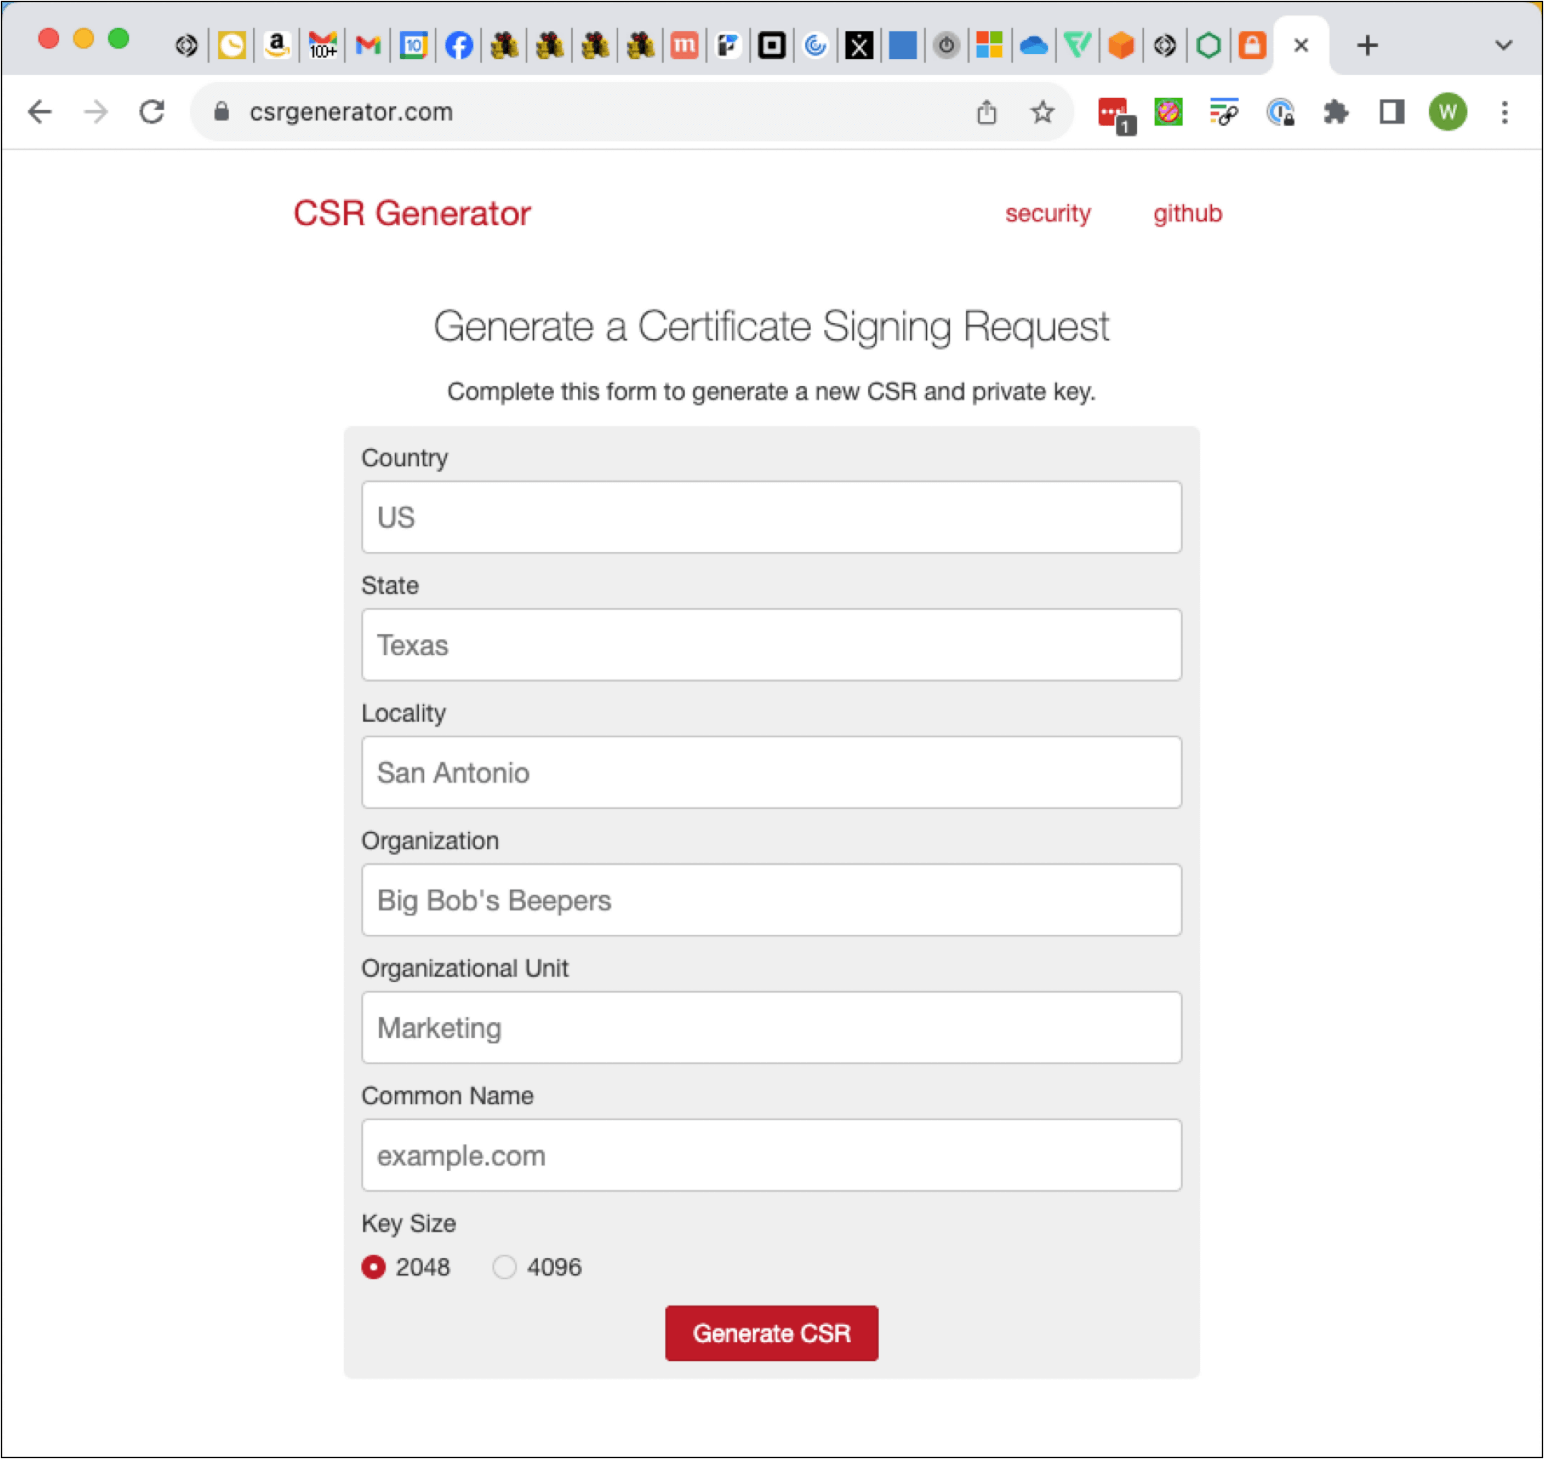
But back to it: you can generate the CSR (and its accompanying private key) from anywhere. You do not have to do this on the FileMaker Server machine. Nothing about the CSR is tied to the machine; it is just a file containing the request for a certificate with the information you provide.
You can generate a CSR online, for instance:
Or even through the command line on any machine that has openssl installed:
openssl req -newkey rsa:2048 -keyout PRIVATEKEY.key -out MYCSR.csrOr, if you are on Windows, you can generate a CSR from inside IIS.
Wherever you generate the CSR from, though, make sure to know where the private key is and keep it nearby and secure. That private key is generated as part of the CSR request and is used to encrypt the CSR.
When using the FileMaker Server Admin console, your CSR will be presented to you like this:
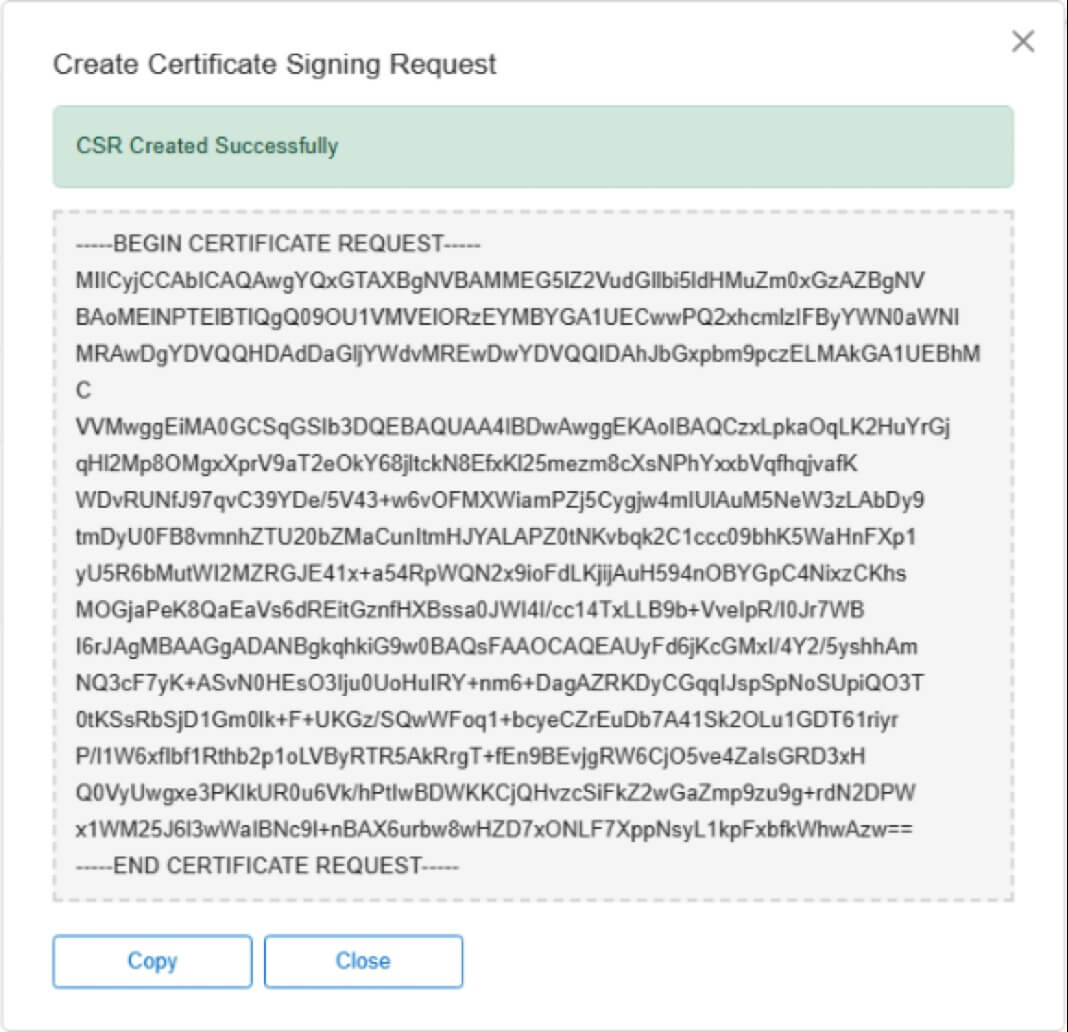
When you use FileMaker Server to generate the CSR then, the private key is called serverKey.pem and is in the FileMaker Server CStore folder. Copy it out of there to a known secure place so that you can re-use it in situations where you don’t have access to your FileMaker Server.
Once you have your CSR and your private key, give the CSR to your SSL vendor. Typically, that’s just part of the workflow, so it should be intuitive. Sometimes, you’ll need to upload the files; sometimes, you’ll have to paste their content.
As an example of a vendor that doesn’t require you to generate and provide a CSR, you may see this:
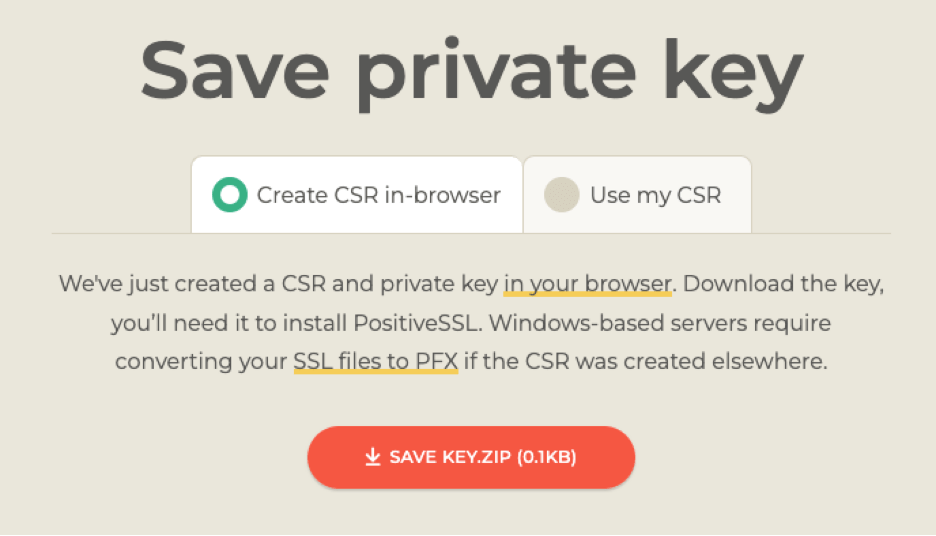
In this case, you can just download the private key file, and they’ll do the CSR work for you.
The Private Key
Keys typically come in pairs: a private key and a public key. The private key is your secret, and you should safeguard it extremely well.
Your key will be used by the certificate authority to digitally sign your certificate. Your public key will be part of the SSL certificate. In the initial connection between the browser, FileMaker Pro or Go, and your FileMaker Server, a complex handshaking happens whereby the client can verify that you do have the private key that was used to sign the certificate and that, therefore, you are you.
Keep that private key safe. It really is your signature.
Whenever you need to reinstall your FileMaker Server (or, in the case of a wildcard or SAN certificate, deploy the cert to another machine), you will need that private key to import the certificate into FileMaker Server.
If you lose your private key, you will have no other option than to rekey your certificate. This is really the same process as starting from scratch: generate a new CSR and thus a new private key, and go through your vendor’s verification steps.
Domain Ownership / Domain Control
When your vendor is happy with the CSR, you will then have to prove that you have control over the domain that is on the requested name. Note that we say control and not own. Sometimes that is the same , but sometimes it is not. You may be doing this on behalf of your client, for instance.
This part is called the challenge in the Let’s Encrypt world; we mentioned the word challenge earlier in this document.
Typically, the vendor will offer multiple ways you can use to prove that control. The most common ones are:
- sending an email to a specific email address on the domain
- adding a special-purpose DNS record to the public DNS server
- uploading a special file to your web server
Uploading a file to your web server is the same as the Let’s Encrypt http challenge.
Let’s Encrypt
For Let’s Encrypt, you also have the DNS option (which we’ve detailed here, including scripts to automate it), but email is not an option. Instead, most community efforts here (and the Claris FileMaker 2024 scripts) take the HTTP option that requires you to give Let’s Encrypt access to the web server on your FileMaker Server. We don’t think that’s a particularly secure way to do this, so if you are exploring Let’s Encrypt, we strongly encourage you to check out the DNS option.
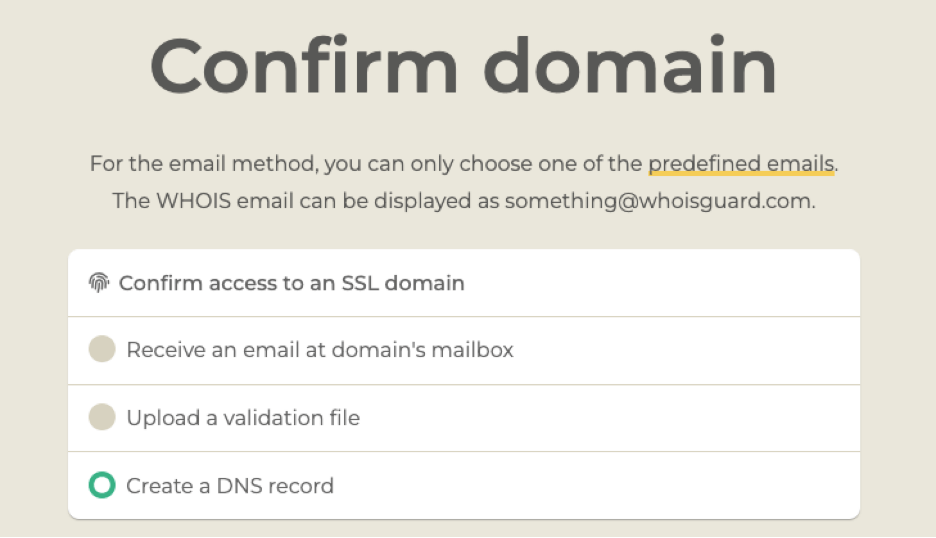
This stage of the process may look this:
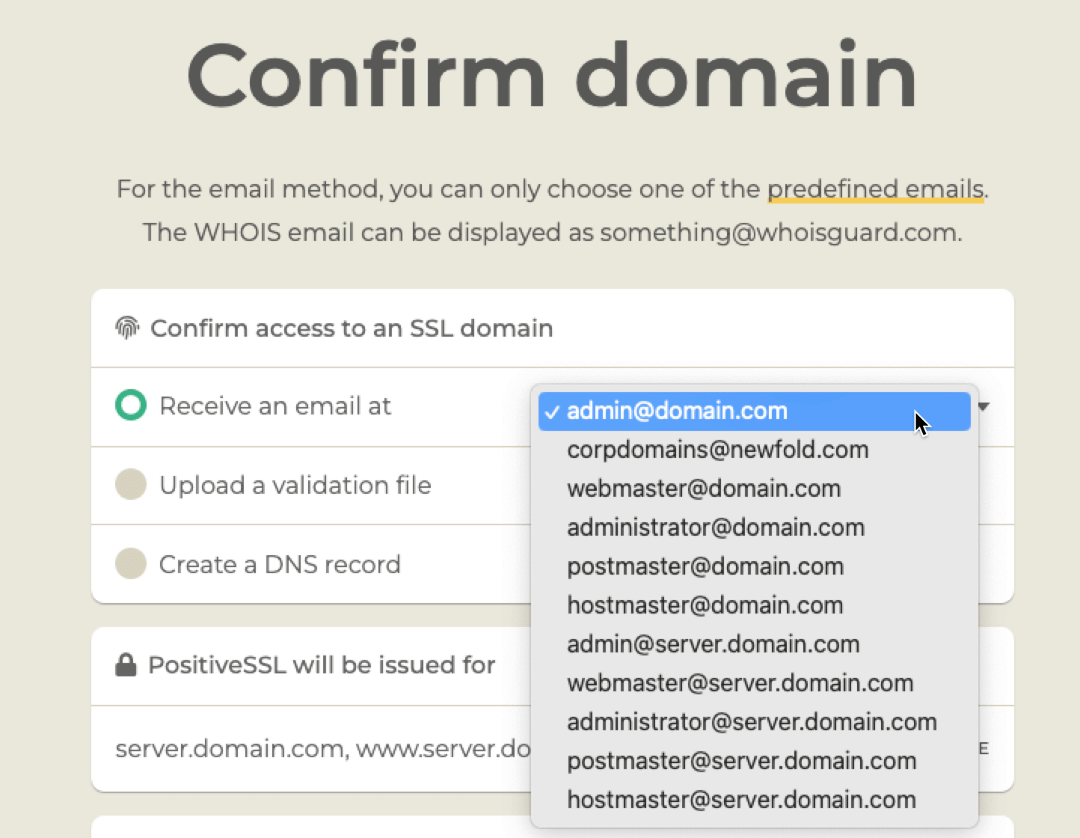
Note that when you choose the email option, your email address options are limited. You must have access to the email box of the email address you choose.
Regardless of the vendor, I find that using DNS verification is the easiest way to do this, but your preference may vary.
Detailed step-by-step instructions are difficult here since this process looks different for every vendor. But the core concepts are always the same.
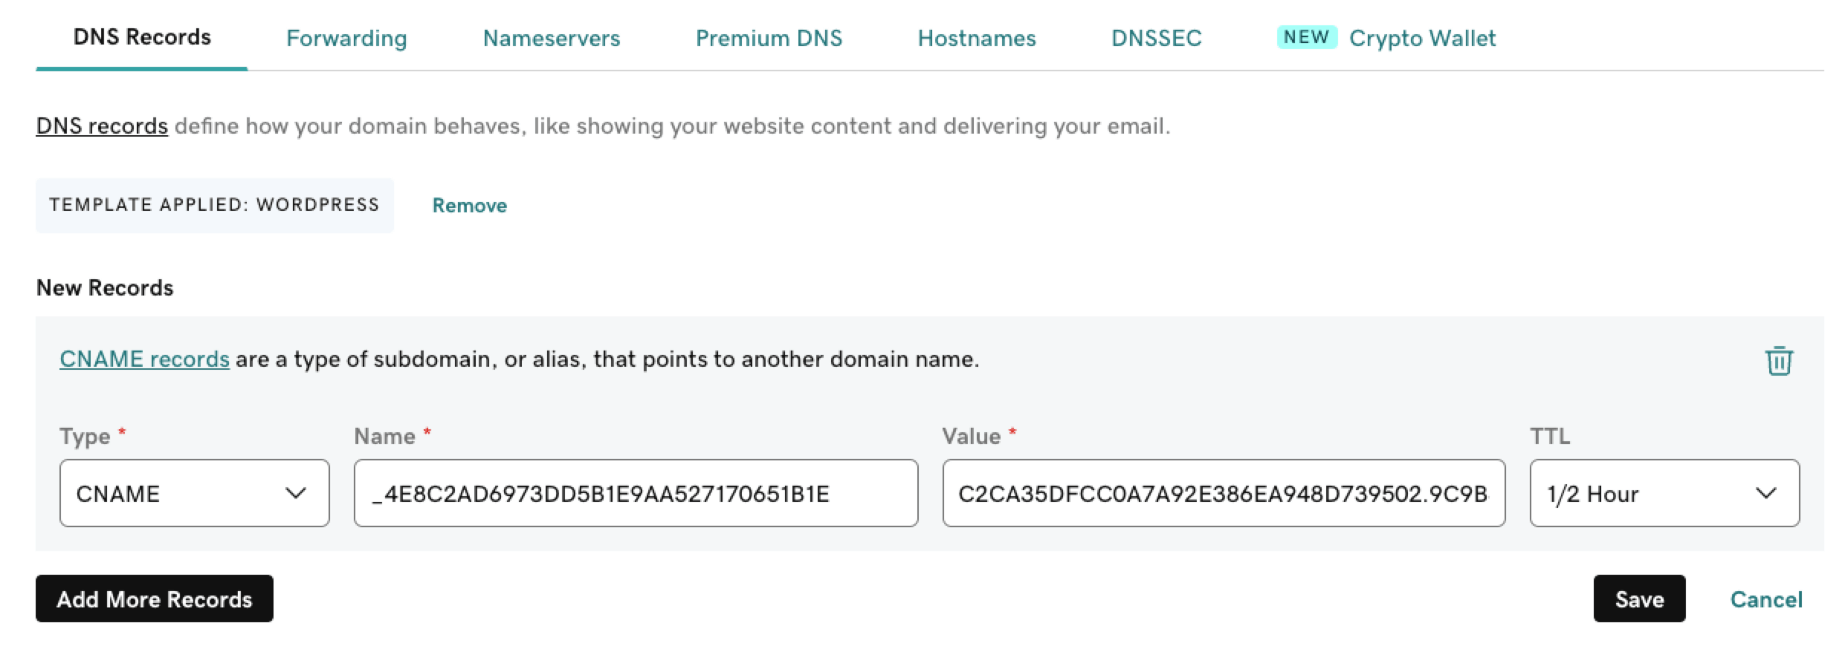
With the DNS option, the vendor will give you instructions on what DNS record to add. In the example below, it is a CNAME record with a specific value and target. Other vendors ask for a TXT record.
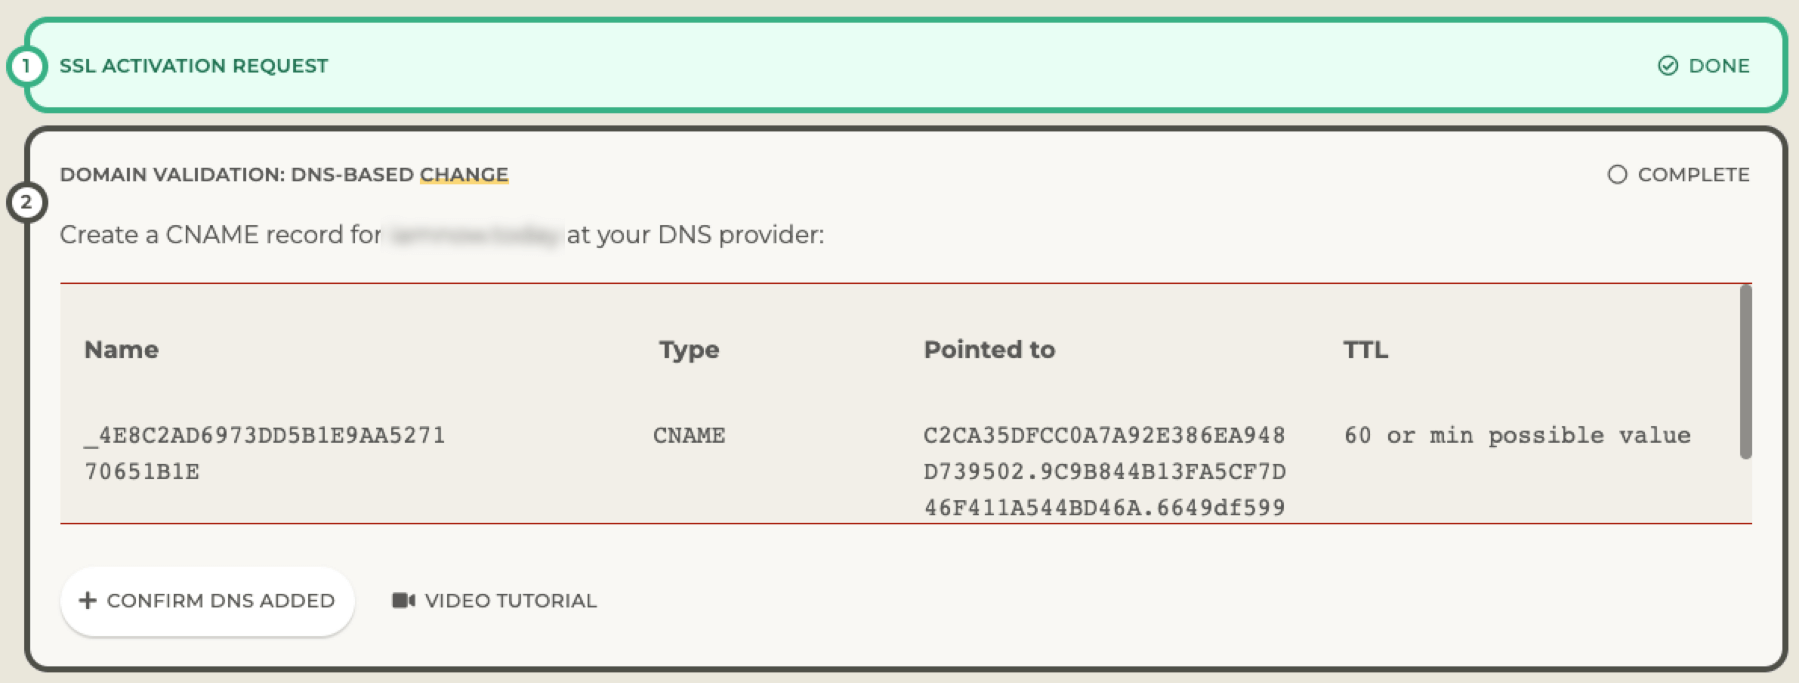
For the domain used here as an example, the DNS is managed at GoDaddy since that is where the domain is hosted. That is where I need to add the record:
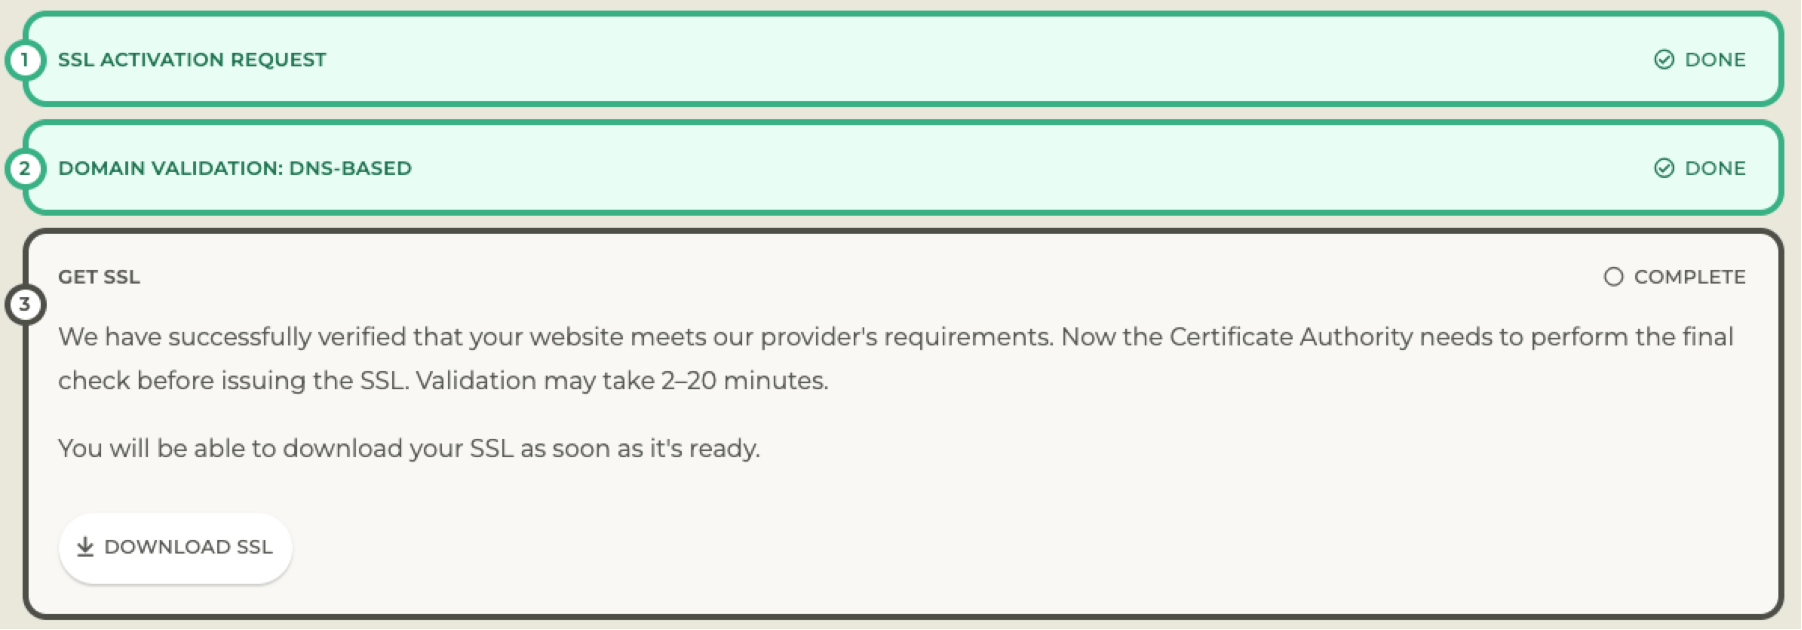
With that done, I go back to the SSL vendor’s website and click the Confirm DNS Added button. They will query the DNS servers for the domain to see if they can find that record. This may take some time, but usually, this process is less than 30 minutes. It’s plenty fast when you use big providers such as AWS Route53 for DNS.
Time to Download Your SSL Certificate
When the check passes, you can download the SSL certificate.
Downloading and Installing the Certificate
When the vendor completes the verification process, you will either receive the certificate and intermediate bundle by email, or they will point you to their website, where you can download them . If they give you the choice of different formats, pick the most generic format and not a format for any specific web server (IIS, Apache,…).
Common file extensions that work for FileMaker Server are .crt and .pem, .ca-bundle. But regardless of the extension, open the certificate with a text editor to verify that it starts like this:

If it is not in this kind of format, download some other options until you get one that you can open in a text editor, and that conforms to this structure.
If your download or email does not include an intermediate bundle, go look at the vendor’s website, where you can download it. It is a critical file that you will need.
Be Prepared for a FileMaker Server Restart
The easiest way to add the certificate to FileMaker Server is through the Admin Console, although you certainly can also use the Admin command line or API. We use both extensively for automated server deployments.
Note: if you are renewing your SSL certificate make sure to first delete the existing one. Do not mess with the FileMaker Server CStore folder though, use either the admin console for this:
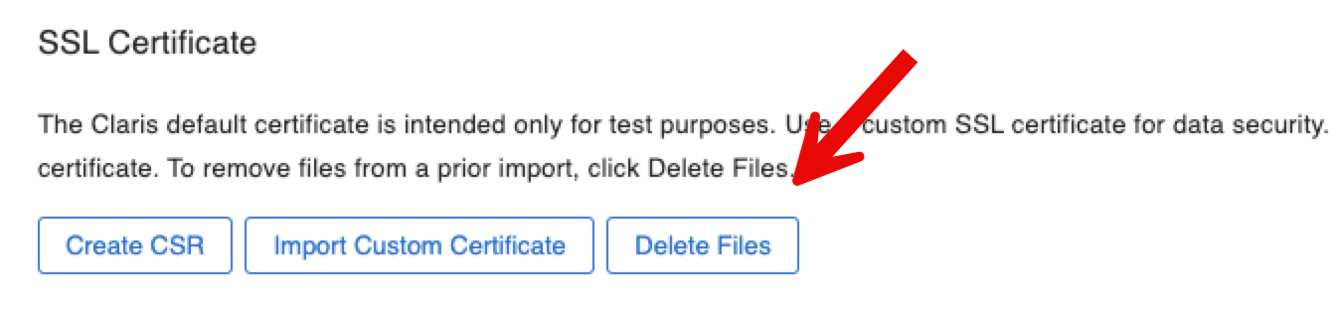
Or the fmsadmin command line:

When you are ready to import the new SSL certificate, in the admin console, you will be presented with this dialog where you can browse and select the three files that you have: your SSL certificate, your private key, and the intermediate bundle.
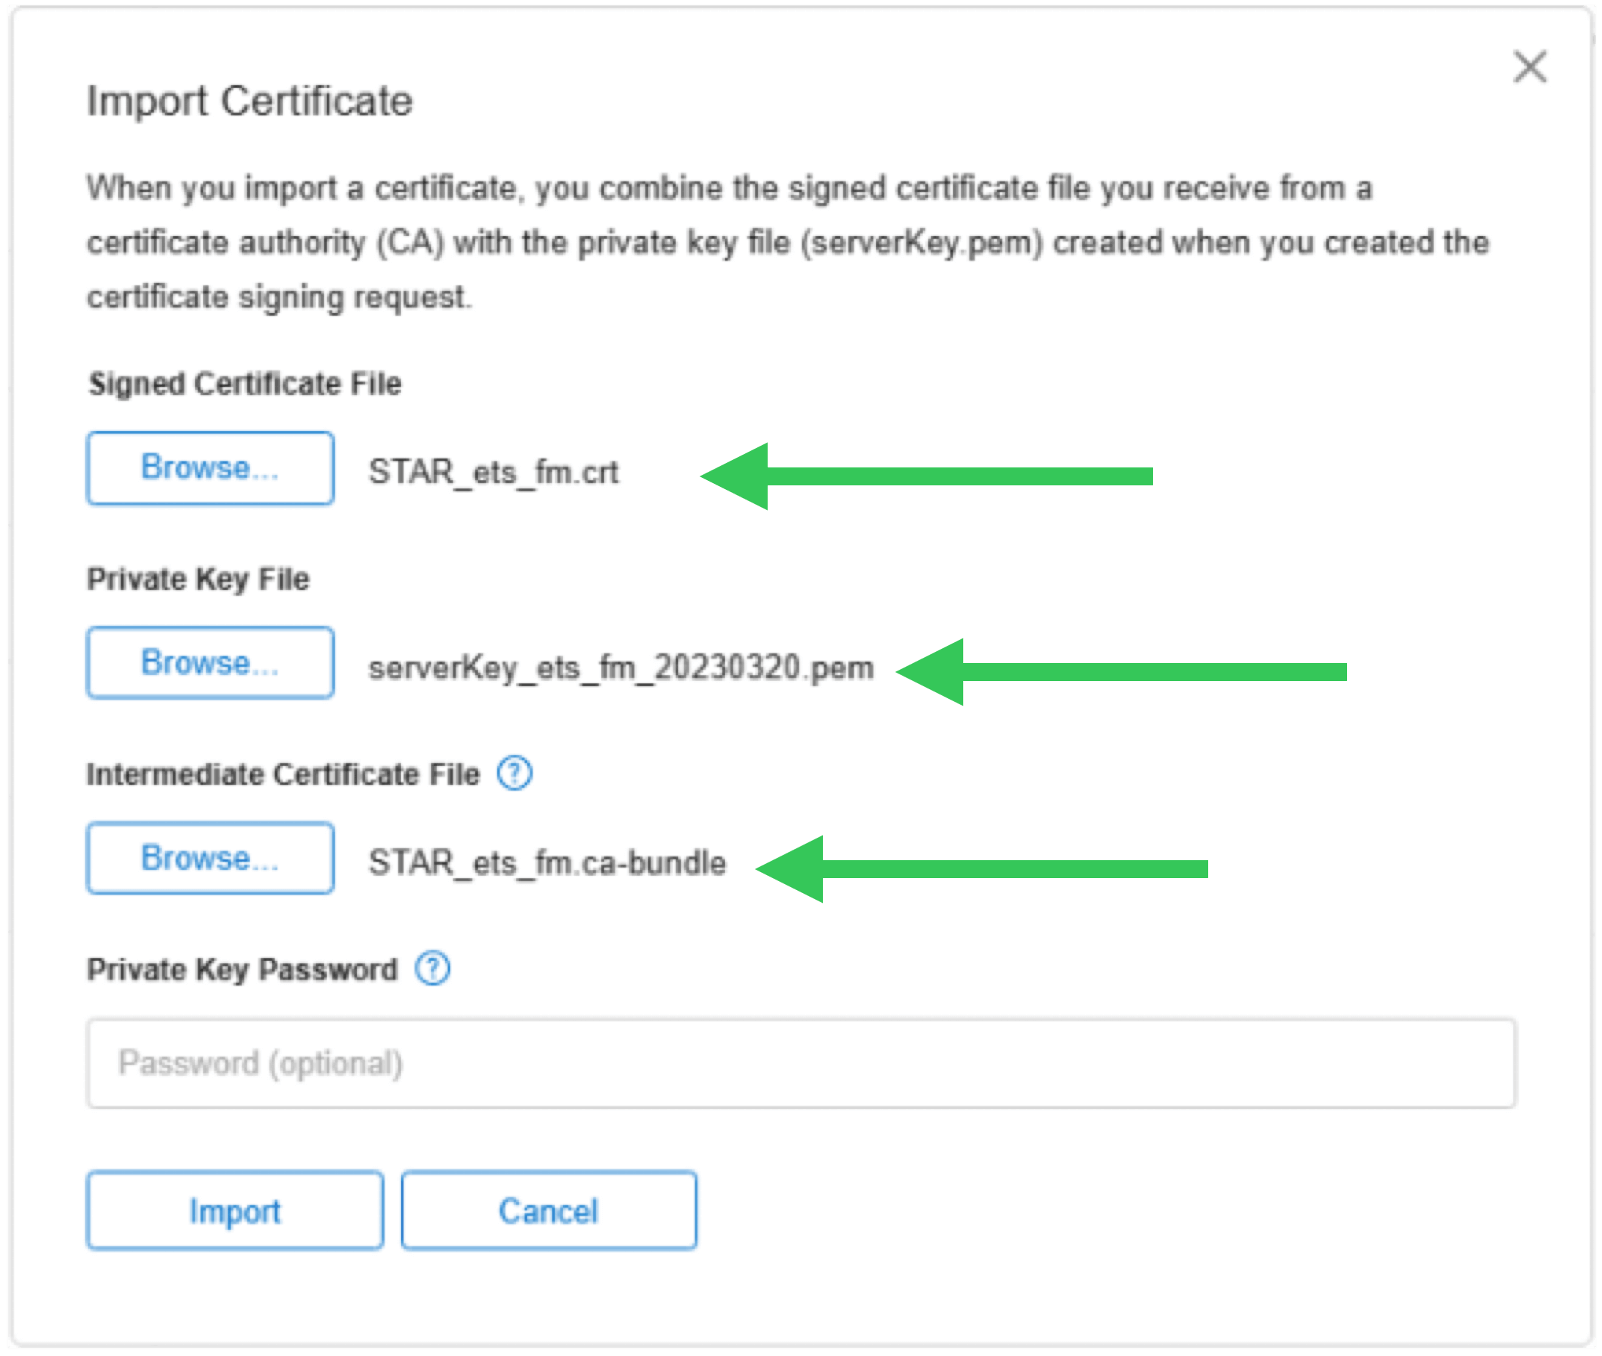
When the import is successful, you will be prompted to restart FileMaker Server for the change to take effect.
On the Admin Console dashboard and in the SSL certificate section, you will see confirmation of the certificate that is being used and when it expires.
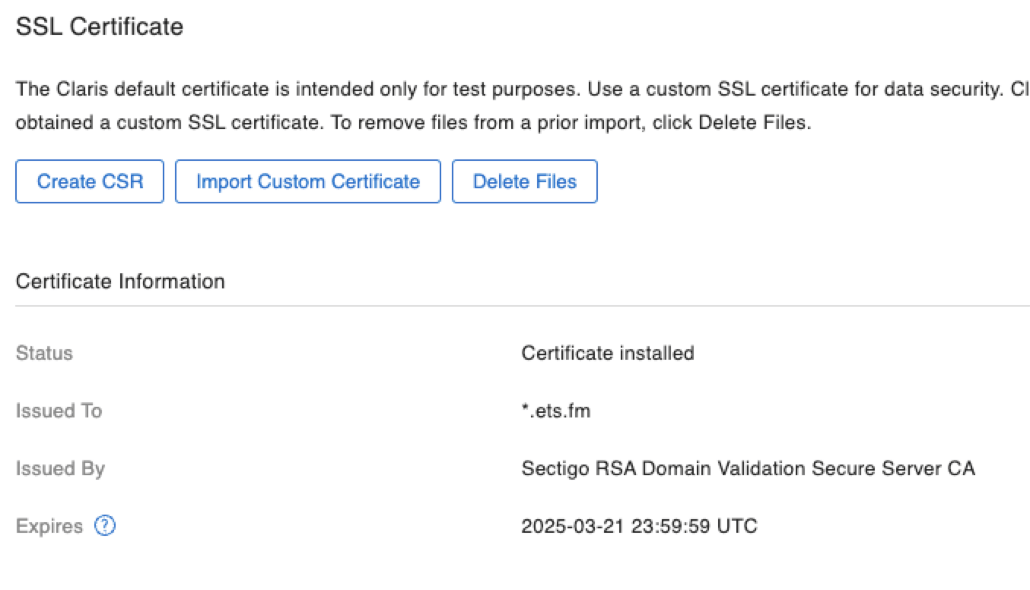
When you have a wildcard cert or a SAN cert, you can repeat this installation process on all servers that you need the certificate on. You do not need to create a CSR on each server. Remember: the CSR has nothing to do with your server, just with the name. For a wildcard, the name is *.domain.com, and for a SAN, the names are already listed.
Renewal vs. Rekey
Your commercial certificate will expire in 12 months. You will want to renew it a few days or weeks before it expires so that you can plan the new import and the server restart that it requires.
The renewal process typically does not require you to go through the whole process again. Most vendors (again: not all) will make a new certificate available to you automatically if you have already paid for it, of course.
In that case, just use the new certificate, the issuer’s current intermediate bundle, and your existing private key from the first issue.
Other vendors will insist on a re-verification, which means going through the whole process again: new CSR, new private key, etc., just like the original issuing process. Technically, this is not a renewal but a rekey since it involves a new key.
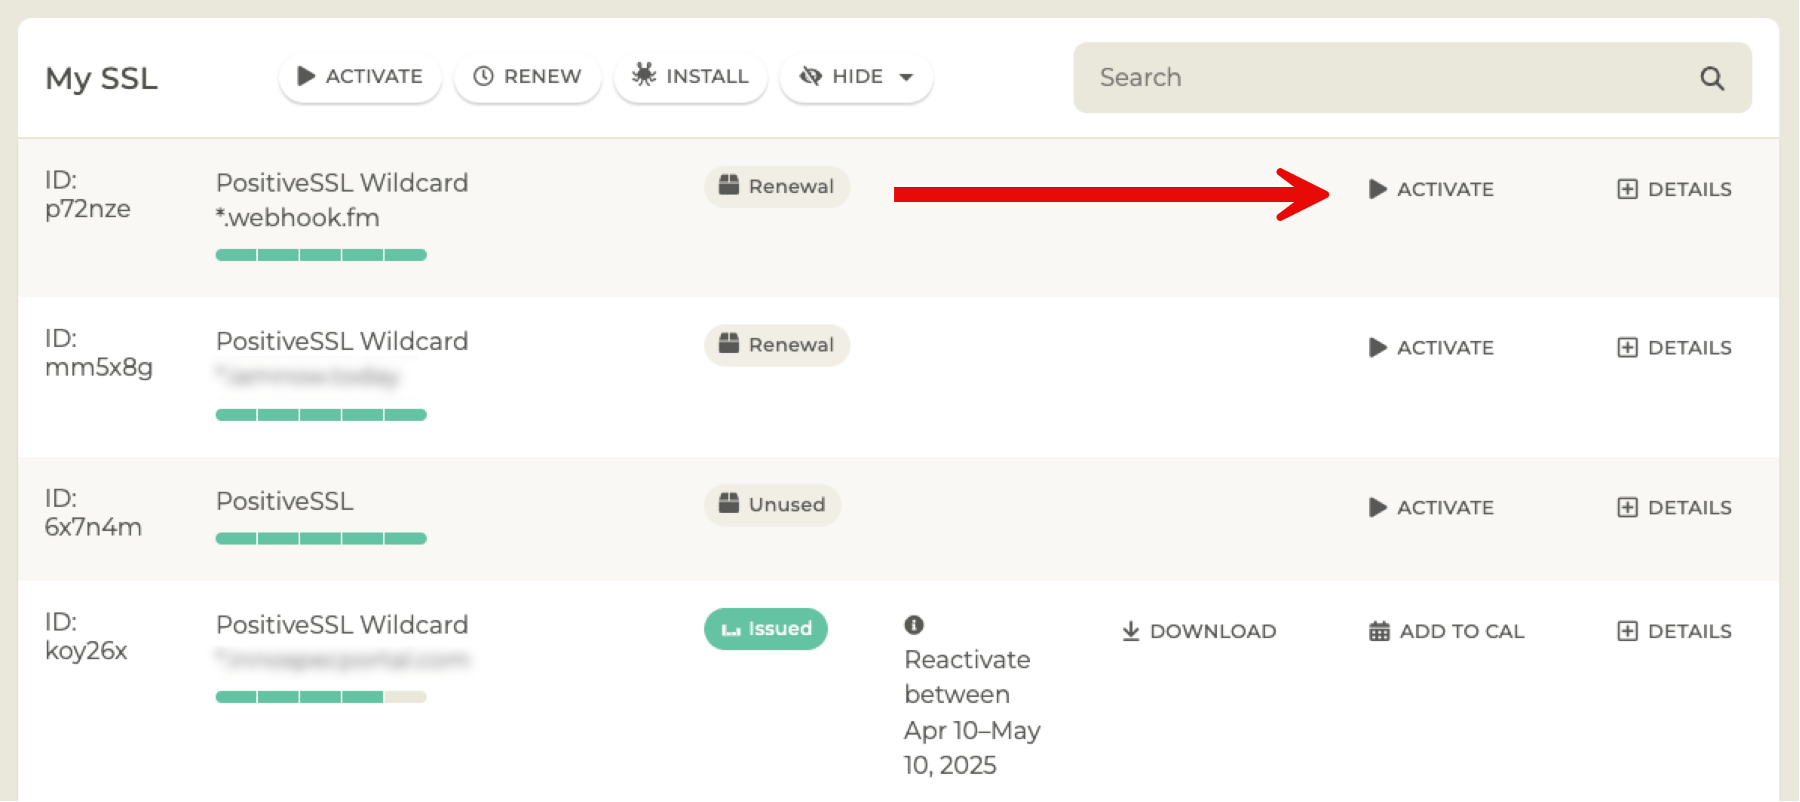
Using that same vendor from the example above, the renewal requires redoing the whole process:
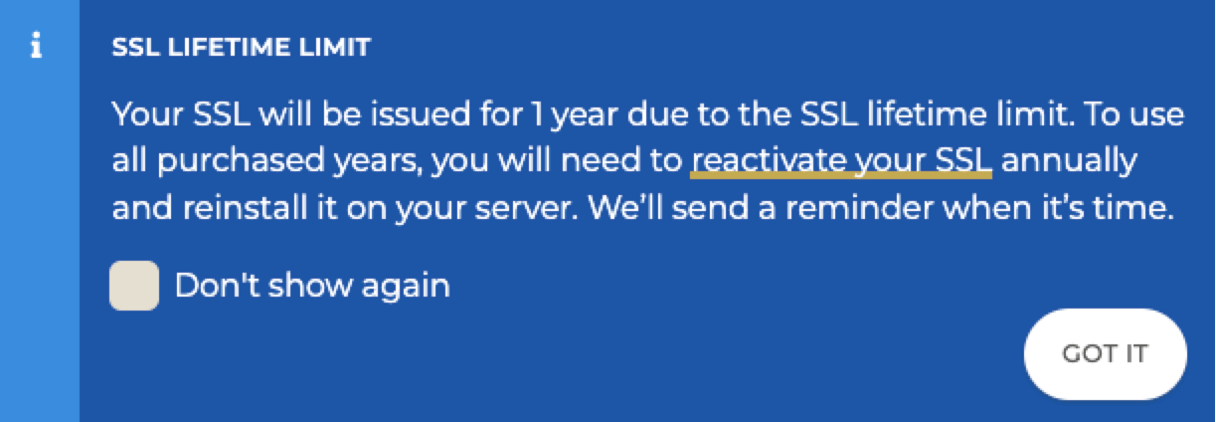
If you have purchased the rights to an SSL certificate for multiple years, they will also remind you that the SSL certificate itself will only be valid for one year:
Establishing & Launching Your SSL Certificate
We hope to have demystified all things related to SSL certificates and how to get them issued. Leave comments if you need more information on any particular aspect.
To learn more about our Filemaker expertise and how we can help you achieve more on the Claris platform, contact us.
Can we use a free CloudFlare SSL/TLS certificate?
https://www.cloudflare.com/application-services/products/ssl/
If they have a mechanism to give you the cert and intermediate bundle and you have the private key that was used to generate the CSR, then yes. SSL certs are universal and as long as the chain of trust works at the server and at the client then the SSL certificate will work.
Thank you! Once I do it, I will update here if it worked, since I know a lot of people are interested in using CloudFlare certs.
Hi Wim,
Thanks for this.
I have just purchased, downloaded and installed a Positive SSL certificate from ssls.com as you have shown.
I uploaded the files, .crt as the signed certificate and the .ca-bundle as the intermediate but I am getting an incomplete chain when checking on ssllabs.com.
What am I doing wrong?
Thanks
Hard to say without seeing the report. But if you are getting a green lock in FMP and Go and WebDirect then you can be assured that all is well. If not, then something is probably off with the intermediate bundle, perhaps it is not in the right format.
In your report look in the “additional certificates” and “certification paths” sections to see why it is complaining.
Thanks for compiling all of that info into one place, Wim. A fair bit of work on your part for the article, but we now have a definitive reference.
Client OS have a Host file where DNS entries could be added to bypass a DNS server.
https://www.liquidweb.com/kb/dns-hosts-file/
https://kinsta.com/knowledgebase/edit-mac-hosts-file/
They do; but I don’t consider that a sustainable solution since it is not centralized nor protected. Too much maintenance hassle to set and update. Great for quick testing but not a viable deployment strategy IMHO.
At first glance, this appears to be a well-written article. When I find articles like this that I want to read thoroughly and fully absorb, I usually create a PDF version so I can annotate and highlight as I read. Have you considered providing PDF versions of your excellent articles ?
We’ll discuss it internally; one of the reasons not to is that we often do small updates to these blog posts and we’d want you to have the latest info….
Thank you for the breadth and depth of your SSL Certificate setup process.
Thank you for this! Just one, maybe stupin, question: do I have to register a subdomain or if it is enough to name the server e.g. fms.ourdomain.se? We have a domain and a static IP.
Hi Michael,
Depends on what you mean by “register”. “fms.ourdomain.se” is a fully qualified domain name (FQDN) that consists of those three parts that I mention in the article:
1) host: fms
2) domain: ourdomain
3) TLD: se
That FQDN is what you need to ask a certificate for. You don’t need to register with a registrar or ask for it since you already own the domain, you can create any and all hosts for it. You will however will need to register it in DNS so that the name can be resolved to a proper IP address for network traffic.
If you will use the server both internally on your LAN and externally through the internet then you need to register it with both your external DNS (using your static IP from your ISP), and in your internal DNS (using your server’s static LAN internal IP).
That
Hi,
Create is probably a better word. Do I begin with creating the subdomain at our web hosting provider, where our domain is managed?
Can’t really say from your description. You need to create a DNS record. If your web hosting provider is where external DNS is managed then yes, you need to create a DNS A record there.
But also don’t forget your internal DNS if you want to use the DNS name internally.
I’m using MacOS. I cannot find a setting or figure out how to “disable AutoDiscovery in your FileMaker Server.” Thanks in advance!
You can (and probably should) disable Bonjour altogether on the server at the OS level. Some googling will show how to do that in macOS.
If you want to leave Bonjour on but just not for FMS, then look at the options from the command line with “fmsadmin get serverprefs”. The option is named “ServerDiscovery”. Set it to false.
I bought a RapidSSL certificate through our webhost, and received a certificate.crt and a certificate.key file (I did not generate the CSR myself). The .cert file includes both the server and the intermediate certificate.
Since they have to be separate, I contacted RapidSSL and they sent me a star_ourdomain.cer and a DigiCertCA.cer file. Are these compatible with Filemaker? I also got a TrustedRoot.cer file that I don’t know what to do with.
You typically don’t need the TrustedRoot certificate since your OS/device will already have a root certificate authority cert for the provider. So for FMS just use the provided star_ourdomain.cer and DigiCertCA.cer, plus your private key.
Most SSL certificates are compatible with FM these days, provided that the full chain of trust can be established. Which is usually not a problem with commercial certs or Let’s Encrypt.
It’s totally fine that you didn’t generate the CSR yourself, as I mention in the article, a CSR can be generated through many different channels and many SSL vendors do that for you automatically.