This post is one in a series of guides that walk you through installing, configuring, and using Zabbix to monitor your FileMaker servers:
- Part 1: Getting Started with Zabbix
- Part 2: Installing Zabbix as an Appliance
- Part 3: Installing Zabbix from Scratch
- Part 4: Installing Zabbix Agent (this post)
- Part 5: Zabbix Configuration
- Part 6: Using Zabbix
- Part 7: Maintaining Your Zabbix Server and Agents
Do We Need an Agent?
Zabbix agents collect data from the monitored host (FileMaker Server). While Zabbix server can monitor servers and devices without the presence of an agent on the host, the amount of data you can collect, and its relevance, would be much less.
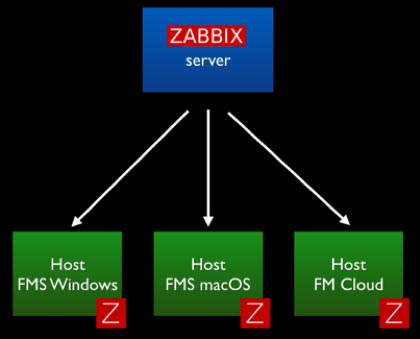
The agent is a small piece of software that runs completely in the background as a service/daemon. It is designed to be lightweight so that its monitoring activity does not affect the host that it is monitoring. These agents exist for all three of the platforms that matter for us: Windows, macOS, and CentOS (FileMaker Cloud).
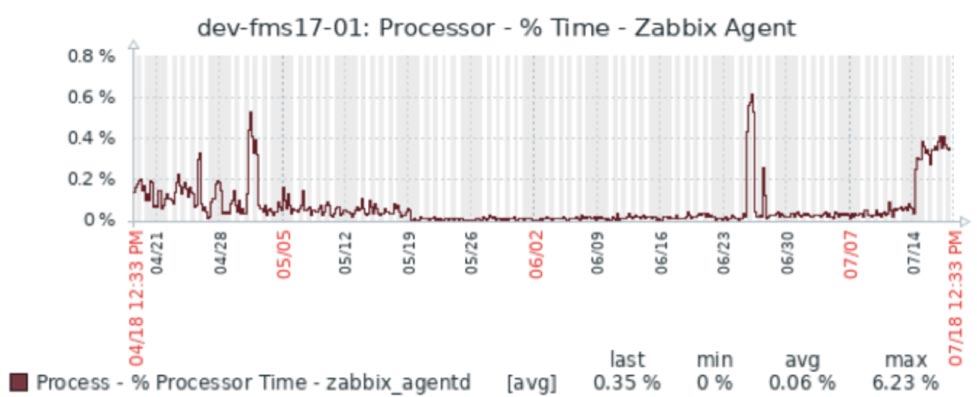
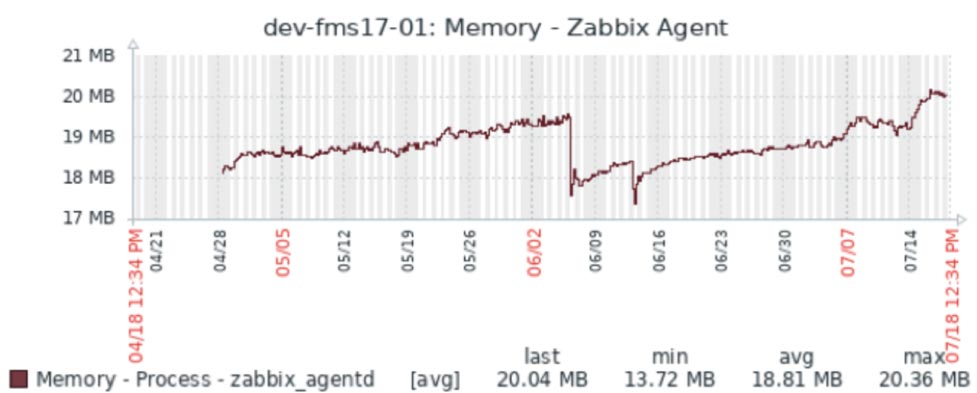
The Zabbix agent footprint is small. As an example, the screenshots below are from one of our Zabbix servers that monitors four development FileMaker Servers. Over the course of three months, the processor time for the Zabbix agent did not exceed 1% and used about 20MB of memory.
Active or Passive Agent and Firewall Ports
Agents can operate in two modes – active or passive – and the difference can matter to you in terms of whether you are comfortable with opening an extra port on the FileMaker Server.
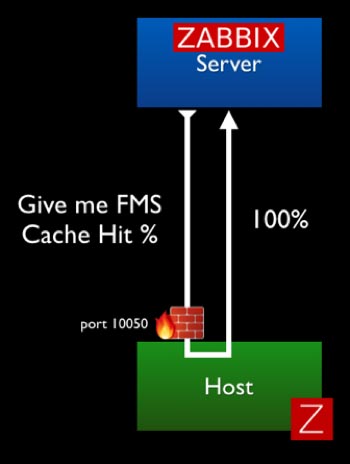
In Passive mode, the agent does not do anything at all until it is asked to do something by the Zabbix server. The communication originates from the Zabbix server and requires port 10050 (These ports can be customized as we will show later.) to open on the FileMaker Server to allow that incoming traffic.
In Active mode, the agent collects all of the required data on its own (based on the interval set for each item it collects data for) and sends that data to the Zabbix server. In this scenario all communication originates from the FileMaker Server; no ports need to be opened on the FileMaker Server. The Zabbix port 10051 needs to be open on the Zabbix server to accept the incoming data.
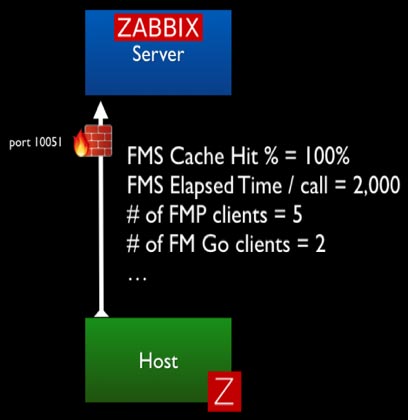
To use all of Zabbix’s functionality, including the ability for Zabbix server to send remote commands to your FileMaker Server (for instance to restart the scripting engine), you’ll need to allow traffic in both directions.
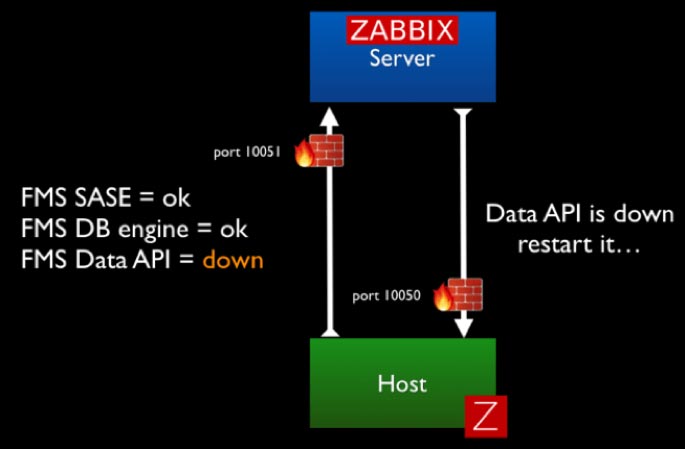
Based on your security requirements, you can decide to forego some of the functionality around triggering remote actions and opt for a more locked-down deployment.
Installing the Agent
For macOS and Windows, you can download the agent from the Zabbix download page. For FileMaker Cloud, you complete the installation through the CentOS software manager command line.
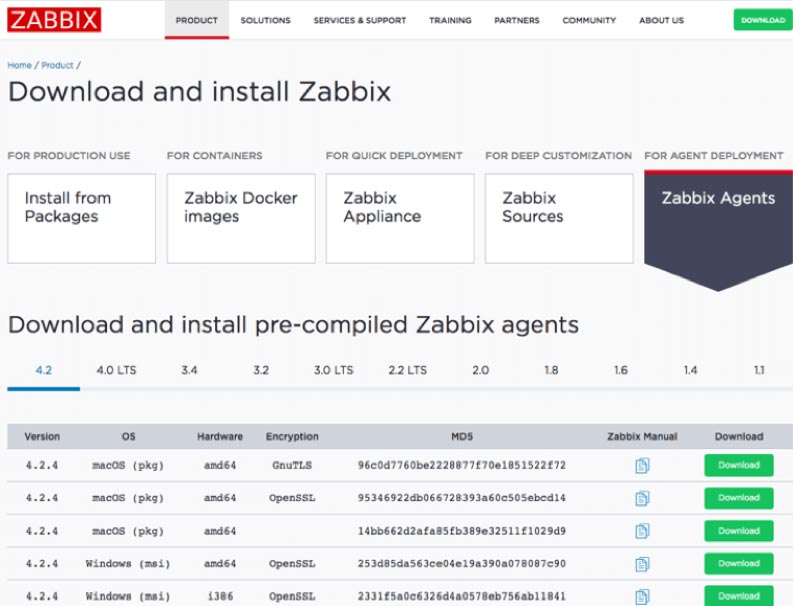
Note that you have multiple choices per platform depending on the encryption engine (GnuTLS, OpenSSL, no encryption). The main reason for offering different encryption engine options is so that if a vulnerability were to be discovered in one encryption platform, we can fairly seamlessly switch to another. In that sense, you can pick whichever one you prefer. There is no functional difference between the choices.
The Zabbix agent for Windows comes as a standard installer with the usual wizard that will walk you through some of the needed basic configuration details.
Installing on Windows
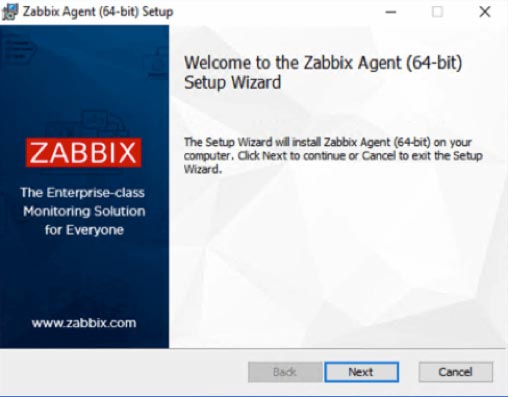
The choices you make on the next screen can all be modified in the Zabbix agent config file as will be shown later in this guide.
The Host Name gets set by default to the hostname of your Windows machine. You can change it to something meaningful, provided that it is unique. The Host Name will be shown on the Zabbix server dashboard and is used when you set up a new host to monitor on your Zabbix server.
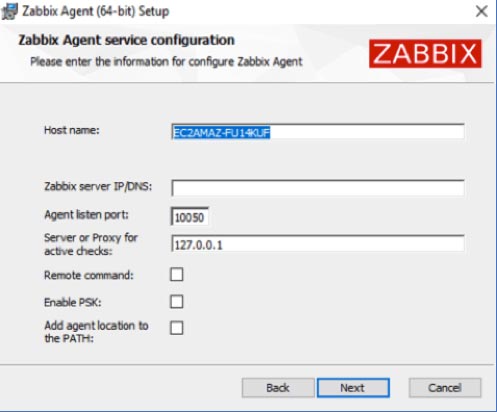
Zabbix Server DNS name or IP address
The Zabbix server DNS name or IP address will be used to inform the agent where to send data and as a security measure so that the agent will only respond to incoming traffic (passive requests for data, remote commands) from the Zabbix server(s) listed.
Port 10050
Port 10050 is the default port on the Agent-side to listen to those incoming requests. You must open this port on your FileMaker Server’s firewall or your perimeter firewall for your network and then forwarded from your router to your FileMaker Server. If you host your FileMaker Server on AWS or a similar provider, remember to adjust the inbound rules there. If you would rather not use the default port, you can adjust it here (or later by modifying the config file).
Server or Proxy for Active Checks
Typically, you would use the same DNS name or IP address for the Server or Proxy for Active Checks as you have for the Zabbix server DNS name earlier. This setting decides where the Agent will send the data it collects for Active items (where the agent does not get prompted by the server to collect data). In complex deployments, you could use a different Zabbix server or a Zabbix proxy for these active checks.
Remote Command
The Remote command toggle is to decide whether you will allow this Agent to accept remote commands from the Zabbix server listed. We do use this functionality in our FileMaker Server templates to restart processes like the FileMaker Server scripting engine, Data API, or Web Publishing Engine if they have stopped running.
Enabling PSK
By enabling PSK, you encrypt the traffic between the Agent and the Server through a Pre-shared Key. This security scheme is similar to how most Wi-Fi networks work.
Add the Agent Location to the PATH
Enabling the option to add the agent location to the PATH will ensure that you can use the Zabbix agent command line commands from anywhere on the machine without first having to navigate to where those executables are. That is similar to how “fmsadmin” works on your FileMaker Server; the FileMaker Server installer does this automatically.
For our deployment, the configuration looks like Figure 10.
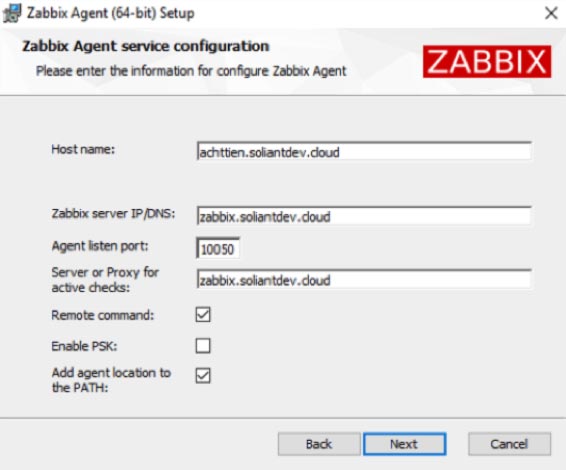
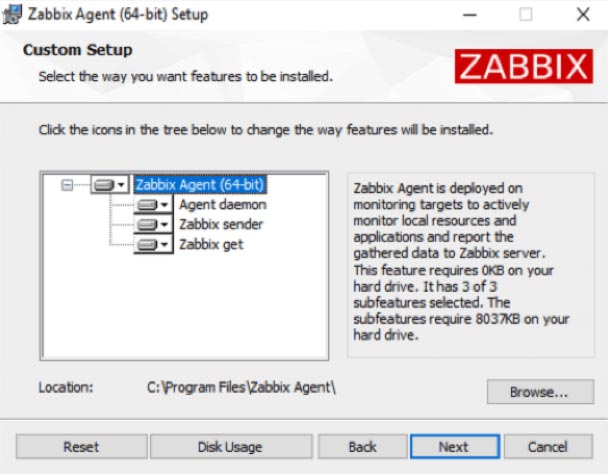
The core of the Zabbix agent is the ‘Agent Daemon’. By default, the installer will also install the Zabbix Sender and Zabbix Get, which are command line tools to manually initiate sending data to the Zabbix server or retrieve information from the Zabbix server about what active items for which to collect data.
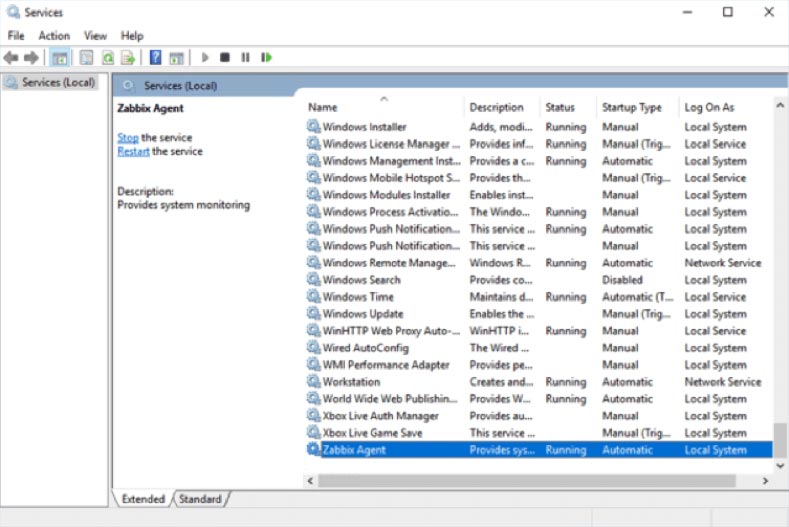
When the installer has completed, you will find the Zabbix agent listed among the Windows services. Like most background services, it runs under the “local system” account.
The log file for troubleshooting is in the Zabbix agent install location under “Program Files”:

Later in this guide, we will make some modifications to the zabbix_agentd.conf file, located in this same folder, to further tweak our deployment.
Installing on macOS
Similarly, on macOS the Agent’s installer, will walk you through the standard wizard:
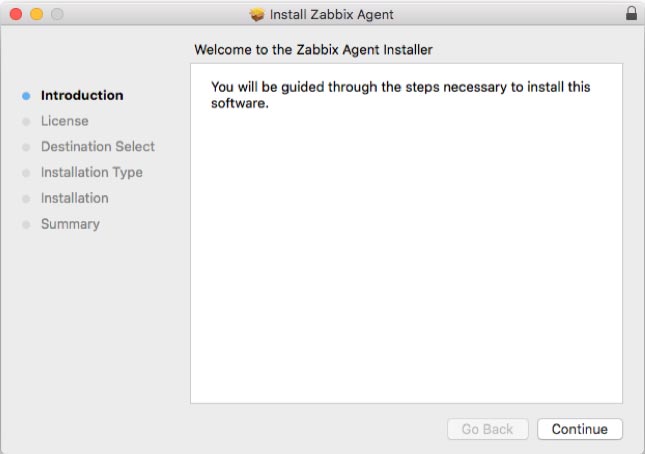
But it will not provide any options to change configuration settings up-front. We will show you how to modify the config file to set the relevant options.
The macOS installer adds a Zabbix user account responsible for running the daemon. This will be relevant later on when we make our configuration changes.
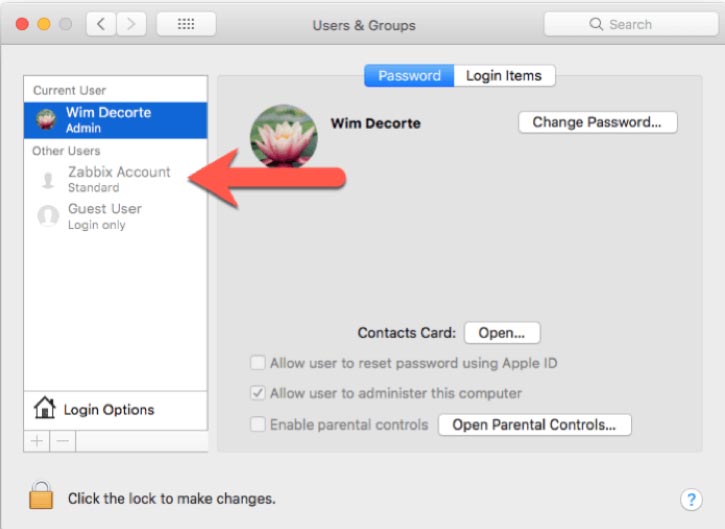
Adding the Zabbix user to sudoers
As part of our Zabbix template, we use some of the macOS and FileMaker Server command line functionality to collect (and take action on) data for items we monitor. As such, the Zabbix agent user needs the right level of privileges to execute those commands.
To make this work seamlessly through the security features available in macOS, we will use the sudoers file.
First off, open Terminal and type in this command to create a new file in the sudoers folder:
sudo nano /etc/sudoers.d/zabbix_nopasswdIn the nano text editor window:

Type in or paste in the following line:
zabbix ALL=(ALL) NOPASSWD: ALL
Hit control-o and then enter to save the file and then control-x to quit out of the nano text editor and return back to the command line.
Type in the following command to restrict that new file’s access level so that it is read-only for the owner of the file and the group to which the owner belongs. (This further protects it from inadvertent changes.)
sudo chmod 0440 /etc/sudoers.d/zabbix_nopasswdWith this done, we’ll instruct macOS to read this new file when evaluating the rights of a certain user to run commands as Super-User (aka the su in sudo).
Visudo
The safest way to do this is through the command line utility visudo. vi is another text editor, and visudo is made specifically to be the text editor for everything that has to do with changes to the super-user do (sudo) levels.
sudo visudoThe Terminal window will change to the vim text editor (a variant of the vi text editor) – which most people find difficult to work with unless you use it very often.
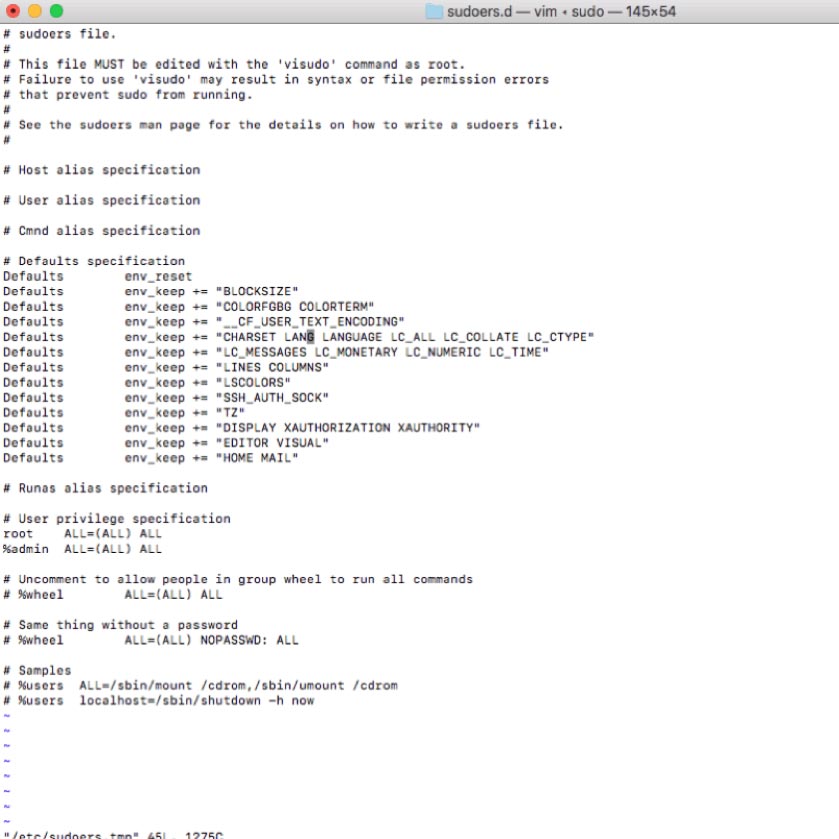
Using the arrow keys, scroll down to the bottom of the file and hit i on your keyboard to enter edit (insert) mode. The bottom of the window will confirm that you are in edit mode:
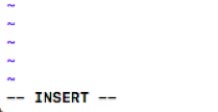
Add the following two lines:
## Read drop-in files from /etc/sudoers.d (## indicates a comment line; # does not)
#includedir /etc/sudoers.d
To exit edit mode, hit escape on your keyboard and type in :wq and then enter to save the document and quit vim. This will place you back on the command line.
The syntax of the file we have just added to the sudoers folder is crucial to the operating system. To ensure you did not make any syntax errors use this command:
sudo visudo -cf /etc/sudoers.d/zabbix_nopasswdWhen all is well, you should see “parsed OK” in the result of that command:

Python Requests Module
As part of our template, we will use a small Python script on the FileMaker Server machine (PowerShell on Windows) to communicate with the FileMaker Server Admin API and retrieve configuration settings. The Admin API is only available in FileMaker Server 18 (and in 17 until its expiry on September 27, 2019).
Recent versions of macOS have Python 2.7.10 installed by default so we made sure that the Python script is compatible with that – somewhat old – version of Python. To make the REST request to the Admin API, we want to use Python’s requests module.
That module, however, is missing from the standard macOS Python installation and so is Python’s software package installer (pip).
First, we need to install pip:
sudo python -m ensurepip --default-pip
And with pip installed, we can install the requests module:
sudo python -m pip install requests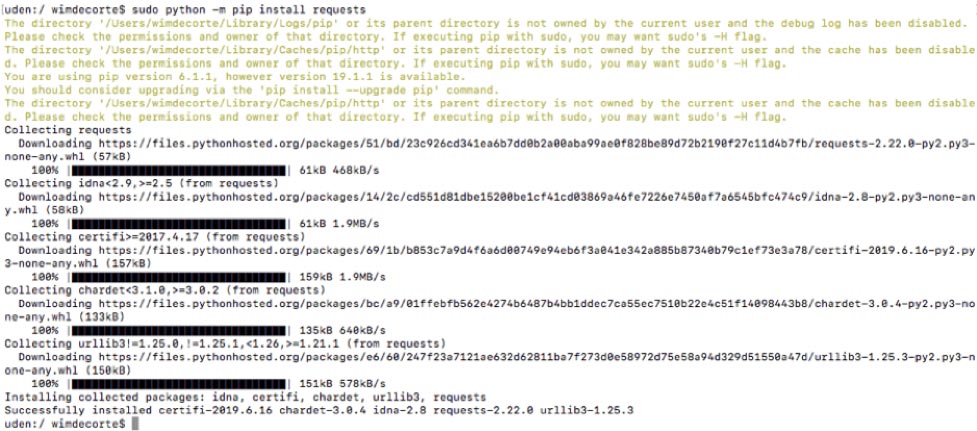
Starting, Stopping the Agent and Where to Find the Log File
To start the agent, use this command in Terminal:
sudo launchctl start com.zabbix.zabbix_agentdOr, use stop to stop the agent, particularly after making changes to the Zabbix agent config file which necessitates an agent restart.
The log file is in this folder: /var/log/Zabbix/Zabbix_agentd.log and contains very useful troubleshooting information.
Installing on FileMaker Cloud
FileMaker Cloud runs on Linux CentOS. The Zabbix downloads page does not offer a pre-compiled agent for that operating system. Instead, all software installations on CentOS are done through its built-in command line software package manager: yum.
Since we need access to the command line, we need to establish an SSH connection to the server. FileMaker Cloud instances do not allow this by default, so we need to change the inbound rules in the AWS EC2 console. Select your FileMaker Cloud instance and click on the security group that applies to it:
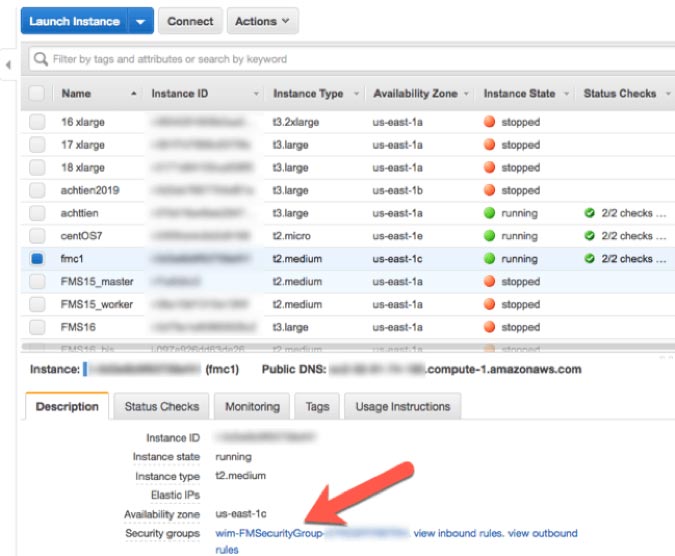
In the security group settings, select inbound rules and adjust them so that:
- Port 22 (SSH) is allowed but only from your IP address
- Port 10050 is allowed but only from the IP address of your Zabbix server
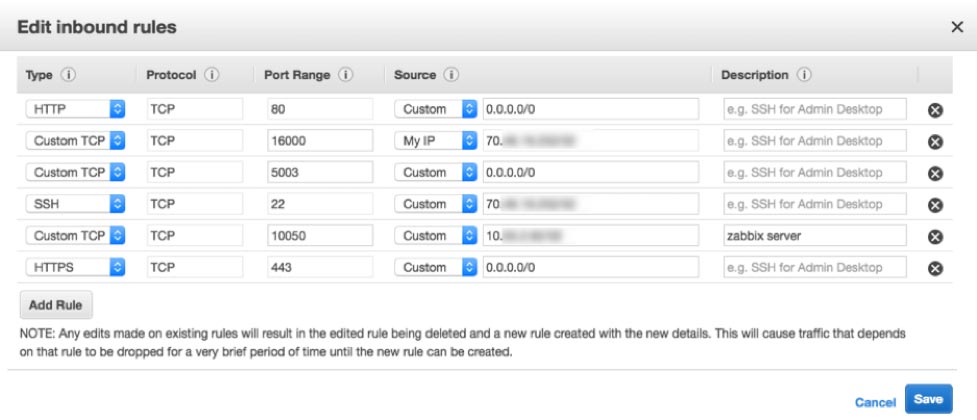
With this done, we can now open Terminal on macOS or your favorite SSH client on Windows and connect to the FileMaker Cloud instance:
ssh -i /Users/wimdecorte/Documents/projects/ETS18/zabbix_resources/wim_ets_15.pem centos@<IP or DNS name of your FileMaker Cloud instance>All SSH connections to AWS instances require the use of the pem file (certificate) that was used to create the instance. You can do this by specifying the -i and the path to that pem file. centos is the default user name to log into CentOS Linux.
Future Configuration Changes
Before we go on, we have to mention a big caveat: any and all configuration changes that we make from this point forward may get lost through the automatic updates that happen on FileMaker Cloud instances. There is nothing that can be done about this, since that is the architecture of FileMaker Cloud. A FileMaker Cloud instance consists of a number of drives, one of which holds your FileMaker Data and all the FileMaker Server configuration settings. The other drives hold the Linux operating system and its configuration, and those drives get replaced from time to time with Linux system updates.
What does this mean for Zabbix monitoring? After a FileMaker Cloud upgrade, you may have to redo the steps in this section, so it is a good idea to save a copy of the configuration file after making changes to it.
Install nano
The very first thing we will do is install nano, our favorite Linux text editor. We will need it to change the Zabbix agent configuration.
Type in:
sudo yum install nanoAs with all installations and updates, you will see a bit of an overview of what will happen, and you will be asked to confirm with “Y” that you want to proceed:
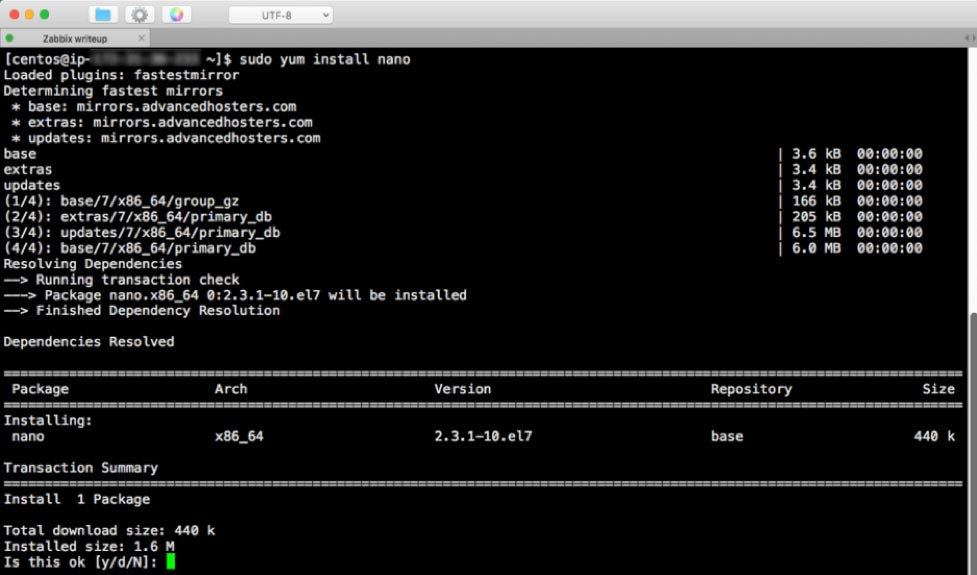
A few seconds later, we will be done:
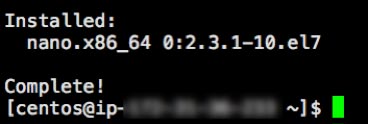
Type in these two commands:
sudo firewall-cmd --zone=public --add-port=10050/tcp –permanent

sudo firewall-cmd --reload
You can check what ports are open with this command, to confirm that the port is now open:
sudo firewall-cmd --list-ports
Yum, the software package manager used by CentOS, keeps a list of repositories with available software that can be installed. The Zabbix repository is not listed by default, so we will need to add it with this command:
sudo rpm -Uvh https://repo.zabbix.com/zabbix/4.2/rhel/7/x86_64/zabbix-release-4.2-1.el7.noarch.rpmfollowed by this command to tell yum to do some internal housekeeping:
sudo yum clean allAnd finally, we can run the command to install the Zabbix agent:
sudo yum install -y zabbix-agentAnd these two commands to start it and set it to auto-start whenever the machine boots:
sudo systemctl start zabbix-agent

sudo systemctl enable zabbix-agent
The next section of this guide will step you through the Zabbix agent configuration.
Configuration Changes for Zabbix Agent
On Windows, the configuration file will be in C:\Program Files\Zabbix Agent\ unless you changed the installation location during the install. On macOS you will find the configuration file in /usr/local/etc/zabbix/. And on FileMaker Cloud it is located in /etc/zabbix/.
The configuration file is always named zabbix_agentd.conf, and its content is the same on all platforms.
On Windows, the installer will have asked for some configuration options already. However, this will not have happened on macOS and FileMaker Cloud, so we will review all the changes here that make our Zabbix server installation work, specifically for monitoring a FileMaker Server.
On Windows, we usually install Notepad++, which allows us to create a custom ‘language’ that colors all the comments in green for easy reading:
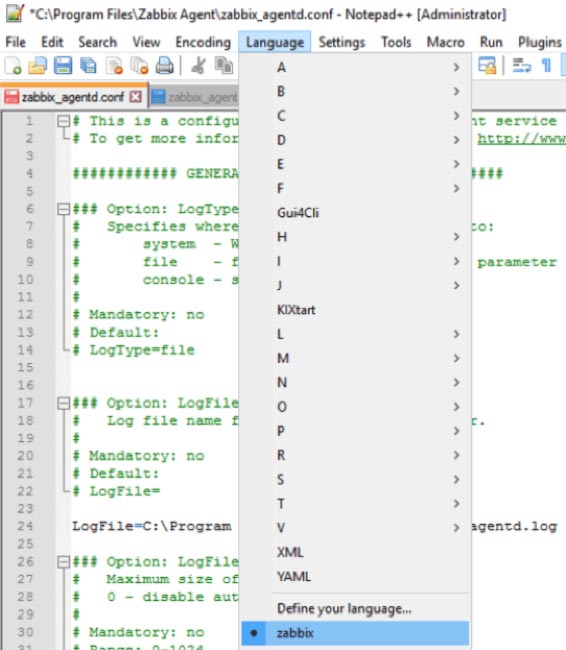
You can download that language file at https://github.com/soliantconsulting/FileMaker-Server-Zabbix-Templates.
On macOS and FileMaker Cloud, you can edit the config file from the command line by using the nano text editor:
macOS:
sudo nano /usr/local/etc/zabbix/zabbix_agentd.confFileMaker Cloud:
sudo nano /etc/zabbix/zabbix_agentd.confUsing the command line on both macOS and FileMaker Cloud ensures that the privileges on the file do not change. On macOS, you could certainly use your favorite text editor but make sure that the privileges do not change from what they need to be for the Zabbix agent to work properly:

Enable Remote Commands
This setting allows Zabbix server to send commands to the FileMaker server as part of a configured Action; for instance, to restart the FileMaker Server Scripting Engine process when it fails. If you enable this setting, we also recommend enabling the setting that logs each executed remote command. But note that doing so will result in the FileMaker Server admin console credentials being included in the agent log for all of the items and remote actions that rely on the fmsadmin utility. (We cover items and actions in more detail in the Zabbix Configuration post.)
Note that from a security point of view, the Zabbix agent will only accept remote commands from servers listed in the “Active” section (see later).
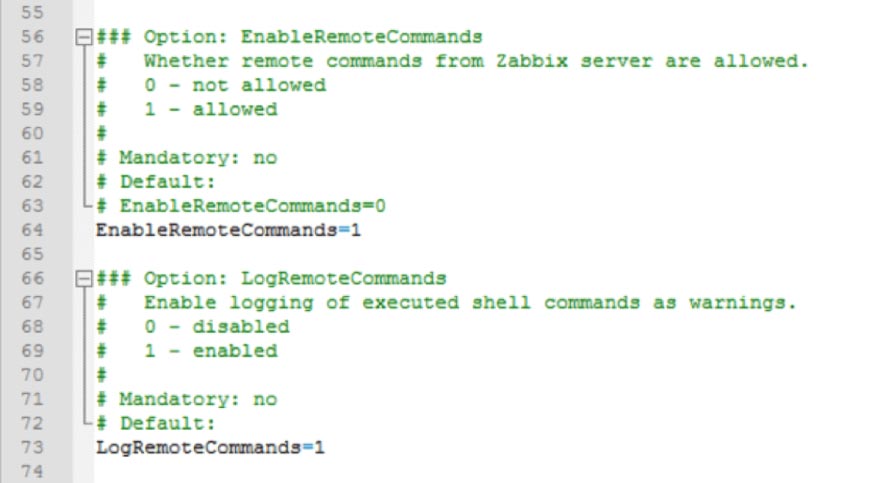
Set Zabbix Server & Port
These settings are relevant for passive checks, where Zabbix server talks to the agent to ask it to collect data for a monitored item or to run a remote command.
We have left the port setting at its default of 10050, but this is where you can change it. The port is also specified in the Zabbix frontend and, as was discussed earlier, in the firewall settings. If you end up changing it in the configuration file, don’t forget to also change it in those other places.
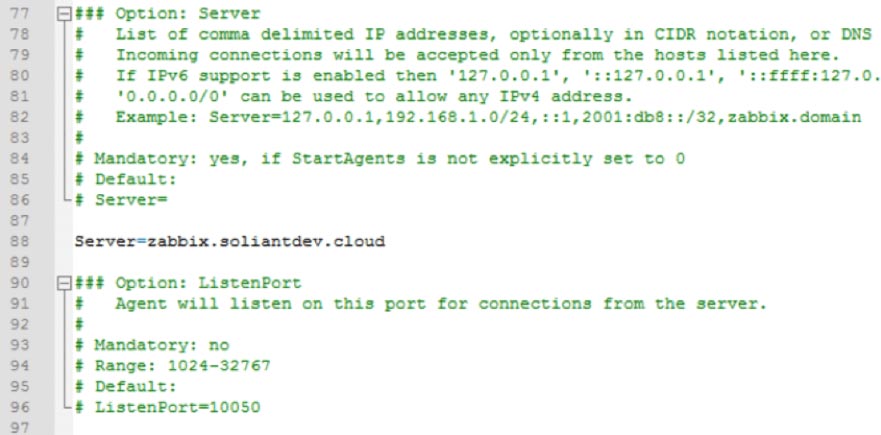
The Zabbix agent will only listen to requests from the server that is listed here.
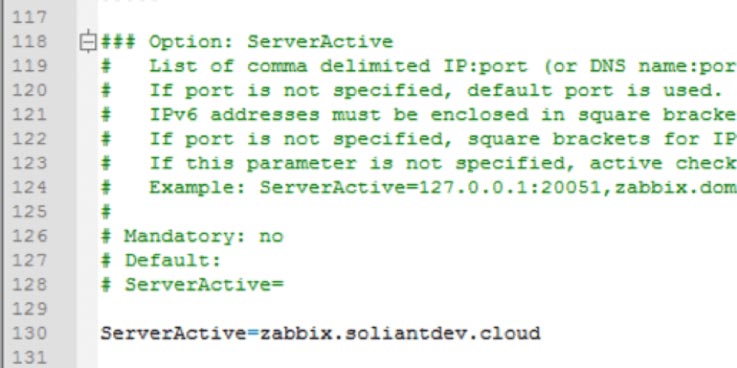
Set Zabbix Server to Send Data
The previous section determines which Zabbix server the agent will listen to, and this section defines which Zabbix server the agent will send its data to for Active items.
Hostname
The hostname will be used to reference the FileMaker server on which the Agent is running. The same name will be used when setting up the monitored host in the Zabbix frontend. It needs to be unique among all the servers monitored by the Zabbix server. Using the DNS name of the FileMaker Server is an easy way to ensure that.

Advanced Parameters – Timeout
The timeout setting is located a lot further down in the config file, and it specifies how long the Zabbix agent is going to spend on any one request. The default is three seconds, but we will ask it to do some things that could take longer as you will see later.

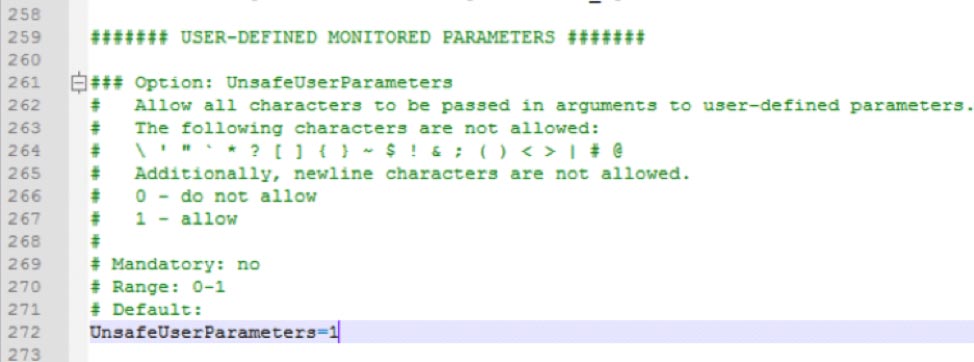
User Defined Monitored Parameters – Allow Unsafe Parameters
This setting sounds scarier than it is. It allows us to send certain characters which Zabbix considers unsafe – such as slashes and spaces – as parameters to remote commands that the Agent will execute.
User Defined Monitored Parameters – UserParameter
The “scripts” folder and the “fms_config.ps1” PowerShell script referenced in the screenshot are items that we deployed to the FileMaker Server machine; they are not part of the default Zabbix agent installation.

The UserParameter configuration is largely the same on macOS and FileMaker Cloud, except that a Python script is called instead of a PowerShell script. The path to the scripts folder and the call syntax are also different between macOS and FileMaker Cloud.
FileMaker Cloud

macOS

Get the PowerShell and Python script files.
Restart Zabbix Agent Service
Whenever you make changes to the configuration file, you will need to restart the agent for those changes to take effect.
On Windows, use the Windows Services Control Panel to restart the agent. On macOS, use these commands:
sudo launchctl stop com.zabbix.zabbix_agentd

sudo launchctl start com.zabbix.zabbix_agentd
And on CentOS (FileMaker Cloud) use this command:
sudo systemctl restart zabbix-agentThe next guide in the series will walk you through how to import the FileMaker Server templates into the Zabbix admin console and configure and monitor your first FileMaker Server.
Download a PDF of this Post
Work with Zabbix FileMaker Server Experts
Would you like to set up Zabbix for your FileMaker solution but would like guidance? Our team has worked extensively with Zabbix, and we’re happy to help. Contact our team to get started.
Wonderful post with lots of great info.
I do have a concern with “Installing on macOS” section:
You recommend adding “zabbix ALL=(ALL) NOPASSWD: ALL” to the sudoers file to give it full access to do anything it needs.
While I can see that is the simple/easy way to make it work, it doesn’t appear to follow a least privilege model, and isn’t required by the standard Zabbix “Mac OS X” template.
Perhaps the security risk is small, but I’m not familiar enough with all that is being configured to be comfortable.
While you wouldn’t know what a wide range of clients might want to do, what if someone (like me) had a pretty limited need? Wouldn’t recommendation be to just authorize zabbix for that?
My current problem is that even though my zabbix account on Mac has read access to /Library/FileMaker Server/Logs files, I get this error in zabbix_agentd.log:
‘…active check “log[/Library/FileMaker Server/Logs/Event.log,”\tError\t”]” is not supported: Cannot obtain information for file “/Library/FileMaker Server/Logs/Event.log”: [2] No such file or directory’
My best assumption is that since I didn’t add zabbix to my sudoers file, zabbix must not have access to the log command. Is that accurate?
Is there a more limited “least privilege” command I could add to sudoers file and still support log cmd and perhaps even majority of what is needed for template to work? Otherwise, the post would be even better if it documented the security risks associated with sudoer recommendation.
Hi Ken,
You are correct in that we could have been more explicit in the intent behind the sudoers entry configuration. We’ll make that correction in the next version. These guides are meant to get people up and running quickly. And since we do not know all the requirements and constraints for individual deployments we cannot offer specific guidance on how to tweak permissions. But we can – and should – add that the setting in the guide is meant to allow smooth setup and testing and that each deployment should then consider whether this setting is appropriate going forward. There are other parts of the monitoring that would be affected on macOS: the ability to use the “ps” command get a list of running processes, the ability to execute “fmsadmin” commands, and so on.
I understand. You have done a lot of great work in what is provided. My suggestions to those who want to make it even better and follow security best practices would be to change the ALL in sudo entry with “/bin/ps, /Library/FileMaker\ Server/Database\ Server/bin/fmsadmin”
along with any other cmds they need. If the instructions listed example in that form, then it would be really easy for clients to remove what they didn’t need/want or change based on differences in their environment or security practices. It would be more aligned with industry best practices if Soliant defined what commands their template requires and perhaps note that clients could change to ALL for simplicity/testing purposes.
As it turns out, my “Soliant FMS Stats.log” issue had nothing to do with sudoers file like I was guessing.
Apparently, something to do with my config (Ubuntu 18.04 Zabbix 4.2 Server going against FIleMaker 17 Mac OSX server) defaulted the type to “Zabbix Agent” for the “Log – Stats” item. Once I change the Type to the required type for Log entries per Zabbix documentation (i.e. Zabbix Agent (active)), then all the log stats entries started to be collected as desired. I’m not sure if Soliant template is wrong, I’m assuming it was tested in at least 1 environment, or if something about my environment makes the Type default differently. The Soliant xml template has a Type of 0 for “Log – Stats” and my working template has a Type of 7 in my environment for that configuration item.
Hi, I am using Zabbix 5.0 LTS and the same agent in the FileMaker Server, and I am guessing something has change because the item FMS admin api config it say “Unsupported item key” when I execute the key
All the macros are filled up
The Javascript preprocessing steps returns nothing
I don’t know what to do beyond this point. If this item doesn’t work I can’t use anything in the Admin API
I am using Catalina 10.15.7 and FileMaker Server 18.0.4 and I have tried with 3 different filemaker servers.
Hi Marco,
On our GitHub page for the Zabbix template (https://github.com/soliantconsulting/FileMaker-Server-Zabbix-Templates), raise it as an issue and add some screenshots. That’s the best way to get issues tracked and solved.
Best regards,
Wim
Thanks, I just did it